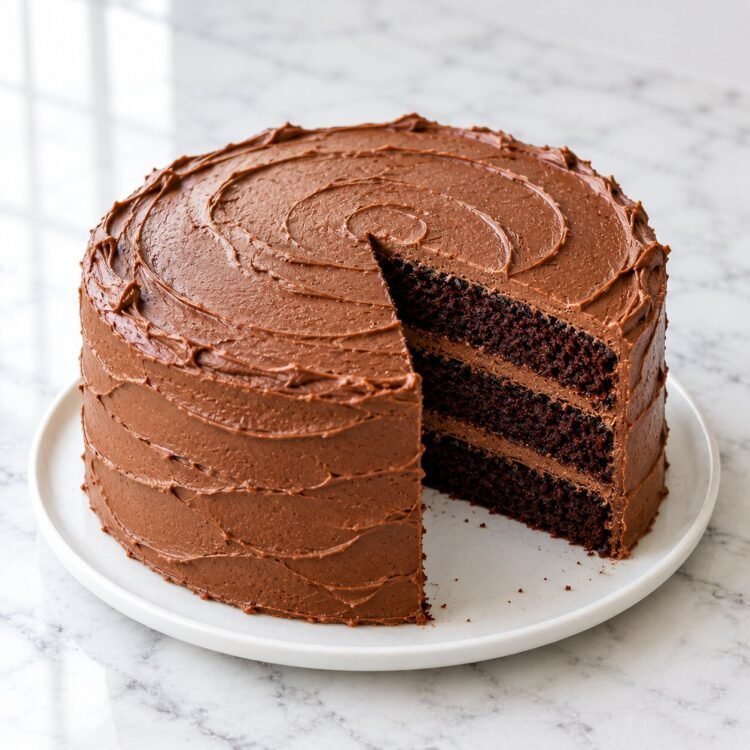
Ask any home baker what the one cake they always want in their repertoire is, and the answer is almost always the same: a great chocolate cake. Not a complicated restaurant dessert with seven components. Not a professional layer cake that requires two days and specialist equipment. Just a deeply chocolatey, reliably moist, unfussy homemade chocolate cake that works every single time.
This is that recipe.
It produces a two-layer, 6-inch chocolate cake that serves 4-6 people — the ideal size for a family celebration, a birthday dinner at home, or a weekend baking project that doesn’t leave you with more cake than anyone can eat in three days. The batter comes together in a single bowl. The frosting requires no stand mixer. And the total time from measuring the first ingredient to pulling the finished layers from the oven is under 40 minutes.
The secret to why this recipe works so consistently? Boiling hot water added to the batter at the end. This one step — which sounds alarming when you first see it — is actually the technique that transforms a decent chocolate cake into a truly outstanding one. We’ll explain exactly why in a moment.
Whether this is your first chocolate cake or your fiftieth, this recipe has everything you need.
Why This Chocolate Cake Recipe Works: The Science Explained Simply
Great baking recipes are not magic. They are chemistry. Once you understand what each ingredient does, you stop following recipes by rote and start baking with genuine confidence. Here is what is happening in this particular recipe — and why every element matters.
The Hot Water Technique: Why Your Batter Will Look Alarming (And Why That’s Good)
The most distinctive step in this recipe is adding ½ cup of boiling water to the finished batter. When you do this, the batter will immediately become very thin and liquid — more like a thick fruit juice than a typical cake batter. First-time bakers sometimes assume they have made a mistake. They have not.
This is what is actually happening:
Cocoa blooming: When boiling water contacts dry cocoa powder, it dissolves the fat-soluble aromatic compounds that give cocoa its flavour — compounds that do not dissolve in cold liquid. This process, called blooming, releases significantly more chocolate intensity than cocoa mixed into cold batter. The result is a cake that tastes dramatically more chocolatey than its ingredient list suggests.
Gluten relaxation: The hot water gelatinises some of the starch molecules in the flour before baking begins, which contributes to the cake’s noticeably moist, tender crumb even after cooling.
The thin batter = moist cake: The liquid batter means less flour relative to moisture in each cell of the cake’s crumb structure. The cake bakes up moist and stays moist for days.
Why Both Baking Powder AND Baking Soda?
This recipe uses both leavening agents, and they are not interchangeable or redundant — they do different jobs.
- Baking soda (sodium bicarbonate) is a base that reacts with the cocoa powder’s natural acidity to produce CO₂ bubbles immediately when liquid is added. It also contributes to browning.
- Baking powder is a complete leavening system (baking soda + a dry acid) that provides a second leavening reaction when heat is applied in the oven. It creates additional rise during baking itself.
Using both ensures the cake rises evenly both when the batter is mixed and while it bakes — producing a level, well-domed top rather than a flat or lopsided one.
Critical note: Baking powder and baking soda cannot substitute for each other. If you only have one available, this is the moment to go to the store — your cake will not be the same.
Why Oil Instead of Butter?
Many home bakers assume butter always produces a better cake than oil. For flavour, butter has an edge. But for moisture retention over time, oil wins decisively.
Butter is approximately 80% fat and 20% water and milk solids. When a butter-based cake cools and the fats resolidify, the crumb firms up noticeably — which is why butter cakes taste best the day they are made.
Oil is 100% fat. It stays liquid at room temperature, which means oil-based cakes remain noticeably softer and moister on day two and day three than equivalent butter-based cakes. For a family cake that will be eaten over several days, oil is the smarter choice.
Ingredients (Makes One 6-Inch Two-Layer Cake — Serves 4-6)
The Cake
| Ingredient | Amount |
|---|---|
| All-purpose flour | ¾ cup + 2 tbsp (112g) |
| Unsweetened cocoa powder | ¼ cup + 2 tbsp (34g / 6 tbsp) |
| Organic or regular sugar | 1 cup |
| Baking powder | ¾ tsp |
| Baking soda | ¾ tsp |
| Salt | ½ tsp |
| Large egg | 1 |
| Full-fat milk | ½ cup |
| Neutral or coconut oil | ¼ cup |
| Vanilla extract | 1–2 tsp |
| Boiling hot water | ½ cup |
The Chocolate Buttercream Frosting
| Ingredient | Amount |
|---|---|
| Unsalted butter (soft but slightly cold) | ½ cup (113g) |
| Powdered sugar (icing sugar) | 1¾ cups |
| Unsweetened cocoa powder | 4 tbsp |
| Milk or whipping cream | 1½ tbsp |
| Vanilla extract | 1 tsp |
Equipment You’ll Need
You do not need much for this recipe — one of its great strengths.
- Two 6-inch round cake pans (or one 7-8 inch pan — see notes below)
- Parchment paper
- A large mixing bowl
- A fine-mesh sieve or sifter
- A hand whisk (electric hand mixer optional for the frosting)
- A wire cooling rack
- A spatula or cake knife for frosting
That is genuinely all you need. No stand mixer, no thermometer, no specialty baking tools.
Step-by-Step Instructions
Step 1 — Prepare Your Pans and Preheat the Oven
Preheat your oven to 350°F (175°C) and allow it to preheat for a full 15 minutes before baking. A properly preheated oven is critical for even rise — an oven that hasn’t reached temperature when the batter goes in produces uneven, sometimes sunken cakes.
Grease both 6-inch pans thoroughly with butter or cooking spray, coating the bottom and all sides. Line the bottom of each pan with a circle of parchment paper cut to fit. The combination of greasing and parchment ensures the cakes release cleanly with no tearing.
Step 2 — Sift the Dry Ingredients
Place your sieve over a large mixing bowl. Add the flour, cocoa powder, baking powder, baking soda, and salt to the sieve and sift everything together into the bowl.
Why sift? Cocoa powder and powdered ingredients clump easily during storage. Sifting breaks up these clumps and ensures the dry ingredients are evenly distributed throughout the batter before the wet ingredients are added — which directly affects the uniformity of the crumb in the finished cake.
Add the sugar to the sifted dry ingredients and mix thoroughly with a spoon or whisk until completely combined.
Step 3 — Add the Wet Ingredients
Make a well in the centre of the dry ingredient mixture by pushing the dry ingredients toward the sides of the bowl with a spoon.
Into this well, add:
- The egg
- The full-fat milk
- The neutral oil
- The vanilla extract
Use a whisk to first combine the wet ingredients in the well, then gradually bring in the surrounding dry ingredients, working from the inside outward. Mix until just combined — the batter should be smooth but you must stop as soon as no dry streaks remain.
Do not overmix. Overmixing develops gluten, which makes cakes tough and dense. The ideal chocolate cake batter is mixed until uniform and no more.
Step 4 — Add the Boiling Water
This is the step that surprises first-time bakers. With the batter ready in the bowl, pour in ½ cup of freshly boiled water in a slow, steady stream while whisking continuously.
The batter will immediately become much thinner — almost pourable, like a thick drink. This is exactly correct. Do not add more flour. Do not panic.
Whisk until the hot water is completely and uniformly incorporated and the batter is smooth with no lumps.
Step 5 — Bake
Pour the batter equally into the two prepared 6-inch pans. A kitchen scale is helpful here — equally divided layers bake more evenly and produce a more professional-looking assembled cake.
Tap each filled pan firmly against the counter 2-3 times. This dislodges any large air bubbles trapped in the batter, which would otherwise create holes in the finished cake’s crumb.
Place both pans in the preheated oven. Bake at 350°F for 28-30 minutes.
To check doneness: Insert a thin skewer or toothpick into the centre of each layer. It should come out completely clean, or with just 1-2 moist crumbs attached. Wet batter on the skewer means the cake needs more time. Overdone cakes will have a dry skewer — but a cracked, dry-looking top.
Step 6 — Cool Completely
Remove the pans from the oven and place on a wire rack. Allow to cool in the pans for 10 minutes — this allows the cake structure to firm up enough to be handled without crumbling.
After 10 minutes, run a thin knife around the inside edge of each pan to loosen the cake. Invert each layer onto the wire rack, peel off the parchment paper, and allow to cool completely — at least 45-60 minutes.
This step is non-negotiable. Frosting a warm cake causes buttercream to melt and slide, wrecking both the appearance and the texture of the finished cake.
Step 7 — Make the Chocolate Buttercream Frosting
Beat the softened (but not completely room-temperature — slightly cool from the refrigerator is ideal) butter with an electric hand mixer or by hand for about 2 minutes until it becomes pale, light, and creamy.
Add the powdered sugar and cocoa powder. Beat on low speed first (to prevent a powdered sugar cloud), then increase to medium. Beat for 2-3 minutes until the frosting is smooth, fluffy, and uniform in colour.
Add the vanilla extract and mix briefly. Add the milk or cream 1 tablespoon at a time to adjust consistency:
- Too thick: Add a small splash more milk
- Too thin/runny: Add more powdered sugar 1 tablespoon at a time
If the frosting becomes very soft during beating (this happens in warm kitchens), refrigerate it for 15-20 minutes before using.
Step 8 — Assemble and Frost the Cake
Place the first cake layer on your serving plate, flat side down.
Using a spatula or the back of a spoon, spread a generous layer of chocolate buttercream over the top of the first layer. Aim for an even, approximately ¼-inch thick layer.
Place the second cake layer on top, flat side up — placing it flat side up gives you a naturally level top surface to frost.
Apply the remaining buttercream to the top and sides of the assembled cake, spreading with long, smooth strokes of the spatula. For a rustic home-baked look, textured swirls and peaks in the frosting are perfectly charming. For a cleaner finish, dip your spatula in a glass of hot water and use the warm blade to smooth the frosting.
One Recipe, Multiple Formats: Beyond the Two-Layer Cake
12 Cupcakes
This exact recipe (same quantities) produces 12 standard-size cupcakes. Fill paper-lined cupcake cups about ⅔ full. Bake at 350°F for 18-22 minutes until a toothpick inserted in the centre comes out clean. Cool fully before frosting with the same chocolate buttercream.
Single 7-8 Inch Layer
If you don’t have two 6-inch pans, bake the entire batter in one 7-8 inch round pan. Increase the baking time to 35-38 minutes. Once cooled completely, use a long serrated knife to slice the single layer horizontally through the middle, creating two layers for assembly.
Double Recipe for 8-Inch Two-Layer Cake
This recipe can be doubled exactly for a larger celebration cake baked in two 8-inch pans. Do not try to halve the recipe — the resulting quantities are too small for consistent results.
Frosting Alternatives: When You Don’t Have a Mixer
The chocolate buttercream in this recipe can be made by hand with a sturdy whisk and some patience — it simply requires more physical effort than using an electric mixer.
If you would prefer an even easier no-mixer frosting option, consider a simple chocolate ganache:
Chocolate Ganache (No Mixer Required):
- ½ cup heavy cream
- 100g (3.5 oz) dark chocolate, finely chopped
Heat the cream until just below boiling (small bubbles around the edges). Pour over the chopped chocolate in a heat-proof bowl. Wait 2 minutes, then stir from the centre outward until completely smooth and glossy. Allow to cool at room temperature until it reaches a spreadable consistency (roughly 30-45 minutes), then pour over the assembled cake and spread with a spatula. The ganache will set to a glossy, fudgy shell.
Tips for Perfect Results Every Time
Use full-fat milk. The fat content in full-fat milk contributes to the cake’s moist, tender crumb. Low-fat or skimmed milk produces a noticeably drier result.
Measure flour correctly. Scoop flour into your measuring cup using a spoon, then level the top with a straight edge. Never dip the measuring cup directly into the flour bag — this packs the flour and results in significantly more than intended, making the cake dense.
Use natural (not Dutch-process) cocoa powder. Natural cocoa powder is acidic, which works with the baking soda to produce good rise and a more intense chocolate flavour. Dutch-process cocoa is alkaline and does not react the same way — it can interfere with the leavening in this recipe.
Room temperature egg and milk. Cold dairy and eggs can cause the batter to curdle when mixed together, producing a slightly lumpy batter that can result in an uneven crumb. Remove both from the refrigerator 30 minutes before baking.
Do not open the oven door before 20 minutes. Cold air rushing into the oven at this critical stage can cause the cake to sink in the centre before the crumb structure has set.
Cool the cake completely before frosting. Even a slightly warm cake will melt the buttercream. Patience here pays off dramatically in the finished result.
Storage Guide
| Method | Duration | Notes |
|---|---|---|
| Room temperature | 1-2 days | Cover with cake dome or airtight container; suitable in cool kitchens |
| Refrigerator | Up to 5 days | Airtight container; bring to room temperature before serving |
| Freezer (unfrosted layers) | Up to 3 months | Wrap tightly in two layers of cling film + foil |
| Freezer (frosted cake) | Up to 1 month | Freeze uncovered until solid, then wrap; thaw in refrigerator overnight |
Frequently Asked Questions
Q1. Can I make this chocolate cake without eggs?
Yes. For an egg-free version (eggless chocolate cake), replace the 1 large egg with any of the following:
- 3 tablespoons of unsweetened applesauce — adds moisture and mild sweetness; most neutral-tasting substitute
- 1 tablespoon ground flaxseed + 3 tablespoons water (mixed and left 5 minutes until gel-like) — excellent binding agent
- 3 tablespoons of full-fat yoghurt — adds a very slight tang that works beautifully in chocolate cake
- ¼ cup mashed ripe banana — adds noticeable banana flavour; ideal if you enjoy this combination
The texture with any of these substitutes will be slightly different from the egg version but still excellent.
Q2. Can I use whole wheat flour instead of all-purpose flour?
You can, with some adjustment. Whole wheat flour has a much higher fibre content than all-purpose flour, which absorbs more moisture and produces a denser, slightly earthier-tasting cake. If you want to use whole wheat flour, substitute only half the all-purpose flour (55g of each) for a cake that has some nutritional benefit without sacrificing too much of the light, tender crumb. Using 100% whole wheat flour produces a noticeably dense, heavier cake.
Q3. Why did my chocolate cake sink in the middle?
Sunken centres are one of the most common baking problems, and they have specific causes:
- Underbaking — the most common cause; the structure hadn’t set when the cake came out of the oven; always test with a toothpick
- Opening the oven too early — the temperature drop before the structure sets causes the centre to collapse
- Too much leavening — excess baking powder or baking soda can cause the cake to rise too fast and then collapse; measure precisely
- Overmixing the batter — too much mixing develops gluten and can produce uneven rise
- Oven too hot — the outer edges set before the centre has time to rise and set
Q4. Can I make this recipe without an oven, in a pressure cooker?
Yes — this is one of the most common questions from Indian home bakers who don’t have an oven. To bake in a pressure cooker: place a layer of salt or sand in the base of the cooker (acts as a heat buffer), set a small metal stand or trivet inside, place the greased and lined cake pan on the stand, and close the lid without the pressure whistle/gasket. Heat on medium for 5 minutes, then reduce to low and cook for 40-50 minutes until a toothpick inserted in the centre comes out clean. The result will be slightly more dense than the oven version but still delicious.
Q5. How do I make the cake more chocolatey?
Several techniques amplify the chocolate flavour without changing the recipe’s core structure:
- Use the highest quality unsweetened cocoa powder you can find — cocoa quality varies enormously, and better cocoa produces dramatically better flavour
- Add 1 teaspoon of instant coffee or espresso powder to the boiling water before adding it to the batter — you will not taste coffee, but it deepens the chocolate significantly
- Add 50g of finely grated dark chocolate (70% cocoa or higher) to the dry ingredients before mixing — it melts into the batter during baking, adding fudgy richness
- Brush the cooled layers with a thin sugar syrup (equal parts boiled water and sugar) before frosting — it adds moisture and intensifies the perceived sweetness and richness
The Chocolate Cake You’ll Make on Repeat
The best recipe is always the one you actually make. And what makes this chocolate cake genuinely special — beyond the moist crumb, the deep cocoa flavour, and the silky buttercream — is how achievable it is for every level of baker.
No stand mixer. No unusual ingredients. No specialist pans. One bowl, two 6-inch cake tins, 40 minutes, and you have a cake that is going to make someone’s day better.
Make it for a birthday. Make it for a school celebration. Make it because it’s Sunday and you felt like chocolate cake — the best possible reason.
Tried this recipe? Drop a comment below with your rating and let us know what you served it with! We would love to hear if you made the cupcake version, tried the pressure cooker method, or added espresso to the batter — tell us everything.
Also explore on KitchenWhisper.in:
- Easy Blueberry Cake – Quick Homemade Dessert
- Air Fryer Banana Muffins – 14-Minute Recipe
- Air Fryer French Toast Sticks – Freeze-First Method