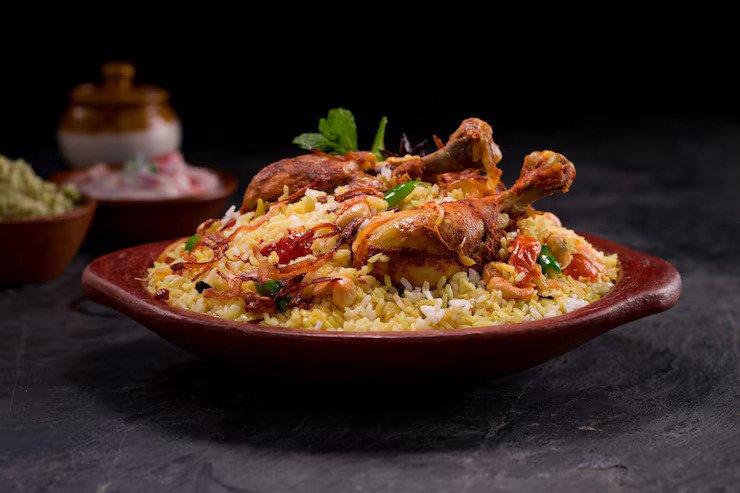
There are biryanis, and then there is Hyderabadi biryani.
Other biryanis are excellent. The Lucknowi biryani is subtle and aromatic. The Kolkata biryani has its famous aloo. The Sindhi biryani is bold and spicy. But Hyderabadi biryani occupies a category of its own — a dish with a texture that is simultaneously tender and distinct in every layer, a fragrance that fills the room before the sealed pot is even opened, and a complexity of spicing that lingers long after the last bite.
What makes it different from every other biryani in India is the cooking method. Hyderabadi biryani is made by the kacchi dum technique — kacchi meaning raw, dum meaning steam. The chicken goes into the pot completely raw and marinated, layered under partially cooked rice, and the entire assembly is then sealed and slow-cooked together. The chicken cooks in its own steam and yogurt marinade while simultaneously finishing the rice. It is a technique that requires attention and the right equipment, but once you understand the logic behind it, it is entirely achievable in a home kitchen.
This guide covers everything: the ingredients and why each one matters, the marinade, the rice cooking method, the layering, the dum, and every troubleshooting scenario you are likely to encounter on your first attempt.
The History Behind the Biryani
Hyderabadi biryani was developed in the royal kitchens of the Asaf Jahi dynasty — the Nizams of Hyderabad — during the 17th and 18th centuries. The Nizams were among the wealthiest rulers in the world at the time, and their court cuisine reflected that: dishes of extraordinary refinement, cooked with premium ingredients and centuries-old technique.
The biryani they developed was a deliberate fusion: Mughal rice-cooking technique (dum pukht — sealed steam cooking) brought south from Delhi, married with the bold, aromatic spicing of the Deccan plateau. The result was something that belonged to neither tradition entirely, and has been imitated everywhere ever since.
Two distinct styles emerged from that royal kitchen and persist today:
- Kacchi biryani (raw method): The chicken is marinated raw and cooked entirely during the dum process under the rice. This is the more technically demanding and more revered method — the one used in this recipe.
- Pakki biryani (cooked method): The chicken is fully or partially cooked in a gravy before layering with the rice. Easier to execute, slightly less complex in the final flavour.
This recipe uses the kacchi method.
Ingredients (Serves 4)
For the Chicken and Marinade
| Ingredient | Amount | Purpose |
|---|---|---|
| Chicken (bone-in thighs/drumsticks) | 500g / ½ kg | Bone-in pieces stay juicier through the long dum |
| Fresh yogurt (not sour) | ⅔ cup | Tenderises the chicken; creates steam during dum |
| Ginger-garlic paste | 1¼ tbsp | Aromatic base for the marinade |
| Red chilli powder | 1–1½ tsp | Heat and colour |
| Biryani masala | 1–1½ tsp | Layered spice profile specific to biryani |
| Green cardamom powder | ¼–½ tsp | Floral, cooling fragrance |
| Turmeric powder | ¼ tsp | Colour and antibacterial properties |
| Green chillies | 1–2, slit | Fresh heat that deepens during cooking |
| Lemon juice | 1 tbsp | Acid tenderiser; skip if yogurt is already sour |
| Salt | ¾–1¼ tsp | Adjust to taste |
For the Rice
| Ingredient | Amount |
|---|---|
| Aged basmati rice | 1½ cups (275g) |
| Water | 6–7 cups |
| Salt | 1–1¼ tsp |
| Oil | 1 tsp |
| Bay leaf | 1 |
| Cinnamon stick (3-inch) | 1 |
| Cloves | 6 |
| Green cardamom | 4 |
| Star anise | 1 |
| Black cardamom (optional) | 1 |
| Mace strands (optional) | 2 |
| Caraway seeds / shahi jeera (optional) | ½ tsp |
For Layering and Finishing
| Ingredient | Amount |
|---|---|
| Large onion, thinly sliced | 1 (or ⅓ cup store-bought fried onions) |
| Fresh coriander, chopped | 4 tbsp (2 tbsp + 1 tbsp + 1 tbsp) |
| Fresh mint leaves, chopped | 4 tbsp (2 tbsp + 1 tbsp + 1 tbsp) |
| Saffron strands | ¼ tsp |
| Hot milk | 3 tbsp (for saffron) |
| Ghee | 2 tbsp (finishing) |
| Oil or ghee | 4 tbsp (for frying onions) |
| Biryani masala or garam masala | ¼–½ tsp (for layering) |
Why These Ingredients Matter
Aged basmati rice is not optional. Fresh basmati absorbs moisture quickly and becomes mushy. Aged basmati (1-3 years old) has lower moisture content, holds its shape through the dum process, and elongates dramatically when cooked — producing those signature long, separate grains. The difference between aged and fresh basmati in a biryani is dramatic enough to ruin an otherwise perfectly made dish.
Bone-in chicken stays significantly juicier through the long dum cooking process. Boneless chicken is more likely to dry out or become stringy. If you must use boneless, cut pieces larger than usual, reduce dum time by 5-7 minutes, and check the moisture level carefully.
Fresh yogurt, not sour: The yogurt in the marinade serves two functions — acid tenderisation and steam generation during dum. Sour yogurt (yogurt that has been sitting too long) is already highly acidic and can over-tenderise the chicken, making it mushy. Always taste the yogurt before using.
Ghee for finishing: The 2 tablespoons of ghee poured over the top layer before sealing are what carry the saffron aroma downward through the rice during dum and create the characteristic richness of the top layer. Oil can be used in the marinade, but ghee in the finishing is one thing worth not substituting.
Saffron: A small amount — ¼ teaspoon — soaked in 3 tablespoons of hot (not boiling) milk for 15-20 minutes. This releases the colour and aroma compounds. The saffron milk is poured over the top layer of rice, creating the signature golden streaks that are as visual as they are flavourful.
How to Make Hyderabadi Biryani: Step-by-Step
Total time: 3 hours (including marination) Hands-on time: ~1 hour Serves: 4
Step 1 — Fry the Onions (30 Minutes Before Anything Else)
Thin, evenly fried onions — called birista in traditional Hyderabadi cooking — are used in three places: the marinade, the layering, and the garnish. Making them properly is one of the most important steps in the recipe.
Slice 1 large onion into very thin rings or half-moons. Heat 4 tablespoons of oil or ghee in a wide pan over medium heat. Add the onions and fry, stirring frequently, for 20-25 minutes until they are deep golden brown and crisp. The key is patient, even browning — rush this and the onions will be pale and soft rather than golden and crisp.
Critical: Remove the onions from the oil before they look done. They will continue to colour from residual heat after removal. Onions that turn dark brown become bitter and will ruin the biryani. Spread them on paper towels and allow to cool and crisp up completely.
Reserve 2 tablespoons of the cooled onion-infused oil for the marinade.
Step 2 — Marinate the Chicken (Minimum 2 Hours, Overnight Best)
Combine in a large bowl:
- Yogurt, salt, turmeric, red chilli powder, biryani masala, cardamom powder, ginger-garlic paste, green chillies, and lemon juice
- Stir well and taste — the marinade should be well-seasoned
- Add the 2 tablespoons of reserved fried onion oil
- Add half the fried onions, half the coriander, half the mint
- Add the chicken pieces and mix thoroughly, coating every surface
Cover and refrigerate for a minimum of 2 hours. Overnight marination produces dramatically more tender, deeply flavored chicken. If marinating for less than 2 hours, cut the pieces smaller to allow the marinade to penetrate faster.
Remove from the refrigerator 30 minutes before cooking to allow the chicken to come to room temperature. Cold chicken placed under hot rice creates uneven cooking.
Step 3 — Soak the Saffron
Add ¼ teaspoon saffron strands to 3 tablespoons of hot milk (not boiling — boiling destroys some of the saffron’s volatile aromatic compounds). Allow to steep for at least 15 minutes. The milk will turn deep orange-yellow and smell intensely floral. Set aside.
Step 4 — Cook the Rice to 75%
Wash the basmati rice under cold water until the water runs clear, then soak in cold water for 30 minutes. Drain completely.
Bring 6-7 cups of water to a rolling boil in a large pot. Add the oil, whole spices, and salt. The water should taste noticeably salty — more salt than you would use for regular rice, because the rice will only be in the water briefly and needs to absorb seasoning quickly.
Boil the spiced water for 5 minutes to allow the whole spices to release their aroma. Add the drained rice and cook on high heat, stirring gently once or twice, for approximately 5-6 minutes — until the rice is exactly 75% cooked.
How to test 75% doneness: Take a grain between your fingers and press. It should be firm with a distinct chalky-white centre — cooked on the outside, raw in the middle. Alternatively, bite a grain: it should be slightly firm in the centre with clear resistance. If it is fully soft and cooked through, it is too far gone for kacchi dum — over-cooked rice will turn mushy during the dum process.
Drain immediately in a colander. Do not rinse with cold water.
Step 5 — Layer the Biryani
Use a heavy-bottomed pot with a tight-fitting lid — cast iron or a thick-based aluminium pot works best. The pot size matters: a wider pot keeps the chicken in a single, even layer, which ensures it cooks uniformly. A narrow, tall pot creates uneven heat distribution.
Layer in this order:
Layer 1 — Chicken: Spread the marinated chicken in a single, even layer across the base of the pot. Pour any excess marinade from the bowl over the chicken. Add the remaining half of the fried onions, spread across the chicken.
Layer 2 — First rice layer: Add half the partially cooked rice over the chicken. Spread it evenly. Scatter half the remaining coriander and mint over the rice. Sprinkle a pinch of biryani masala.
Layer 3 — Second rice layer: Add the remaining rice. Spread evenly. Top with the last of the coriander and mint, a pinch of biryani masala, and the remaining fried onions.
Finishing: Drizzle the saffron milk evenly over the top layer of rice. Follow with 2 tablespoons of ghee, drizzled over everything. The saffron creates the golden streaks; the ghee carries the aroma down into the rice during cooking.
Step 6 — Dum Cooking (The Sealed Steam Method)
The dum seal is what separates Hyderabadi biryani from ordinary layered rice. The pot must be completely sealed so that no steam escapes — that trapped steam is what cooks the raw chicken through the partially-cooked rice, and what finishes the rice to perfect tenderness.
To seal the pot: Lay a double layer of heavy-duty aluminium foil over the mouth of the pot before placing the lid, pressing it down firmly at the sides to create a tight seal. Alternatively, use a thick damp cloth pressed around the lid rim. Some cooks use a rope of dough (atta dough) pressed around the entire lid edge — the traditional method that gives the most airtight seal.
Stovetop dum method:
- Place the sealed pot on a heavy iron griddle (tawa) or a heat diffuser over medium-high heat. The griddle distributes heat evenly across the base and prevents hotspots that can scorch the bottom layer of rice.
- Cook on medium-high for 20 minutes.
- Reduce to the lowest possible flame and cook for 15 more minutes.
- Turn off the heat and allow to rest, undisturbed and still sealed, for 20-30 minutes. This rest period is essential — the residual steam finishes any final cooking and allows the flavours to settle and develop.
Oven dum method: Preheat oven to 390°F / 200°C. Place the sealed pot in the oven and bake for 30-40 minutes (longer for a deep pot, shorter for a wide, shallow one). Check after 30 minutes — if the chicken looks very moist when the seal is broken, return to the oven for 10 more minutes.
To check doneness: Break the seal carefully (the escaping steam is very hot). Gently insert a long spoon or skewer into the centre of the pot through the rice layers until it touches the chicken. The spoon should slide through the rice without resistance. Press a piece of chicken — it should feel tender with no resistance. Any pink visible in the marinade juice at the base is fine if it looks like it is from the spice; clear or light-coloured juices that run when you press the chicken indicate it needs more time.
Step 7 — Fluff and Serve
Use a large, wide spatula or two large spoons to gently fold the layers together — you want to mix without breaking the rice grains. The finished biryani should have distinct long grains, visible saffron streaks of golden colour through the white rice, tender chicken pieces, and a fragrance that is noticeably different from the raw spice smell of the assembled dish.
Serve immediately, garnished with additional fresh coriander if desired.
What to Serve with Hyderabadi Biryani
| Accompaniment | Role |
|---|---|
| Raita (yogurt with cucumber/boondi) | Cools the heat; the classic pairing |
| Shorba (thin biryani gravy) | Traditional Hyderabadi accompaniment; adds moisture |
| Mirchi ka salan | Green chilli and peanut curry; authentic Hyderabadi side |
| Burani raita | Garlic-flavoured yogurt; particularly good with spicy biryani |
| Lassi (sweet or salted) | Drink pairing to balance the richness |
Troubleshooting Hyderabadi Biryani
| Problem | Cause | Fix |
|---|---|---|
| Bottom layer burnt | Thin-based pot, too-high heat, or seal leaked | Use heavy pot + tawa; lower heat; check seal before dum |
| Rice is mushy | Rice over-cooked to 75% stage; too much moisture | Cook rice less next time; reduce yogurt slightly in marinade |
| Chicken undercooked | Marinade not penetrated; pieces too large; dum too short | Marinate overnight; cut pieces smaller; extend dum time 10 min |
| Biryani too dry | Insufficient yogurt or too little sealing | Increase yogurt in marinade; ensure perfect seal |
| Biryani too watery | Very wet yogurt or sour yogurt | Drain yogurt before using; use fresh, not sour yogurt |
| No fragrance | Poor saffron quality; ghee skipped | Use good-quality saffron; always finish with ghee |
| Pale colour | Insufficient saffron soak time; light chilli powder | Soak saffron longer; use Kashmiri red chilli for colour |
Kacchi vs Pakki: Which Hyderabadi Biryani Should You Make?
| Kacchi Biryani | Pakki Biryani | |
|---|---|---|
| Chicken goes in | Raw + marinated | Pre-cooked in gravy |
| Complexity | Higher | Moderate |
| Margin for error | Smaller | Larger |
| Final flavour | More complex; chicken flavour infuses rice | Excellent; slightly less layered flavour exchange |
| Best for | Experienced home cooks | Beginners; first-time biryani makers |
| Cooking time | 35-40 min dum | 20-25 min dum |
Storage and Reheating
Hyderabadi biryani stores well when handled properly:
- Refrigerator: Allow to cool completely, then transfer to an airtight container. Stores for up to 3 days. The flavour actually deepens after 12-24 hours as the spices continue to meld.
- Reheating: The best method is a covered pot on low heat with 2-3 tablespoons of water added to create steam — this prevents the rice from drying out and becoming hard. Microwave reheating works but can make the rice slightly mushy; if using a microwave, cover with a damp paper towel and use 50% power.
- Freezing: Freeze in individual portions in airtight containers for up to 1 month. Thaw overnight in the refrigerator before reheating as above.
Nutrition Profile (Per Serving)
| Nutrient | Amount |
|---|---|
| Calories | 809 kcal |
| Carbohydrates | 69g |
| Protein | 31g |
| Fat | 44g (Saturated: 12g) |
| Fibre | 4g |
| Iron | 4.3mg |
| Calcium | 162mg |
| Cholesterol | 118mg |
| Sodium | 969mg |
Hyderabadi biryani is a complete, satisfying meal. The combination of rice and chicken provides a balanced carbohydrate-to-protein ratio. The yogurt in the marinade adds calcium and probiotics. Using less ghee in the finishing and a lighter hand with oil in the fried onions can reduce the fat content significantly without affecting the character of the dish.
Frequently Asked Questions
Q1. What is the difference between Hyderabadi biryani and other biryanis?
Hyderabadi biryani uses the kacchi dum method — raw marinated chicken cooked simultaneously with partially cooked rice in a sealed pot. This creates a distinct flavour exchange between the chicken and rice that pakki (pre-cooked chicken) biryanis cannot replicate. Hyderabadi biryani also uses a more restrained approach to ground spices compared to restaurant versions — the flavour comes primarily from the whole spices in the rice water, the marinade, and the fried onion birista, not from heavy masala additions.
Q2. Why does my Hyderabadi biryani stick to the bottom of the pot?
A burnt bottom in biryani almost always comes from one of three causes: the pot has a thin base that creates hotspots, the heat was too high during the first stage of dum cooking, or the seal was not airtight and steam escaped, drying out the base layer. Fix: use a heavy-bottomed pot placed on a cast iron tawa or heat diffuser; ensure a completely airtight seal; start on medium-high (not high) heat; reduce to the lowest flame after 20 minutes.
Q3. How do I know when the chicken is fully cooked during dum?
After the dum rest period, carefully open the seal and insert a skewer or thin knife into the thickest chicken piece — it should slide through without resistance. Press the piece: the juices should run clear. The chicken should pull away from the bone with gentle pressure. If you are unsure, reseal the pot and cook on very low heat for an additional 10 minutes before checking again.
Q4. Can I make Hyderabadi biryani without saffron?
Saffron contributes both colour (the golden streaks) and a delicate floral-honeyed aroma that is characteristic of Hyderabadi biryani. Without it, the biryani will still be excellent but will lack those visual streaks and a layer of fragrance. If saffron is unavailable, a pinch of turmeric dissolved in warm milk creates a similar golden colour, but the flavour profile will be different. For a special occasion, the saffron is worth sourcing — even a very small amount makes a significant difference.
Q5. What is the best pot for making Hyderabadi biryani at home?
A heavy-bottomed pot with a tight-fitting lid is essential. Cast iron Dutch ovens are excellent — they distribute heat evenly and hold temperature consistently. Thick-base aluminium pots (the kind traditionally used in Indian kitchens) work very well. Avoid non-stick pots — the high heat of the first dum stage can damage non-stick coatings and also makes it impossible to develop the slight crust that forms on the base of a properly made biryani. The pot should be wide rather than tall, so the chicken fits in a single layer.
The Biryani Worth the Wait
Hyderabadi biryani is not a quick weeknight dinner. It is a Sunday project, a celebration dish, a cooking experience that rewards the time and attention you give it. The sealed pot, the saffron-streaked rice, the fall-off-the-bone chicken flavoured by the yogurt marinade and whole spices — these are things worth doing properly.
Start the marinade the night before. Source aged basmati. Buy good saffron. Take your time with the fried onions. Seal the pot properly. And when you finally break that seal after the dum rest and that first wave of fragrance hits the room — you will understand exactly why Hyderabadi biryani has been the gold standard for four hundred years.
Made this recipe? Leave a star rating and tell us in the comments whether you used the stovetop or oven dum method, and how your first kacchi biryani turned out. Your experience helps other home cooks making this for the first time.
More biryani and rice recipes on KitchenWhisper.in:
- Chicken Biryani Recipe: How to Make Authentic Dum Biryani at Home (Step-by-Step)
- Egg Fried Rice Recipe: How to Make Restaurant-Quality Fried Rice at Home in 20 Minutes
- Paneer Fried Rice: Quick & Healthy Indo‑Chinese Delight
- Vegetable Pulao Recipe – A One-Pot Flavorful Rice Dish