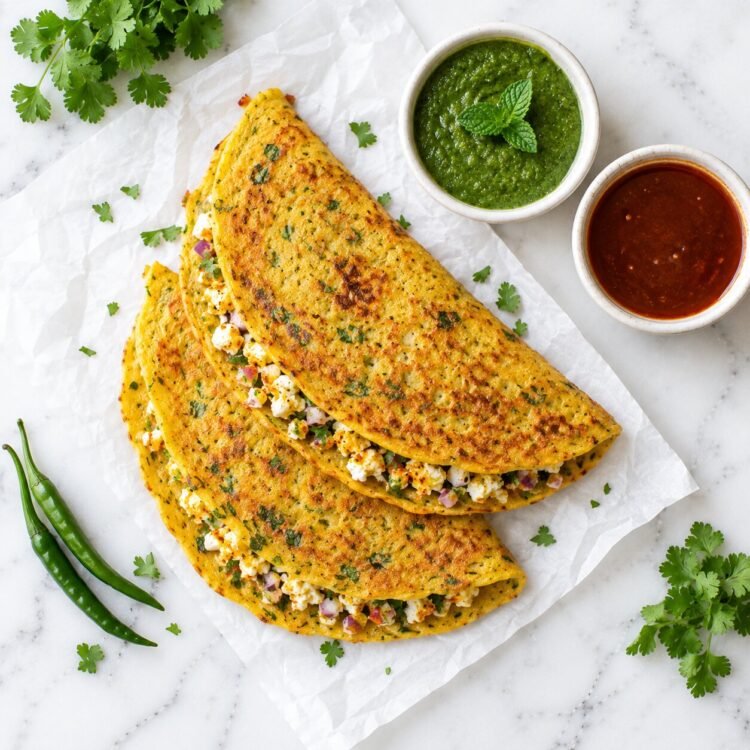
There is a particular kind of breakfast that earns its place in your weekly routine not because it is trendy or because a nutritionist told you to eat it — but because it is genuinely, straightforwardly excellent.
Paneer Besan Chilla is that breakfast.
A thin, golden, slightly crispy savory pancake made from besan (chickpea flour) — naturally gluten-free, naturally high in protein, with a glycemic index of just 6 that makes it one of the most blood-sugar-friendly breakfast options in Indian cooking. Spread on a hot tawa, cooked until the edges lift and the surface turns from shiny to matte. Then filled with a quickly assembled paneer mixture — crumbled cottage cheese, raw onion, chopped tomato, green chili, coriander, and a pinch of chaat masala — folded over and served immediately with green chutney and curd.
The result is a breakfast that provides 18-22 grams of protein per serving from the combined power of besan and paneer, keeps you full until well past midday, costs a fraction of any equivalent takeaway option, and takes twenty minutes from the moment you pick up the mixing bowl.
It is one of the most beloved breakfast options across North Indian households for a reason — and this recipe gives you the complete, expert-level guide to making it perfectly every time.
Why Paneer Besan Chilla Is One of India’s Best Breakfast Options
The Nutritional Case
<cite index=”6-1″>A standard besan chilla delivers roughly 8–10g of protein per serving from chickpea flour alone. By adding paneer, you can push that to 18–22g — making it one of the fastest, most affordable high-protein breakfasts available in an Indian kitchen.</cite>
<cite index=”9-1″>Besan is chickpea or gram flour, with a Glycemic Index (GI) of 6, which makes it one of the healthiest options for diabetics and those looking to restrict calories. It is full of good fats that help boost good cholesterol and is known as ‘heart healthy’ food in India.</cite>
<cite index=”7-1″>Besan contains no gluten and offers naturally higher protein (approximately 22g per 100g raw flour) and dietary fiber (approximately 10g per 100g).</cite>
The Amino Acid Pairing Science
<cite index=”6-1″>Chickpea protein is relatively low in methionine, a sulphur-containing essential amino acid. Pairing besan with a methionine-richer source — paneer, yogurt, seeds, or a pea and brown rice protein blend — creates a complete amino-acid profile your muscles can actually use for repair and growth.</cite>
This is why the paneer stuffing in this recipe is not merely a flavour addition — it is a nutritional completion strategy. The besan provides the protein base; the paneer fills the amino acid gaps, creating a full-spectrum protein meal from plant and dairy sources together.
Practical Advantages That Make It a Daily Recipe
- No soaking required — unlike moong dal chilla, which needs 3-4 hours of soaking, besan chilla uses ready-to-mix flour that goes from pantry to batter in 5 minutes
- Naturally gluten-free — suitable for those avoiding wheat without any special substitutions
- Kid-friendly and tiffin-box appropriate — <cite index=”9-1″>a complete breakfast for adults, it really works as a ‘superhero meal’ in your kid’s tiffin box too</cite>
- Endlessly customisable — the batter accepts virtually any spice, herb, or vegetable addition; the filling adapts to whatever is available
- Budget-friendly — besan and paneer are among the most affordable high-protein ingredients available in Indian grocery shopping
Besan Chilla Batter: Understanding What Makes It Perfect
The Batter Consistency Rule
<cite index=”9-1″>If you want a soft chilla, prepare a thick batter. For a crisp chilla, go for a thinner batter, which still coats the back of the spoon with a layer when poured.</cite>
For this recipe — where the chilla needs to be thin enough to fold over the paneer filling without cracking — aim for the thinner end: the batter should coat the back of a spoon in a uniform layer but run off cleanly when tilted. It should pour like a thin pancake batter, not like a thick paste.
Adding batter to the tawa in a slow, circular pour and then spreading outward with the back of the ladle gives you control over final thickness.
The 20-Minute Rest: Small Wait, Big Payoff
After mixing the batter, cover and rest for 20 minutes before cooking. This rest period:
- Allows the besan to fully hydrate — dry pockets of flour that have not absorbed water become visible as lumps if cooked immediately
- Allows the spices to bloom slightly into the batter, distributing flavour more evenly
- Slightly thickens the batter as the starch absorbs moisture, making it easier to control thickness on the tawa
Ingredients for Paneer Besan Chilla (Serves 2-3, Makes 4-5 Chillas)
For the Besan Batter
- 1 cup besan (chickpea flour / gram flour) — sifted to remove any lumps before mixing
- ¼ teaspoon turmeric powder — provides the characteristic golden colour and anti-inflammatory properties
- ½ teaspoon Kashmiri red chili powder — for gentle heat and deep colour; use regular red chili for more heat
- ¼ teaspoon ajwain (carom seeds) — aids digestion and adds the distinctive earthy warmth that makes besan chilla unmistakably different from plain pancakes
- ½ teaspoon cumin seeds — optional; adds a pleasant, nutty depth
- A pinch of asafoetida (hing) — another digestion support ingredient and essential flavour note in North Indian chickpea preparations
- Salt to taste
- ¾ cup water — start with ½ cup and add more as needed to achieve the right consistency
Optional Batter Additions
- 2 tablespoons rice flour — makes the chilla crispier; particularly good if you want a very crisp edge
- 2 tablespoons fine semolina (rava/sooji) — adds a pleasant texture and helps with crisping
- 1-2 tablespoons curd (yogurt) — adds mild tang and makes the chilla slightly softer inside
For the Paneer Stuffing
- 1 cup paneer (cottage cheese), freshly crumbled — approximately 200g; use the freshest paneer available for the best flavour and texture
- 1 small onion, very finely chopped
- 1 medium tomato, finely chopped (seeds removed to reduce excess moisture)
- 2 green chilies, very finely chopped — adjust to heat preference
- 2 tablespoons fresh coriander (cilantro), finely chopped
- 1 teaspoon fresh ginger, grated or very finely minced
- ½ teaspoon red chili powder — optional
- ½ teaspoon chaat masala — the finishing flavour that lifts the entire stuffing; do not skip
- ½ teaspoon lemon juice — adds brightness
- Salt to taste
For Cooking
- Oil or ghee — approximately 1 teaspoon per chilla; ghee adds rich flavour but oil works well for a lighter version
- A non-stick tawa or flat griddle — essential for cooking thin chillas without sticking
The Two Approaches to Paneer Chilla
There are two well-established approaches to making Paneer Besan Chilla, and understanding both helps you choose the right one for your morning:
Approach 1 — Stuffed (Restaurant Style)
The paneer filling is prepared separately as a raw or lightly tossed mixture and spread on the cooked (or partly cooked) chilla, which is then folded. This is the approach in this recipe — it takes slightly more time but produces a distinct textural contrast between the crispy chilla exterior and the fresh, slightly crunchy raw onion and tomato in the filling.
Approach 2 — Mixed-In (Instant Version)
<cite index=”8-1″>In a large bowl, combine besan, crumbled paneer, chopped onion, chopped capsicum, chopped tomato, and fresh coriander. Add spice powders, mix well, and gradually add water to achieve a smooth batter.</cite> The paneer is incorporated directly into the batter before cooking. This is faster and requires no separate stuffing step, but produces a different — more homogeneous — result where paneer flavour runs throughout the chilla rather than being concentrated in a distinct filling.
Which to choose: The stuffed version (this recipe) for more interesting texture and the authentic North Indian experience. The mixed-in version when speed is the absolute priority.
Step-by-Step: How to Make Paneer Besan Chilla
Step 1 — Make the Batter
Sift the besan into a large mixing bowl to remove lumps. Add the turmeric, Kashmiri red chili powder, ajwain, cumin seeds (if using), asafoetida, and salt. Whisk the dry ingredients together until evenly distributed.
Add the water gradually — start with ½ cup — whisking continuously. The gradual addition prevents lumps from forming; adding all the water at once tends to trap dry pockets of flour that are difficult to break down. Add more water as needed until you reach a smooth, thin, pourable batter.
Cover the bowl and rest for 20 minutes.
After resting, the batter will have thickened slightly. Whisk once more, then check the consistency — it should coat the back of a spoon evenly and flow off cleanly when tilted. If too thick, add 1-2 tablespoons of water and whisk again.
Step 2 — Prepare the Paneer Stuffing
In a separate bowl, combine the crumbled paneer, finely chopped onion, tomato (seeds removed), green chili, fresh coriander, ginger, chaat masala, lemon juice, and salt. Toss gently to combine.
The stuffing texture: This filling should be fairly dry — excess moisture from the tomato will make the chilla soggy when folded. Removing the tomato seeds before chopping and gently pressing the mixture with a spoon to check for excess liquid ensures the stuffing holds its texture inside the folded chilla.
Taste the stuffing and adjust seasoning. The raw stuffing should taste intensely seasoned — it mellows slightly when enclosed in the warm chilla.
Step 3 — Heat the Tawa
Heat a non-stick tawa or flat griddle over medium heat. Allow it to heat for 2-3 minutes — a properly hot tawa is essential. An under-heated tawa causes the batter to stick even on a non-stick surface.
Test readiness: sprinkle a few drops of water on the tawa’s surface. If they sizzle and evaporate immediately, the tawa is ready.
Reduce to medium-low heat. Brush or drizzle with ½ teaspoon of oil or ghee and spread it evenly across the surface.
Step 4 — Pour and Spread the Chilla
Pour approximately ¼ cup of batter onto the centre of the tawa. Immediately use the back of the ladle to spread the batter in slow, outward circular motions — starting from the centre and working toward the edges. The goal is a round, even chilla approximately 17-18cm in diameter.
Work quickly — the batter begins setting within seconds of hitting the hot surface.
Add a few drops of oil around the edges of the chilla.
Step 5 — First Side: Cook Until Edges Lift
Cook on medium-low heat for 2-3 minutes, until:
- The surface appears dry and matte (no wet shine)
- Small bubbles begin appearing on the upper surface
- The edges have turned golden and lift naturally from the tawa surface
- The underside, visible at the edges, looks golden-brown
Flip gently using a flat spatula, sliding it fully under the chilla before lifting.
Step 6 — Second Side and Stuffing
Cook the second side for 1-2 minutes until golden.
While the second side cooks, place 2-3 tablespoons of the paneer stuffing on one half of the chilla, spreading it across that half surface.
Once the second side is cooked, fold the empty half over the stuffing-covered half — the chilla folds like a semi-circle, enclosing the filling.
Press gently with the spatula and cook for another 30 seconds to ensure the stuffing is lightly warmed and the fold has set.
Remove and serve immediately.
Step 7 — Repeat and Serve
Repeat with the remaining batter and stuffing. Keep finished chillas in a roti box lined with a cloth while making the rest of the batch — they stay warm and do not go rubbery for approximately 15-20 minutes.
Serve hot with:
- Mint-coriander green chutney — the essential pairing; the bright acidity of the chutney contrasts with the earthy besan
- Plain curd (yogurt) — cooling and complementary
- Tamarind chutney — for sweet-sour balance
Nutrition Information Per Chilla (Approximate, 1 of 4-5)
| Nutrient | Amount |
|---|---|
| Calories | 185-220 kcal |
| Protein | 12-15g |
| Carbohydrates | 18-22g |
| Fat | 7-9g |
| Fiber | 3-4g |
| Calcium | 150mg |
| Iron | 2mg |
| GI (Glycemic Index) | Low (~6 for besan base) |
For a complete 2-chilla serving: 370-440 kcal | 24-30g protein | 36-44g carbs — a nutritionally complete, high-protein breakfast.
5 Variations Worth Making
Variation 1 — Spinach Paneer Chilla (Iron Boost)
Add 2 tablespoons of very finely chopped fresh spinach or methi (fenugreek leaves) directly to the batter. The green-flecked chilla is visually striking and significantly richer in iron and folate. Particularly recommended for women with anaemia.
Variation 2 — Masala Paneer Chilla (Restaurant Style)
Lightly sauté the paneer stuffing instead of using it raw: heat ½ teaspoon of oil in a small pan, add a pinch of cumin seeds, then the green chili, onion, and tomato. Cook for 2 minutes, add the paneer and spices, cook for 1 more minute. Use this cooked stuffing. The warm filling inside the hot chilla has a noticeably more integrated, restaurant-style flavour.
Variation 3 — Veggie-Loaded Chilla
Add finely grated carrot and finely chopped capsicum directly to the batter. <cite index=”9-1″>You can make it healthier by adding some vegetables of your choice, cut to mirepoix size, such as carrot, onion, capsicum, minced fenugreek, coriander or spring onions, to enhance its taste.</cite>
Variation 4 — Tofu Paneer Chilla (Vegan Version)
Replace paneer with 100g of firm tofu, crumbled and seasoned identically. The batter itself is already vegan. Use oil rather than ghee for cooking. The protein content is slightly lower than with paneer (tofu has approximately 8g protein per 100g vs. 18-20g for paneer) but still excellent.
Variation 5 — Moong Dal + Besan Mixed Chilla
Replace ¼ cup of the besan with ¼ cup of moong dal flour (or soaked-and-blended yellow moong dal). This combination provides a slightly more delicate texture and a broader amino acid profile. More complex to prepare but nutritionally superior.
Expert Tips for Perfect Chillas Every Time
Sift the besan. Lumps in besan batter are almost impossible to remove once water is added. 30 seconds of sifting prevents 5 minutes of frustrated whisking.
Hot tawa, medium-low cooking. A hot tawa (high initial heat) prevents sticking. Dropping to medium-low after adding batter gives the chilla time to cook through without burning.
Spread fast. The batter sets within 3-4 seconds on a hot tawa. Spread in confident, outward circular movements immediately after pouring — hesitation produces thick, uneven chillas.
Remove tomato seeds from the stuffing. Wet stuffing makes the chilla soggy at the fold. Take 30 seconds to squeeze or deseed the tomato.
Rest the batter. The 20-minute rest is worth planning for. Rested batter spreads more evenly and produces a better-textured chilla than batter used immediately.
Serve immediately. Like all Indian flatbreads, chillas lose their crispness within 15-20 minutes. The full eating experience — crispy exterior, warm filling, bright chutney — is at its best the moment it comes off the tawa.
Frequently Asked Questions
Q1. What is the difference between besan chilla and moong dal chilla?
The primary difference is the base ingredient and preparation time. Besan chilla uses chickpea flour (besan) that mixes instantly with water — no soaking required, batter ready in 5 minutes. Moong dal chilla uses whole or split green moong that requires 3-4 hours of soaking before blending into batter. Nutritionally, moong dal chilla has a slightly lower glycemic index and more complete protein profile; besan chilla is faster and equally high in protein, particularly when paneer is added. Both are excellent high-protein Indian breakfast options.
Q2. How do I prevent the besan chilla from sticking to the tawa?
Three techniques prevent sticking: first, ensure the tawa is properly and evenly heated before adding oil (a cold tawa creates sticking even on non-stick surfaces); second, use a high-quality non-stick or well-seasoned cast-iron tawa — a worn non-stick coating will stick regardless of oil; third, flip the chilla only when the edges have lifted naturally and the surface looks dry and matte — flipping too early, before the chilla has set, always causes sticking and tearing.
Q3. Can I make besan chilla batter in advance?
Yes, with one important note: do not add salt to the batter until just before cooking. Salt draws moisture from the batter, gradually thinning it and making it more difficult to spread evenly if stored overnight. Without salt, the batter keeps refrigerated for up to 24 hours — add salt just before you begin cooking. Bring the batter to room temperature and whisk again before using, as it may have settled and thickened in the refrigerator.
Q4. Is paneer besan chilla good for weight loss?
Yes — paneer besan chilla is well-suited for weight loss for three reasons: its low glycemic index (GI of approximately 6 for the besan base) means it causes minimal blood sugar spike, reducing the insulin response that promotes fat storage; its high protein content (18-22g per serving) supports satiety and muscle preservation during a calorie deficit; and the cooking method (1 teaspoon of oil per chilla) is minimal in added fat. Use low-fat paneer and keep the oil to the minimum for the most calorie-efficient version.
Q5. Why does my besan chilla taste raw or smell like chickpea flour inside?
This is almost always a cooking temperature issue — the chilla was not cooked through sufficiently on the first side before flipping. Besan needs to cook completely to develop its pleasant, nutty flavour; undercooked besan has a distinct raw, slightly bitter chickpea taste. Cook the first side on medium-low heat until the surface is completely dry and matte with no wet patches — approximately 2-3 minutes. If the chilla is browning quickly but the surface still looks wet, your heat is too high; reduce to low and give it more time.
The Indian Breakfast That Earns a Place on Every Morning Table
Paneer Besan Chilla earns its status as one of North India’s most beloved breakfasts not through novelty or nutritional theory, but through the very practical experience of eating it regularly and finding that it genuinely delivers what a good breakfast should: real flavour, real satiety, and real energy for the morning.
The besan provides the gluten-free, low-GI, high-protein base. The paneer completes the protein profile and adds the creaminess that makes the filling so satisfying. The chaat masala, green chutney, and bright lemon pull everything together into something that is nutritious without tasting like it is trying to be.
Make it once with the stuffed version in this recipe. Then adjust the filling to whatever is available — different vegetables, different chutney, different heat level. The recipe will become yours within the first three attempts.
Made this recipe? Share your results in the comments on KitchenWhisper.in! Tell us which variation you tried, what you served alongside, and whether the 20-minute batter rest made a noticeable difference for you. And if you found a spice combination that worked better for your household — we want to know.
Pairs perfectly with: Mint-Coriander Chutney | Tamarind Chutney | Plain Curd | Masala Chai | Fresh Lime Water
Also explore on KitchenWhisper.in:
- Moong Dal Chilla for Weight Loss
- High Protein Poha with Vegetables
- Paneer Bhurji for Weight Loss
- High Protein Cottage Cheese Breakfast Bowl