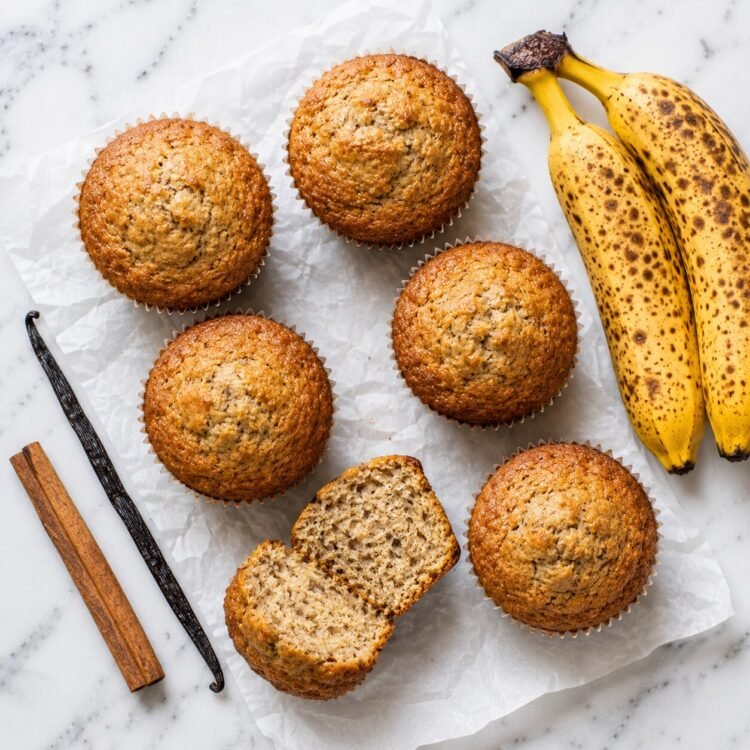
Every household has that moment — the three bananas on the counter that have crossed from ripe to deeply speckled, past the point of pleasant eating, entering the territory of almost too sweet. The bananas that are either about to be discarded or transformed into something extraordinary.
This is the moment Air Fryer Banana Muffins were made for.
In 14 minutes of cooking — no oven preheating, no 25-minute bake, no risk of the top doming while the centre stays raw — you have twelve perfectly golden, genuinely moist banana muffins with the soft, tender crumb that only properly ripe bananas can produce. The air fryer’s circulating hot air crisps the exterior into a beautiful golden dome while locking moisture into the interior in a way that conventional oven baking sometimes struggles to achieve without very precise timing.
These are muffins that make the kitchen smell like a bakery. That come together in one large bowl and one dry-ingredients bowl with ten minutes of hands-on prep. That freeze beautifully, reheat brilliantly, and work for breakfast, snack time, lunchboxes, and bake sales with equal success.
For anyone who has never used their air fryer for baking, this recipe is the ideal first experiment. It is simple enough to succeed on the first attempt and delicious enough to want to make again immediately.
Why Bake Banana Muffins in an Air Fryer?
This is a genuine question worth answering properly — because the air fryer is not universally better than a conventional oven for all baking, and understanding when it specifically excels helps you make intelligent choices.
Speed and Energy Efficiency
A conventional oven typically requires 10-20 minutes of preheating before any baking begins, then 20-25 minutes of actual baking time for a standard muffin. Total time from deciding to make muffins to eating them: 35-45 minutes minimum.
An air fryer preheats in 3-5 minutes and bakes these muffins in 14 minutes. Total time from decision to eating: approximately 25 minutes. That is a 30-40% time saving — meaningful when breakfast is needed quickly or when baking late in the evening.
Energy efficiency follows the same pattern: an air fryer uses significantly less electricity than a full-size oven for small-batch baking, making it particularly practical for quantities under 12 items.
Even Heat Distribution
The air fryer’s fan-driven convection heat circulates from every direction simultaneously, which solves one of the most persistent problems in muffin baking: the uneven dome. In a conventional oven, heat primarily radiates from above and below — the top of a muffin often sets and browns before the interior has fully cooked. The air fryer’s all-around heat distribution means the batter sets and rises more uniformly, producing consistent domes across the whole batch.
Superior Moisture Retention
The smaller, enclosed cavity of an air fryer traps moisture from the baking batter more effectively than a large conventional oven, where steam escapes into a much larger interior space. For moisture-dependent baked goods like banana muffins — where the quality of the crumb depends almost entirely on retaining the moisture from the ripe bananas — this enclosed environment produces a noticeably moister result than equivalent oven baking.
No Oven Required
For households without a conventional oven (rented accommodations, studio apartments, RV kitchens, or international situations where built-in ovens are less common), the air fryer makes quality home baking genuinely possible. This recipe requires no oven at any stage.
Why Overripe Bananas Are Non-Negotiable
The bananas in this recipe are not just a flavour addition — they are the primary sweetener, the moisture provider, and the leavening supporter. And their ripeness determines everything.
What Ripeness Does to a Banana
As a banana ripens, its starches convert to simple sugars through enzymatic activity. A yellow banana has approximately 1.5g of sugar per gram of starch; a fully ripe (deeply spotted or brown-black) banana has converted nearly all of its starch to sugar — making it up to 25% sweeter than a yellow banana by weight.
This sugar conversion matters for muffins in three ways:
- Natural sweetness: Overripe bananas provide significantly more sweetness than yellow bananas, reducing the amount of added sugar needed
- Moisture: The cellular breakdown that accompanies ripening releases more water from the banana, contributing more moisture to the batter
- Flavour intensity: The complex, fruity banana flavour that makes banana muffins distinctive comes from aromatic compounds that develop during ripening — unripe or barely-ripe bananas produce muffins that taste of banana in a vague, flat way; properly overripe bananas produce muffins with unmistakable, concentrated banana character
How to Identify the Right Banana
The correct banana for this recipe is:
- Predominantly brown or black on the skin (not just spotted — heavily marked)
- Soft and yielding when squeezed
- Smells intensely of sweet banana — you can detect the aroma before peeling
- Mashes with minimal effort to a smooth, pourable consistency
Yellow bananas and lightly spotted bananas produce pale-flavoured muffins with less natural sweetness. They work technically but produce an inferior result that requires extra sugar to compensate.
Ripening shortcut: If you only have yellow bananas, place them unpeeled on a baking sheet and bake in a conventional oven (or air fryer at 300°F) for 10-15 minutes until the skins have turned fully black. Cool before using. The concentrated heat accelerates the starch-to-sugar conversion and produces a banana nearly as sweet and flavourful as naturally overripe fruit.
Frozen bananas: Frozen ripe bananas, thawed completely and drained of excess liquid, work excellently in this recipe. Freezing and thawing collapses the cellular structure and accelerates the sugar concentration — some bakers specifically freeze bananas for 24-48 hours before using in muffin batter for this reason.
Ingredients (Makes 10-12 Muffins)
Wet Ingredients
- 2 large ripe bananas (heavily spotted to brown-black), mashed to a smooth paste — approximately ¾-1 cup of mashed banana
- ½ cup neutral oil — vegetable oil, canola, or light olive oil; neutral oil produces a moister muffin than melted butter as it remains liquid at room temperature, keeping the crumb tender after cooling
- ¼ cup milk — whole milk for richness; any milk alternative (oat, almond, soy) works well for dairy-free versions
- 1 large egg, room temperature — room-temperature eggs incorporate more evenly than cold eggs, producing a more consistent batter
- ½ cup granulated sugar — or brown sugar (see variation note below)
- 1 teaspoon pure vanilla extract — pure vanilla, not imitation; the vanilla note complements banana particularly well
Dry Ingredients
- 1½ cups all-purpose flour — spooned into the measuring cup and levelled, not packed (packed flour is the most common cause of dense muffins)
- 1 teaspoon baking powder
- 1 teaspoon baking soda
- ¼ teaspoon salt — balances sweetness and enhances all other flavours
Equipment
- Silicone muffin cups — strongly recommended over paper liners for air fryer baking (see the silicone vs paper section below)
Silicone vs Paper Muffin Liners in the Air Fryer
This is a choice that matters more in an air fryer than in a conventional oven, and it deserves explanation.
Silicone muffin cups hold their shape completely under the air fryer’s circulating hot air. They have firm, structured walls that support the batter during rising, produce a well-defined muffin shape, and release cleanly after baking. They also reuse indefinitely, making them economical and sustainable.
Paper muffin liners in an air fryer have a specific problem: the air fryer’s powerful circulating fan can cause paper cups to fold, tip, or collapse inward before the batter has had time to set. A collapsed paper liner produces a muffin that spreads rather than rises — it will still taste excellent but will look flat and irregular rather than dome-shaped.
If paper liners are all you have: place them inside a silicone liner or a metal muffin tin ring to support the sides, or lightly crumple aluminium foil into rings around each paper liner to hold the shape. Alternatively, fill paper liners only half-full (less batter = less height = less risk of the liner tipping).
For the best, most consistent results: use silicone cups.
Understanding the Leavening: Why Both Baking Powder and Baking Soda?
The recipe uses both baking powder and baking soda — not as redundancy but because each serves a different function.
Baking soda (sodium bicarbonate) requires an acid to activate. In this recipe, the mashed ripe banana provides natural acidity — the same fermentation-related acids that make overripe bananas slightly tangy when eaten plain. When baking soda meets the acids in the banana, it produces carbon dioxide bubbles immediately, creating rise in the batter.
Baking powder contains its own acid (cream of tartar) and produces a second round of gas release when heat is applied — a different, sustained rising action that continues through the early minutes of baking as the batter sets.
Together, the immediate rise from baking soda and the heat-activated rise from baking powder produce a taller, lighter muffin than either would achieve alone. This is why the recipe uses both at equal quantities — they are complementary, not interchangeable.
Step-by-Step: How to Make Air Fryer Banana Muffins
Step 1 — Prepare Silicone Cups and Preheat
Arrange your silicone muffin cups in the air fryer basket. Most standard air fryer baskets accommodate 4-6 silicone cups in a single layer. If you have a smaller basket, plan to bake in two batches of 5-6 cups each.
Preheat the air fryer to 320°F (160°C) for 3-4 minutes. Preheating ensures the muffins enter a properly hot environment and begin rising immediately, rather than sitting in a gradually heating space that can cause the batter to settle before it rises.
Step 2 — Mash the Bananas
Peel the bananas and transfer to a large mixing bowl. Using a fork, mash vigorously until the texture is smooth and mostly lump-free. A few small banana pieces remaining are fine — they will create small pockets of concentrated banana flavour in the finished muffin.
The texture test: Well-mashed banana for muffin batter should look similar to thick applesauce — smooth, uniformly textured, pourable rather than chunky. If the banana is not cooperating with a fork, use a potato masher for quicker results.
Step 3 — Combine Wet Ingredients
Add the oil, milk, egg, sugar, and vanilla extract to the mashed banana. Whisk vigorously for 60-90 seconds until the mixture is smooth, uniform, and slightly foamy from the egg incorporation. The mixture should look cohesive — no separate pools of oil and no streaks of egg white.
The room temperature rule: Take the egg out of the refrigerator 20-30 minutes before starting. A cold egg added to room-temperature banana mixture can cause the oil to seize slightly. Room-temperature eggs emulsify more smoothly and produce a more homogenous batter.
Step 4 — Combine Dry Ingredients Separately
In a second bowl, whisk together the flour, baking powder, baking soda, and salt until evenly distributed. Whisking the dry ingredients together before adding to the wet mixture ensures the baking powder and baking soda are evenly distributed — which means consistent rising throughout all muffins rather than some that rise dramatically and others that do not.
Step 5 — Fold Wet and Dry Together (The Most Important Step)
Add the dry ingredients to the wet banana mixture gradually — pour approximately half at a time. Using a large spatula (not a whisk), fold the mixture together using a gentle, sweeping, folding motion rather than aggressive stirring.
Stop mixing the moment no dry flour is visible. A few small lumps are absolutely fine and actually desirable — they indicate that the batter has not been overworked. A completely smooth, lump-free muffin batter has been overmixed.
Why Overmixing Is the Enemy of Good Muffins
When flour is mixed with liquid, the gluten proteins in the flour hydrate and begin linking together. Brief, gentle mixing forms a small amount of gluten — enough to give the muffin structure. Continued, aggressive mixing forms long, tangled gluten networks that make the muffin tough and dense, with a rubbery rather than tender crumb, and a characteristic “tunnelling” pattern of long holes inside the muffin rather than the fine, even crumb structure you want.
The moment the flour disappears: stop. Do not mix for texture perfection. Lumps cook out. Overdeveloped gluten cannot be reversed.
Step 6 — Fill the Muffin Cups
Using a large spoon or a cookie scoop (a 3-tablespoon scoop is ideal for consistent portions), fill each silicone muffin cup approximately two-thirds to three-quarters full. The batter will rise during cooking — cups filled more than three-quarters will overflow.
Consistent filling produces consistent muffins. A cookie scoop rather than a spoon produces more uniform portions, which means all muffins in the batch finish at the same time.
Step 7 — Air Fry
Place the filled silicone cups in the preheated air fryer basket. Do not overcrowd — leave visible space between cups so the circulating air can reach all sides of each muffin.
Air fry at 320°F (160°C) for 14 minutes.
At the 14-minute mark, perform the toothpick test: insert a clean toothpick or thin skewer into the centre of one muffin. If it comes out clean or with just a few moist crumbs clinging to it, the muffins are done. If wet batter clings to the toothpick, return for 1-2 additional minutes and test again.
The visual cues: Done muffins will have a set, golden-brown dome on top that springs back lightly when pressed with a fingertip. Underdone muffins will look shiny and slightly wet on the surface, and the dome will not spring back when pressed.
Step 8 — Cool Before Serving
Remove the silicone cups from the air fryer (use oven mitts or tongs — they are hot) and transfer to a wire rack. Allow to cool for at least 10 minutes before removing from the silicone cups.
Cooling matters for muffin structure: the interior crumb continues to set during the first 10 minutes after leaving the air fryer. Muffins removed from their cups while still very hot can compress and lose their domed shape. Wait for 10 minutes minimum.
For batches of 12 muffins (in a 4-6 cup basket), bake the second batch while the first batch cools.
6 Add-Ins and Variations Worth Trying
Variation 1 — Chocolate Chip Banana Muffins
Fold ½ cup of semi-sweet chocolate chips into the completed batter (before filling the cups). The chocolate chips melt slightly during baking and create small pockets of molten chocolate throughout the muffin. Use dark chocolate chips for a less sweet, more sophisticated result.
Variation 2 — Walnut Banana Muffins
Add ⅓ cup of roughly chopped walnuts to the batter. The walnuts toast slightly during baking, developing a nutty depth that contrasts with the sweet banana. Pecans are an excellent alternative.
Variation 3 — Brown Sugar Banana Muffins
Replace the granulated sugar with an equal amount of light or dark brown sugar. Brown sugar contains molasses, which adds a caramel-toffee warmth and depth that complements banana particularly beautifully. It also adds slight moisture to the batter, producing an even more tender crumb.
Variation 4 — Cinnamon Streusel Banana Muffins
Make a quick streusel topping: mix 3 tablespoons of flour, 3 tablespoons of brown sugar, ½ teaspoon of cinnamon, and 2 tablespoons of cold butter cut into small pieces. Use fingertips to work into coarse crumbs. Sprinkle over filled muffin cups before air frying. The streusel bakes into a crunchy, spiced topping.
Variation 5 — Peanut Butter Banana Muffins
Reduce the oil to ¼ cup and add ¼ cup of creamy peanut butter to the wet ingredients. The peanut butter adds protein and the classic banana-peanut butter flavour combination. Particularly popular with children.
Variation 6 — Healthier Version (Whole Wheat, Less Sugar)
Replace all-purpose flour with whole wheat flour (use ¾ cup whole wheat + ¾ cup all-purpose for best texture). Reduce sugar to ¼ cup (the natural sweetness of the overripe banana compensates significantly). Replace oil with unsweetened applesauce at the same quantity for reduced fat. The texture will be slightly denser than the original but genuinely more nutritious.
Storage, Freezing, and Reheating
Room Temperature
Store in an airtight container for up to 2 days. The natural oils from the banana help retain moisture, keeping the muffins tender for this period without refrigeration.
Refrigerator
Refrigerate in an airtight container or sealed zip-lock bag for up to 1 week. Note that refrigerated muffins tend to firm up slightly — bring to room temperature for 20-30 minutes before eating, or reheat briefly.
Freezer (The Best Long-Term Strategy)
Cool muffins completely on a wire rack (a minimum of 30 minutes — any residual warmth inside the muffin creates condensation that becomes freezer ice). Wrap each muffin individually in cling film or aluminium foil. Place all wrapped muffins in a sealed freezer bag and freeze for up to 3 months.
Reheating from frozen: Let thaw at room temperature for 30-40 minutes, or air fry the unwrapped muffin at 300°F for 3-4 minutes until warm throughout. Do not microwave — it makes the crumb gummy and slightly wet.
Nutrition Information (Per Muffin — 1 of 12)
| Nutrient | Amount |
|---|---|
| Calories | ~195-220 kcal |
| Fat | 9-10g |
| Saturated Fat | 1-2g |
| Carbohydrates | 28-32g |
| Sugar | 14-16g |
| Fiber | 1g |
| Protein | 2-3g |
| Sodium | ~120mg |
| Potassium | ~100mg |
Calories are approximate based on the recipe using ½ cup each of oil and sugar with 2 medium bananas. The brown sugar variation adds approximately 10 calories per muffin; the whole-wheat-and-applesauce variation reduces to approximately 160 calories per muffin.
Expert Tips for Perfect Muffins Every Time
Use the most overripe bananas you can find. The browner the skin, the sweeter and more flavourful the muffin. There is no such thing as a banana too ripe for this recipe — the more spotted and black the skin, the better the muffin.
Measure flour correctly. Spoon the flour into the measuring cup using a separate spoon, then level with a flat edge. Never scoop directly with the measuring cup — it compresses the flour and you end up with 20-30% more flour than the recipe calls for, producing dense, dry muffins.
Do not overmix. Fold the dry ingredients in until just combined. Stop at “no dry flour visible.” Lumps are not a problem — overworked gluten is.
Preheat the air fryer. Those 3-4 minutes of preheating are the difference between a muffin that rises immediately and one that spends the first few minutes slowly warming before it begins to set.
Fill cups consistently. A cookie scoop produces more uniform muffins than a spoon. All muffins the same size = all muffins done at the same time = no guessing about doneness.
Use the toothpick test, not just the timer. All air fryers run slightly differently. The 14-minute guideline is accurate for most models but your specific appliance may need 12 or 16 minutes. The toothpick is the definitive test.
Frequently Asked Questions
Q1. Can I use whole wheat flour instead of all-purpose flour?
Yes, with an adjustment. Using 100% whole wheat flour produces a noticeably denser, nuttier muffin because whole wheat flour’s bran content inhibits gluten development and absorbs more moisture. For the best result, use half whole wheat and half all-purpose (¾ cup each) — you get the nutritional benefit and slightly denser texture of whole wheat while maintaining enough lightness from the all-purpose flour.
Q2. Can I freeze air fryer banana muffins?
Yes — these freeze exceptionally well for up to 3 months. Cool completely (at least 30 minutes on a wire rack), wrap each muffin individually in cling film or foil, and place all wrapped muffins in a sealed freezer bag. Thaw at room temperature for 30-40 minutes or reheat from frozen in the air fryer at 300°F for 3-4 minutes. Avoid freezing muffins that are still warm — trapped steam creates ice crystals that make the texture gummy.
Q3. Can I make banana muffins without eggs?
Yes. Replace the one egg with one of these egg substitutes: 1 tablespoon of chia seeds mixed with 3 tablespoons of water, rested for 5 minutes until gel-like (a chia egg); or ¼ cup of unsweetened applesauce; or 3 tablespoons of mashed ripe banana (increasing the total banana quantity). All three produce a slightly denser muffin than the egg version but still genuinely good results.
Q4. My muffins are sinking in the middle. What went wrong?
Sunken muffins typically result from one of three causes: too much leavening (double-check the baking soda and baking powder measurements — both should be level teaspoons, not heaped); underbaking (the toothpick test came back clean before the interior had fully set — check that your toothpick is going into the centre, not the edge); or opening the air fryer too early during baking (wait until at least the 12-minute mark before checking). Also ensure your baking soda and baking powder are fresh — expired leaveners produce insufficient rise.
Q5. Can I use silicone muffin cups, and do I need to grease them?
Yes — silicone muffin cups are ideal for air fryer muffin baking and strongly preferred over paper liners (which can tip over in the circulating air). Silicone cups generally do not need greasing if they are good quality — the non-stick surface releases cleanly after cooling. However, lightly spraying with cooking oil spray or wiping with a small amount of oil before filling is a sensible precaution, particularly when using new cups for the first time.
The Muffin Your Overripe Bananas Were Always Meant to Become
Every batch of overripe bananas is a choice waiting to be made. And the choice that takes the least effort, produces the most satisfying result, and fills the home with the most extraordinary baking aroma is the one that starts with mashing them into a bowl with oil, sugar, and vanilla.
Fourteen minutes later — not the 35-45 minutes of oven baking — you have muffins. Golden, domed, genuinely moist, full of concentrated banana flavour. Ready to eat now, or stored, or frozen for the week ahead.
The air fryer makes this faster. The overripe bananas make it better. And the ten ingredients, one bowl, and straightforward method make it something you will come back to every time that spotted bunch appears on the counter.
Make these muffins and share your results in the comments below! Tell us which variation you tried, whether you went with chocolate chips or walnuts, and how long your batch lasted before it disappeared. We especially want to hear from first-time air fryer bakers — your experience helps other newcomers get it right on the first attempt.
Pairs perfectly with: Morning Coffee | Masala Chai | Cold Milk | Greek Yogurt | Fresh Fruit Salad
Also explore: Air Fryer Puff Pastry Danishes | Air Fryer French Toast Sticks | Air Fryer Chocolate Lava Cakes | Air Fryer Churros