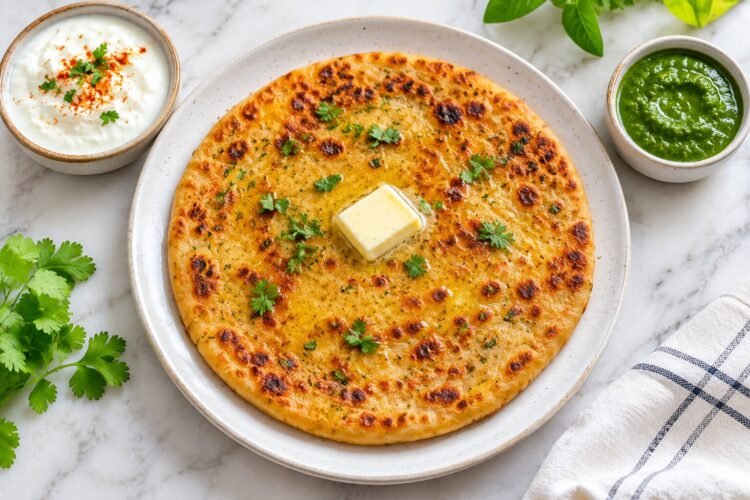
If there is one dish that defines the morning table across North India — from Punjab dhabas on the highway to home kitchens in Delhi — it is aloo paratha. Golden, slightly crisp on the outside from hot ghee, soft and yielding inside, with a perfectly spiced potato filling that holds together through every fold and bite.
It is deceptively simple. Wheat flour dough. Boiled potatoes. A small handful of spices. And yet the results, when the technique is right, are spectacular enough that people order it again and again at restaurants and dhabas without ever feeling the need to try something else.
This recipe covers every detail: the dough that stays soft without tearing, the filling that is smooth enough to roll without breaking the paratha, the ghee quantity that produces the characteristic crispness, and the serving combination that makes aloo paratha the complete breakfast or dinner it is meant to be.
Why Aloo Paratha Works — The Logic of the Dish
Aloo paratha succeeds because of complementary textures. The wheat dough is neutral, slightly chewy, and provides structure. The spiced mashed potato filling is soft, flavourful, and aromatic. When cooked in ghee on a hot tawa, the outer dough layer develops a light, slightly crisp surface while the inner filling steams in its own moisture — producing a contrast of textures in every mouthful that no other flatbread quite achieves.
The spice selection in the filling reinforces this logic:
- Amchur (dry mango powder): Adds sharp sourness that cuts through the starchy richness of potato — without it, the filling tastes flat
- Garam masala: Warm spice depth that makes the filling aromatic rather than merely savoury
- Green chilli: Fresh heat that is distinct from the cooked, blended heat of red chilli powder
- Coriander leaves: A herbal brightness that lifts the entire filling
Together, these four additions transform plain mashed potato into something that holds its own as a filling inside a wheat flatbread.
Ingredients (Makes 6–8 Parathas)
For the Dough
| Ingredient | Amount | Notes |
|---|---|---|
| Whole wheat flour (atta) | 2 to 2½ cups | Fine-milled chakki atta gives best texture |
| Salt | ½ tsp | |
| Oil or ghee | 1 to 2 tsp | Makes the dough softer and easier to roll |
| Water | As needed | Add gradually; aim for soft, pliable dough |
For the Aloo (Potato) Filling
| Ingredient | Amount | Notes |
|---|---|---|
| Potatoes, boiled and peeled | 3 medium | About 350–400g; see note below on boiling method |
| Green chillies, very finely chopped | 1 to 2 | Adjust to heat preference |
| Kashmiri red chilli powder | ¼ to ½ tsp (optional) | Adds colour; skip for milder version |
| Garam masala (Punjabi preferred) | ¼ to ½ tsp | Use Punjabi garam masala if available |
| Amchur (dry mango powder) | 1 tsp | Essential for tartness; substitute: anardana powder |
| Fresh coriander leaves, finely chopped | 2 tbsp | Optional but highly recommended |
| Salt | To taste |
For Cooking
| Ingredient | Amount |
|---|---|
| Ghee | 1 to 1½ tsp per paratha |
| Whole wheat flour | For dusting while rolling |
For Serving
- White butter (makhan)
- Plain curd (yogurt)
- Mango pickle or any favourite Indian pickle
The Two Most Important Prep Steps
1. How You Boil the Potatoes Matters
The moisture content of your mashed potato determines whether the filling holds together cleanly during rolling or breaks the paratha. Two methods:
Pressure cooker (best): Cook whole, unpeeled potatoes under pressure until just done — not overcooked. Overcooked potatoes absorb more water, making the mash sticky and difficult to work with.
Stovetop boil (reliable): Place potatoes in a pot, cover with cold water, bring to a boil, and cook until a fork slides in cleanly with no resistance. Drain immediately — do not leave potatoes sitting in hot water, as they continue absorbing moisture.
After draining, peel while still warm (the skins slip off easily) and allow to cool completely on a plate before mashing. Mashing hot potatoes produces a gluey paste. Cool mashed potatoes produce a drier, easier-to-work-with filling.
2. The Lump-Free Mash Rule
This is non-negotiable: the filling must be completely smooth with no lumps. A single piece of unmashed potato creates a small bump under the rolled dough. When the rolling pin passes over that bump under pressure, the dough tears at that point and the filling escapes.
Use the back of a large spoon or a potato masher and work the potatoes for longer than you think necessary. Run your fingers through the mash to find any remaining lumps before adding spices. The filling should feel like thick, smooth dough — not rough or chunky.
How to Make the Dough
Step 1: Combine the wheat flour, salt, and oil or ghee in a large bowl. Mix briefly with your fingers until the fat is distributed throughout.
Step 2: Add water gradually — start with ¾ cup and add more a little at a time. Mix after each addition until the dough just comes together.
Step 3: Knead firmly for 8–10 minutes until the dough is smooth, soft, and springs back slowly when pressed with a finger. It should not stick to your hands; if it does, add a little dry flour. It should not crack when folded; if it does, it needs more water.
Step 4: Cover with a damp cloth or cling film and rest for 20–30 minutes. This resting period allows the gluten network to relax, making the dough significantly easier to roll without springing back.
A properly rested, well-kneaded dough is the single biggest factor in making aloo paratha that rolls out evenly and does not tear.
How to Make Aloo Paratha: Step-by-Step
Stage 1 — Make the Filling
Add all spices (green chilli, chilli powder if using, garam masala, amchur, salt) and chopped coriander to the cooled mashed potato. Mix thoroughly. Taste and adjust: the filling should be clearly seasoned, slightly sour from the amchur, and aromatic.
Divide into 6–8 equal balls and set aside.
Stage 2 — The Two Rolling Methods
Method 1 — Two-Circle Sandwich (Easier for Beginners)
This method is more forgiving for new cooks because the filling is spread across a wider surface with less pressure on the edges.
- Divide the dough into 12–16 equal balls (two per paratha)
- Roll each ball into a small circle, about 3 to 3.5 inches across
- Place filling on one circle, spreading it evenly but leaving a ½-inch border around the edge
- Place the second circle on top and press the edges firmly together all the way around — use your fingers to crimp and seal completely
- Dust with dry flour and roll gently outward from the centre to a disc about 7–8 inches across
Method 2 — Single-Circle Gather (Traditional Dhaba Style)
This method produces a paratha with a slightly thicker centre and very sealed edges. It is the method used in most Punjabi kitchens and dhabas.
- Divide the dough into 6–8 equal balls
- Roll each ball into a circle about 4–5 inches across
- Place a ball of filling in the centre
- Bring the edges of the dough up around the filling, gathering and pleating them together at the top like a money bag — pinch firmly to seal
- Press the sealed ball gently flat with your palm
- Dust generously with dry flour and roll very gently outward with even, light pressure — do not press hard at the edges, where the dough is thinner
- Roll to 7–8 inches across
Rolling tip for both methods: Always roll from the centre outward, rotating the paratha a quarter turn after each pass. Never roll back and forth over the same line repeatedly — this stretches the dough unevenly and creates weak spots that tear when the paratha hits the hot tawa.
Stage 3 — Cook on the Tawa
Heat a cast iron or heavy tawa over medium-high heat until genuinely hot — a drop of water should evaporate immediately on contact.
Place the rolled paratha on the dry tawa. Cook for 1–1.5 minutes until the underside shows small brown spots and the top surface begins to look dry and matte rather than raw.
Flip. Add ¾ to 1 teaspoon of ghee, spreading it across the surface with the back of a spoon or a small piece of folded cloth. Cook 1–1.5 minutes more until the second side has golden-brown spots.
Flip again. Add ghee to this side. Press gently with a spatula, particularly at the edges — the edge areas often cook more slowly. Cook 30–45 seconds until both sides are spotted golden-brown and the paratha feels slightly firm when pressed.
On ghee quantity: The temptation with home cooking is to use less ghee than the recipe calls for. Resist it. Insufficient ghee produces a paratha that is dry, slightly chewy, and does not develop the characteristic crispness. Each paratha needs 1 to 1.5 teaspoons of ghee to cook correctly. That is not excessive — it is the quantity that produces the texture the dish is designed to have.
Remove and stack in a roti basket or on a plate lined with foil to retain warmth. Add a small knob of white butter on top of the hot paratha immediately — it melts into the surface as the next one cooks.
Why the Paratha Breaks — and How to Fix It
The most common frustration with aloo paratha is filling bursting through the dough during rolling. Here is a systematic breakdown:
| Cause | Why It Happens | Fix |
|---|---|---|
| Lumpy filling | Lumps create hard spots that puncture the dough | Mash thoroughly; run fingers through fill to check |
| Wet/sticky filling | Overcooked or under-drained potatoes add excess moisture | Boil potatoes just until done; drain and cool before mashing |
| Overfilled paratha | Too much filling creates excess pressure during rolling | Use equal parts dough and filling by weight; less is more |
| Dough too thin at edges | Uneven rolling leaves thin spots that tear | Roll from centre outward; keep even pressure |
| Dough too stiff | Stiff dough resists rolling and cracks | Rest dough 20–30 min; add water if needed |
| Chopped onion in filling | Raw onion releases water during rolling | Use onion paste instead; or skip for first attempts |
| Rolling too hard at edges | Pressure at edges thins the dough to tearing point | Use light, even pressure; rotate paratha frequently |
Dhaba-Style Aloo Paratha: What Makes It Different
The roadside dhaba version of aloo paratha differs from home cooking in three specific ways:
- Anardana instead of amchur: Dhaba cooks traditionally use dried pomegranate seed powder (anardana) for the sour note in the filling rather than dry mango powder. Anardana has a more complex, slightly fruity sourness compared to the sharper tartness of amchur. If you have access to anardana, try it — the difference in the filling is noticeable and very good.
- More ghee: Dhabas cook parathas in what appears to be an irresponsible quantity of ghee. The tawa surface is well-oiled, and additional ghee is added with each flip. The result is a paratha with a genuinely crisp exterior and an almost shatteringly flaky surface that home-cooked versions rarely match.
- Higher tawa temperature: Dhaba tawas run hotter than most home burners, which produces faster browning and a slightly charred character at the spots that home cooks cannot fully replicate. Cooking on a cast iron skillet preheated for a full 5 minutes gets closer than a thin nonstick pan.
Variations Worth Trying
| Variation | What Changes |
|---|---|
| Aloo Pyaaz Paratha | Add very finely chopped (or grated) onion to the filling |
| Aloo Paneer Paratha | Replace 30% of potato with crumbled paneer for richness |
| Aloo Palak Paratha | Knead finely pureed cooked spinach into the dough |
| Aloo Gobi Paratha | Use half potato and half finely grated raw cauliflower |
| Aloo Methi Paratha | Add 2 tbsp finely chopped fresh methi (fenugreek) to filling |
| Mixed Veg Paratha | Add boiled mashed peas and grated carrot to the potato base |
Nutrition Profile (Per Paratha, Approximate)
| Nutrient | Amount |
|---|---|
| Calories | 220–260 kcal |
| Carbohydrates | 32g |
| Protein | 5g |
| Fat | 8g (from ghee) |
| Dietary Fibre | 3g |
| Iron | 1.5mg |
| Potassium | 380mg |
| Vitamin C | 12mg |
Aloo paratha is a moderate-calorie, carbohydrate-forward meal. The whole wheat flour provides meaningful fibre and B vitamins compared to maida. The ghee contributes fat-soluble vitamins (A, D, E, K) and medium-chain fatty acids that have a different metabolic profile from refined seed oils. For a lighter version, reduce ghee to ½ teaspoon per paratha and serve with low-fat curd rather than white butter.
Serving the Way It Should Be Served
A freshly cooked aloo paratha served with the right accompaniments is a significantly better experience than a plain paratha eaten alone. The classic Punjabi combination:
- White butter (makhan): Applied directly to the hot paratha immediately off the tawa. The butter melts in and enriches the surface texture. Cultured white butter, with its slight tanginess, is superior to processed table butter for this purpose.
- Plain curd: Cool, slightly sour, and creamy — the curd provides relief from the spiced filling and balances the richness of the ghee. Full-fat curd at room temperature (not cold from the refrigerator) is the right choice.
- Mango pickle: Sharp, oily, and spiced — a small quantity of good aachar alongside the paratha completes the meal. Even one small piece of mango pickle eaten with a bite of paratha changes the entire flavour experience.
This combination — paratha, butter, curd, and pickle — has remained the definitive aloo paratha meal for generations across Punjab for good reason. Each element does something the others do not.
Frequently Asked Questions
Q1. Why does my aloo paratha filling burst through while rolling?
The most common cause is a filling that contains either lumps or excess moisture. Any unmasked lump acts as a pressure point under the rolling pin and breaks the dough at that spot. Excess moisture from overcooked or under-drained potatoes makes the filling sticky and causes it to migrate toward the edges under pressure. The fix: boil potatoes just until tender (not beyond), drain and cool completely before mashing, and mash until absolutely no lumps remain. The second most common cause is overfilling — the filling ball and dough ball should be roughly equal in size.
Q2. Can I make aloo paratha without ghee?
Yes — oil works as a cooking fat substitute. The result will be slightly different in flavour (ghee has a distinctive nuttiness that oil cannot replicate) and the paratha will be marginally less crisp. Butter is a closer substitute to ghee than vegetable oil. Coconut oil changes the flavour profile noticeably but works technically. For a fully oil-free version, you can cook on a dry tawa — the paratha will cook through but will lack the browning, crispness, and flavour that make aloo paratha the dish it is. This is a case where the technique ingredient (ghee) is genuinely important to the outcome.
Q3. How do I keep aloo parathas soft and warm for a long time?
Stack hot parathas in a casserole or insulated roti box lined with a clean kitchen towel. The trapped steam and insulation together keep parathas warm and soft for 30–45 minutes without them drying out. Avoid stacking them on a plate uncovered — the exposed surface dries and stiffens within minutes. For longer storage, cool completely, stack with parchment paper between each one, and refrigerate in a zip-lock bag. Reheat on a medium tawa with a small amount of ghee for 1 minute per side.
Q4. Can I make aloo paratha dough the night before?
Yes — and it actually works better when made ahead. A well-kneaded dough that has rested overnight in the refrigerator becomes noticeably softer and more elastic than freshly made dough, because the extended resting period gives the gluten network time to fully relax. Store in a lightly oiled airtight container or zip-lock bag in the refrigerator. Bring to room temperature for 20–30 minutes before rolling. The filling can also be made a day ahead and refrigerated — just check the seasoning and re-mix before using, as the flavours intensify overnight.
Q5. What is the best potato variety for aloo paratha filling?
Medium-starch potatoes (the type sold as standard white potatoes or all-purpose potatoes in most Indian grocery stores) work best. High-starch varieties (like Russet) become very dry and crumbly when mashed, which makes the filling hard to work with and prone to cracking the paratha. Waxy varieties (like new potatoes) become sticky and gluey when mashed. The ideal is a medium-starch potato that mashes to a smooth, slightly firm consistency that holds its shape without being either sticky or crumbly. In India, the standard “potato” sold loose at any vegetable market is typically exactly the right variety.
The Flatbread Worth Mastering
Aloo paratha has a reputation for being finicky, but the difficulty is entirely in the details — and every detail is learnable. Smooth filling. Properly rested dough. Even rolling from the centre outward. Enough ghee. These are not complex skills; they just need to be done correctly and in the right order.
Once the method is second nature, aloo paratha becomes one of the most satisfying things you can make in a home kitchen. It is a complete meal in itself, it uses ingredients that are always available, and it delivers something genuinely special — the kind of food that makes people sit down at the table and not want to leave.
Made this aloo paratha recipe? Leave a comment below — share which rolling method worked better for you, and what you served it with. Your experience helps the next reader make it without a single torn paratha.
More Indian bread and comfort food recipes on KitchenWhisper.in:
- Veg Pulao Recipe – One-Pot Basmati with Vegetables
- Matar Paneer Recipe
- Dal Tadka Recipe – Smoky Punjabi Style
- Paneer Bhurji – High Protein Breakfast Under 20 Minutes
- Palak Paneer Recipe – Restaurant Style
- Paneer Butter Masala – The Silky Gravy Guide