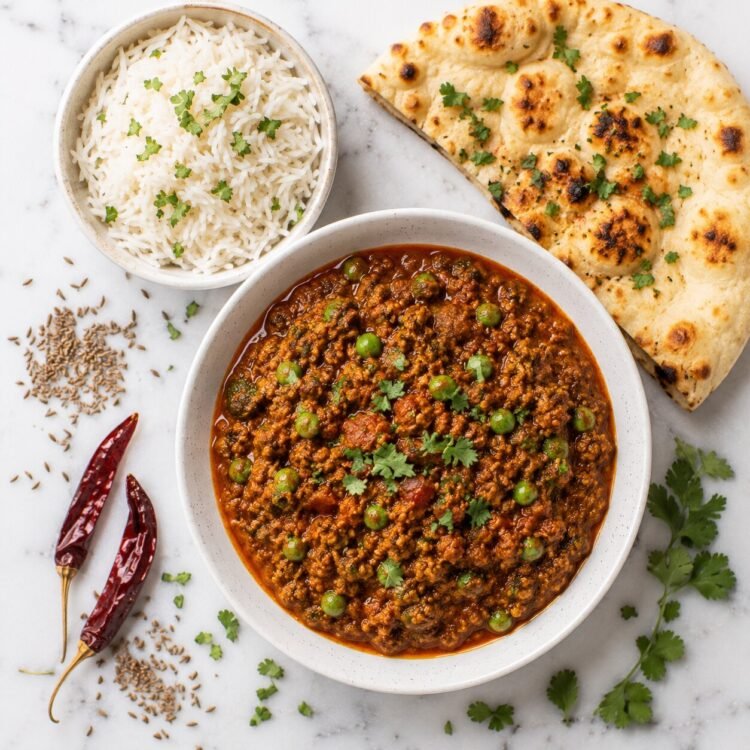
Some of the best Indian restaurant meals you will ever eat come from dishes that look, on paper, almost too simple to justify their reputation.
Chicken Keema Curry is the perfect example.
Minced chicken. Onions. Tomatoes. Ginger. Garlic. A handful of spices that are already in your pantry. Thirty minutes of cooking on a single burner. And the result is a deeply aromatic, intensely savoury curry that tastes like it has been building on a slow fire for twice the time it actually took.
Keema curry is one of those Indian dishes that occupies a curious cultural position — it is simultaneously street food (keema-stuffed parathas at roadside stalls across North India), home cooking (the weeknight protein dish in millions of Indian households), and restaurant fare (elevated with cream, saffron, or slow-cooked preparation in upscale settings). It moves comfortably across all three contexts because the foundational technique — building a proper masala, browning the mince, achieving oil separation — produces consistently excellent results regardless of the occasion.
The chicken version specifically has become increasingly popular for practical reasons. It cooks faster than lamb or mutton keema (no concern about connective tissue or tougher muscle fibres needing long cooking), has a lower fat profile while still being deeply flavourful, and is more accessible and affordable than the traditional mutton version. And it is genuinely excellent — the thin, absorbent fibres of minced chicken take on the surrounding masala’s flavour more completely than any whole-cut protein, producing a curry where every grain of the mince is thoroughly seasoned.
This guide gives you the complete recipe with every technique detail — the exact onion and tomato preparation that builds the right masala base, the oil separation cue that tells you the masala is done, the keema cooking stages, and four variations including keema matar (with peas) and a low-fat version. Plus the full answers to every question that comes up when making this for the first time.
What Makes Chicken Keema Curry Different from Other Indian Chicken Curries
The defining characteristic of keema curry — any keema curry — is the use of minced meat rather than whole pieces. This single difference changes almost everything about how the dish cooks and how it tastes.
Surface area: Minced chicken has vastly more surface area than chicken breast cubes or thighs. More surface area means more points of direct contact with the hot masala oil — which means more Maillard browning, more flavour development, and faster cooking.
Masala absorption: The fine texture of ground meat means the masala permeates the entire dish, not just the surface. Every grain of keema is coated in the spiced oil, seasoned through its entire mass rather than just on the outside. This is why keema curry has such consistent flavour in every bite — there is no “lean inside” problem that affects whole-cut curries.
Cooking time: Ground chicken cooks in 10-12 minutes once the masala is prepared. This makes the dish genuinely suitable for weeknight cooking — 30 minutes total — in a way that most Indian curries simply are not.
Versatility: The texture of keema makes it the most versatile of all curry bases — it works stuffed into parathas, spooned over rice, served alongside naan, used as a filling for samosas, or loaded into a wrap. It adapts to contexts that whole-cut curry does not.
The Onion Masala: The Foundation of Flavour
The masala in this recipe is built in two stages, and understanding each stage makes you a meaningfully better cook of this dish.
Why Onions Need to Be Cooked to Deep Golden
The amount of time given to onion cooking in Indian recipes is not mere tradition — it is chemistry. Onions contain sugars (approximately 5g per 100g raw) and the Maillard reaction that occurs between these sugars and the amino acids in the onion as it cooks at high temperature produces hundreds of complex flavour compounds that are simply not present in undercooked onions.
Pale, barely-softened onions add a sharp, raw flavour and very little body to the curry base. Golden, properly caramelised onions add natural sweetness, depth, and the structural body that makes a masala thick and cohesive rather than thin and watery.
For this recipe, the onions need to cook to deep golden — not pale, not lightly golden, but the colour of raw honey approaching amber. This takes 10-12 minutes on medium-high heat with regular stirring. It is the longest step in the recipe and the most important one.
The Ginger-Garlic Window
Once the onions are properly golden, the ginger-garlic paste goes in for a specific, timed window: 2 minutes of continuous stirring. This window is calibrated to cook out the raw, pungent sharpness of both aromatics (which becomes unpleasant if they are undercooked into the masala) without burning them (which becomes bitter). Two minutes at medium heat with constant movement hits the sweet spot: the sharp notes cook off and are replaced by the sweeter, deeper aromatic character of properly cooked ginger and garlic.
Tomatoes: Cook Until the Oil Separates
The tomatoes go in after the ginger-garlic and cook until they fully break down — a process that takes approximately 5-7 minutes and produces the classic bhunofying effect that defines great Indian masala: the oil and tomatoes, initially combined into a wet mixture, gradually separate as the tomato moisture evaporates, leaving a concentrated, glossy paste with oil visibly pooling at the edges.
This oil separation is one of the most important visual and practical cues in Indian cooking. It signals:
- All the raw moisture from the tomatoes has cooked off
- The tomato solids have caramelised slightly into a concentrated flavour paste
- The oil has absorbed all the fat-soluble flavour compounds from the spices added at this stage
- The masala is ready to receive the chicken
Never add the keema before seeing clear oil separation. If you add it too early, the residual tomato moisture will cause the chicken to steam rather than fry into the masala — producing a wetter, less flavourful curry.
Ingredients for Chicken Keema Curry (Serves 4)
The Protein
- 500g (1 lb 2 oz) minced chicken — chicken mince/ground chicken; ideally from thigh meat for better flavour and moisture retention, though breast mince works; choose freshly minced rather than frozen for the best texture
The Masala Base
- 2 tablespoons oil — neutral oil such as sunflower, rapeseed, or avocado; ghee adds extraordinary depth and is the traditional choice
- 1 large onion (about 1 cup), very finely diced — the finer the dice, the more evenly it caramelises and the smoother the finished masala; a food processor to pulse the onion saves time
- 1 tablespoon fresh ginger, finely grated or pounded to paste
- 1 tablespoon fresh garlic (5-6 cloves), minced or pounded to paste; fresh ginger-garlic paste is dramatically better than jarred
- 2 medium ripe tomatoes, very finely chopped — or ½ cup passata for a smoother sauce
The Spice Blend
- 1 teaspoon Kashmiri red chili powder — for deep colour and mild heat; adjust to preference
- 1 teaspoon ground coriander (dhaniya powder)
- ½ teaspoon ground cumin (jeera powder)
- ½ teaspoon ground turmeric (haldi)
- 1 teaspoon garam masala — added at the end of cooking for maximum fragrance; pre-mixed or homemade
- Salt to taste
For the Fresh Ingredients
- ½ cup fresh or frozen peas (optional, for keema matar — see variations)
- ½ cup water — to adjust consistency
- 2 tablespoons fresh coriander (cilantro), finely chopped — for garnish and freshness
- 1 teaspoon lemon or lime juice — for brightness at the end
Optional Additions
- 1 teaspoon kasuri methi (dried fenugreek leaves) — adds a distinctive herbal depth associated with restaurant keema
- 2 tablespoons yogurt — added with the tomatoes for a slightly creamier masala
- 1 green chili, finely sliced — for fresh heat
The Key Ingredient Decisions
Chicken Thigh Mince vs Breast Mince
This distinction genuinely matters for the finished dish:
| Thigh Mince | Breast Mince | |
|---|---|---|
| Fat content | Higher (~10-12%) | Lower (~3-4%) |
| Flavour | Richer, more pronounced | Lighter, milder |
| Texture after cooking | Moist, tender | Can dry slightly if overcooked |
| Protein | ~19g/100g | ~23g/100g |
| Best for | Everyday, most flavourful | Lower calorie, high protein |
For maximum flavour: thigh mince. For maximum protein at minimum calories: breast mince with careful cooking (do not exceed medium-well doneness).
The Garam Masala Question
Adding garam masala at the start vs the end of cooking produces genuinely different results:
- Added at the start (with other spices): The garam masala’s aromatic compounds bloom into the oil and distribute through the masala during the long cooking process. Produces a more integrated, background warmth.
- Added at the end (last 2 minutes): The aromatics bloom in the residual heat and stay more vibrant and distinct. This technique preserves the fragrance of the garam masala in a way that long cooking destroys.
This recipe adds garam masala at the end — and specifically recommends stirring in kasuri methi at the same stage — because the freshness of these finishing aromatics is what makes the difference between a good keema and a genuinely memorable one.
Step-by-Step: How to Make Chicken Keema Curry
Step 1 — Cook the Onions to Deep Golden (12 minutes)
Heat the oil in a wide, heavy-bottomed pan or kadai over medium-high heat. Once the oil shimmers, add the finely diced onion. Stir to coat with oil.
Cook, stirring every 1-2 minutes, for 10-12 minutes. The onions will go through several stages: transparent, then pale gold, then medium golden. You want deep golden — when you press a piece between your fingers, it feels soft and almost melted, and the colour throughout is a warm amber. Pale onions at this stage produce a flat-tasting masala. Deep golden onions produce a sweet, complex, properly built base.
If the onions begin to stick or darken too quickly, reduce heat to medium and add 1-2 tablespoons of water to deglaze the pan — scrape the brown bits from the bottom and stir them back into the onions. These brown bits contain concentrated flavour compounds.
Step 2 — Add Ginger and Garlic (2 minutes)
Add the minced ginger and garlic (or ginger-garlic paste) directly to the golden onions. Stir continuously for exactly 2 minutes — do not pause and do not leave the pan unattended. The ginger-garlic should turn from pale and raw-smelling to a slightly darker colour with a cooked, sweeter aroma. If it threatens to stick, add a splash of water.
Step 3 — Add Tomatoes and Spices — Cook to Oil Separation (7 minutes)
Add the finely chopped tomatoes to the pan. Stir thoroughly to combine with the onion-ginger-garlic base.
Add the Kashmiri red chili powder, ground coriander, ground cumin, and turmeric directly to the wet tomato mixture. Stir to incorporate fully.
Cook over medium heat for 6-8 minutes, stirring every 1-2 minutes, until the tomatoes have completely broken down — no visible chunks — and the mixture has darkened from its raw tomato colour to a deeper, russet-red paste. Most importantly: cook until you see clear oil separating at the sides of the pan and pooling at the top of the masala mixture. This oil separation is the signal the masala is ready. Do not proceed until you see it.
Step 4 — Add the Chicken Mince (10-12 minutes)
Add the minced chicken to the masala. Break it apart immediately with a spatula or wooden spoon — press and fold the mince through the masala, breaking any large chunks into smaller, more uniform pieces.
Cook over medium-high heat, stirring and breaking the mince continuously, for 3-4 minutes until the chicken has changed colour from raw pink to white throughout.
Reduce heat to medium. Add ½ cup of water, stir to combine, and cover the pan loosely. Cook for 5-6 more minutes, stirring once or twice, until the chicken is completely cooked through and the curry has reached your preferred consistency.
Consistency check: Chicken keema curry can range from relatively dry (with very little sauce) to medium-thick (with a coating sauce around each grain of mince). The traditional North Indian version is semi-dry to medium. If you prefer more sauce, add additional water in 2-tablespoon increments until the texture suits you.
Step 5 — Add the Finishing Elements
Turn heat to low. Add the garam masala and kasuri methi (if using). Stir through and cook for 1-2 minutes — the residual heat is sufficient to bloom these fragrant ingredients without destroying their volatile aromatics.
Taste and adjust salt. Add the lemon or lime juice and stir through. The acid brightens the entire dish in a way that no amount of extra seasoning can replicate.
Garnish with freshly chopped coriander immediately before serving.
4 Variations That Transform the Recipe
Variation 1 — Keema Matar (Minced Chicken with Peas)
Add ½ cup of fresh or frozen green peas in Step 4 alongside the chicken mince. The peas require exactly the same cooking time as the chicken keema, so they are added simultaneously and cook together. The natural sweetness of the peas balances the savoury, spiced mince and creates the most popular everyday keema variation in North Indian cooking.
Variation 2 — Keema with Potatoes (Keema Aloo)
Add 1 medium potato, peeled and cut into 1-cm cubes, to the pan after the oil separation in Step 3. Cook for 5 minutes before adding the chicken mince — potatoes need a longer cooking window than the mince. Increase the water by 2-3 tablespoons and the cooking time by 5 minutes. The starchy potato absorbs the masala deeply and makes the dish more substantial.
Variation 3 — Creamy Restaurant-Style Keema
After Step 4, stir in 3 tablespoons of plain yogurt (room temperature to prevent curdling — cold yogurt directly into hot curry causes separation) and 2 tablespoons of cream or cashew paste. This transforms the semi-dry keema into a richer, more opulent restaurant-style version. Finish with a pinch of sugar to balance the cream’s richness.
Variation 4 — Low-Fat Chicken Keema
Use 1 teaspoon of oil (not 2 tablespoons) — just enough to sauté the aromatics without allowing them to stick. Use breast mince rather than thigh. Reduce garam masala by half. Skip the cream entirely. Add an extra tablespoon of fresh coriander for freshness. At this modification level, the calorie count drops to approximately 190 kcal per serving at 28g protein — exceptional macros for a curry this flavourful.
What to Serve With Chicken Keema Curry
The versatility of chicken keema as a curry base is one of its defining advantages:
Classic Indian accompaniments:
- Steamed basmati rice — the simplest and most elegant pairing; the separate grains absorb the keema masala beautifully
- Jeera rice — cumin-scented rice that adds another aromatic dimension
- Plain roti or chapati — for the most everyday, authentic serving style; use the roti to scoop the keema
- Naan — for a restaurant-style experience; tear and use to scoop the keema
- Paratha — particularly good with the semi-dry version
For a full meal:
- Cucumber raita — cooling, essential balance to the spiced keema
- Sliced raw onion with lime juice and chaat masala
- Mixed vegetable salad — kachumber (cucumber, tomato, onion, lime)
- Mango or lime pickle
Fusion uses:
- Stuffed into a toasted bun for a keema burger
- Used as a filling for stuffed parathas (keema paratha)
- Wrapped in a flatbread with raita and salad for a keema wrap
- Spooned over baked potato with yogurt and coriander
- Used as a topping for naan pizza with mozzarella
Nutrition Information (Per Serving — 1 of 4, Thigh Mince)
| Nutrient | Amount | Notes |
|---|---|---|
| Calories | 265-310 kcal | Based on 500g thigh mince with 2 tbsp oil |
| Protein | 27-30g | Excellent high-protein main |
| Fat | 14-18g | Primarily from chicken thigh fat and oil |
| Saturated Fat | 4-5g | |
| Carbohydrates | 8-10g | From onion and tomato |
| Fiber | 2g | |
| Sodium | ~480mg | Varies with salt added |
| Iron | 2.5mg | ~14% daily value |
| Vitamin A | 800 IU | From tomato and turmeric |
| Vitamin C | 18mg | From tomato |
The protein density of this dish — 27-30g per serving from 500g mince divided into four portions — makes it an exceptional protein source for a curry. Using breast mince increases protein further to approximately 32-35g while reducing calories to 210-240 kcal. The low carbohydrate content also makes this suitable for low-carb and diabetic-friendly eating patterns.
Expert Tips for Perfect Chicken Keema Every Time
Do not rush the onion step. The quality of your masala is determined by how golden your onions become before the next ingredients are added. An extra 3 minutes on the onions is never wasted time in an Indian curry.
Add the spice powders into the wet tomatoes, not into the oil directly. Spice powders added directly to hot oil burn almost instantly. Adding them to the wet tomato mixture allows them to bloom and temper more gently, avoiding the bitter, scorched flavour of overheated spices.
Wait for oil separation before adding mince. This is the single most important visual cue in the recipe. Oil separation = masala is cooked through and ready. No separation = the masala is still raw and will produce an underdeveloped curry.
Break the mince continuously as it cooks. Large chunks of mince that cook together create dense, unpleasant textures in the finished curry. Use the back of your spoon or spatula to break and separate the mince constantly during the first 3-4 minutes of cooking.
Finish with lemon juice and fresh coriander. These two finishing elements are not garnish — they are flavour. The acid from the lemon brightens the entire dish. The fresh coriander adds a green, herbal note that dried spices cannot provide. Both should go in in the last 60 seconds of cooking.
Taste before serving, always. Seasoning adjustments made in the last 2 minutes of cooking are incorporated into the dish far better than adjustments made at the table.
Frequently Asked Questions
Q1. Can I use ground turkey instead of minced chicken for this recipe?
Yes — ground turkey is an excellent substitute that requires no changes to the recipe technique or timing. Turkey mince has a similar fat content and protein profile to chicken breast mince and produces a very good keema. The flavour is slightly milder than chicken mince but the masala’s spices more than compensate. For best results, use dark meat turkey mince (thigh) rather than breast-only turkey mince, which can be slightly drier.
Q2. Can I make chicken keema curry in advance?
Yes — and it actually improves overnight as the flavours meld and deepen. Cook the keema completely, cool, and refrigerate in an airtight container for up to 3 days. Reheat over low-medium heat with 2-3 tablespoons of added water (the curry thickens significantly in the refrigerator). Chicken keema also freezes excellently for up to 2 months — cool fully, portion, and freeze in sealed bags or containers. Thaw in the refrigerator overnight.
Q3. Why did my keema come out watery?
Watery keema typically results from one of three causes: the masala did not reach oil separation before the mince was added (residual tomato moisture then cooks out into the keema rather than evaporating properly); the pan was too small or crowded, which caused steaming rather than frying; or too much water was added when adjusting consistency. If your keema is too watery, simply remove the lid and cook on medium-high heat for 3-5 minutes uncovered, stirring frequently — the excess moisture will evaporate rapidly.
Q4. What is the difference between keema curry and keema bhurji?
Keema curry has a distinct masala sauce — the spiced onion-tomato base that coats the mince and forms the recognisable curry character. Keema bhurji is a drier preparation, closer to a scramble or stir-fry, where the mince is cooked more directly with the aromatics without building a sauce around it — more like a spiced mince sauté than a curry. Keema bhurji is faster but less versatile; keema curry is what you serve with rice or bread when the dish is intended as the main.
Q5. How do I make keema curry less spicy for children?
Omit or significantly reduce the Kashmiri chili powder (or replace with sweet paprika — which provides colour without any heat). Skip the green chili entirely. Keep all the other spices as written — coriander, cumin, turmeric, and garam masala provide warmth and depth without heat. Adding a tablespoon of plain yogurt stirred into the finished keema also cools the overall spice perception. The result is a mildly spiced, aromatic keema that is genuinely enjoyable for children and adults who prefer less heat.
Thirty Minutes to Your New Favourite Weeknight Curry
Chicken Keema Curry earns its place in the permanent weekly rotation not through complexity or drama but through consistent delivery. Every time you make it, the golden onion masala behaves the same way, the mince absorbs the spices the same way, and the finished dish hits every note — savoury, warming, aromatic, deeply satisfying — in exactly the way you were hoping it would.
That reliability is what makes a weeknight recipe worth returning to. When you know a dish will succeed, you make it again. When you make it again, the technique becomes second nature. And then it stops being a recipe you follow and becomes something you simply cook — with the confidence that only repetition produces.
Try this recipe and share your results in the comments below! Tell us whether you used thigh or breast mince, which variation you tried (keema matar is especially worth making), and what your household served it with. And if this became your go-to 30-minute curry — which it likely will — we would genuinely love to hear that.
Pairs perfectly with: Steamed Basmati Rice | Plain Roti | Garlic Naan | Jeera Rice | Cucumber Raita | Kachumber Salad
Also explore: Butter Chicken | Chicken Biryani | Aloo Gobi | Dal Makhani | Chana Masala