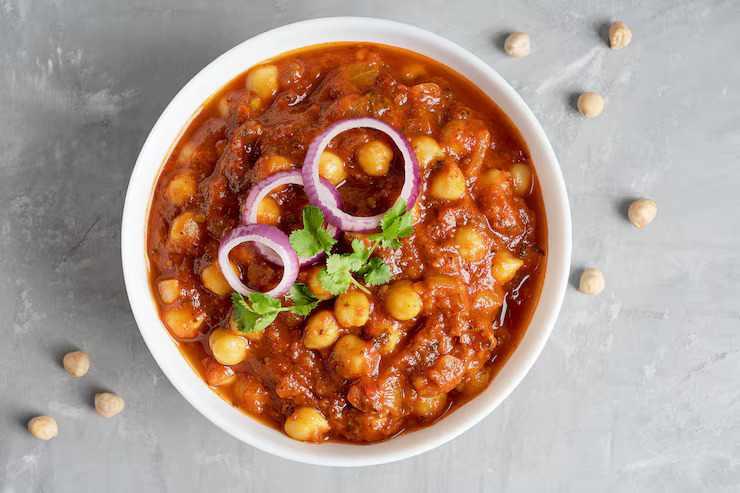
There are curries you make when you have time, and then there’s Chana Masala — the one you make when you want something deeply satisfying without spending half your day in the kitchen.
It’s bold. It’s unapologetically spiced. It smells like every good North Indian meal you’ve ever had. And unlike many restaurant-style dishes that require a long list of specialty ingredients or complex techniques, Chana Masala is genuinely approachable for home cooks at every skill level.
This recipe centers on a technique that makes all the difference: building a deeply flavored onion-tomato masala paste from scratch, with fennel and black pepper ground right in. That paste becomes the soul of the curry — the reason the gravy clings to every chickpea rather than sitting separately around it.
Whether you’re pairing it with crispy poori at Sunday breakfast, soft butter roti on a weeknight, or the puffed glory of bhatura for a special occasion, this Chana Masala recipe delivers every time. Here’s everything you need to know.
What Is Chana Masala?
Chana Masala — also written as Chole Masala — is one of the most beloved chickpea dishes in Indian cooking. It belongs to the North Indian culinary tradition, with its strongest roots in Punjab and Delhi’s street food culture, but it has traveled far beyond those borders. You’ll find versions of it in homes and restaurants across the entire country, and increasingly around the world.
The dish is built on three foundational elements:
- Kabuli chana (white chickpeas), soaked and pressure-cooked until perfectly tender
- A ground masala paste made from sautéed onions, tomatoes, ginger, garlic, fennel seeds, and pepper
- Whole spice tempering — cinnamon, cloves, and bay leaf bloomed in hot oil to create an aromatic base
What makes Chana Masala different from a basic chickpea curry is this layering of flavor. The masala paste is cooked separately, the tempering builds the base, and the chickpeas finish cooking together with the masala under pressure — allowing the spices to fully penetrate the chickpeas rather than just coating them on the outside.
Chana Masala vs. Chole: Are They the Same?
The terms are often used interchangeably, but there are subtle differences worth knowing:
| Feature | Chana Masala | Chole (for Chole Bhature) |
|---|---|---|
| Spice level | Medium to bold | Spicier, more robust |
| Souring agent | Lemon juice / tomatoes | Amchur (dry mango powder) |
| Gravy texture | Medium to thick | Thick, semi-dry |
| Best paired with | Roti, rice, poori | Bhatura, kulcha |
| Sweetness notes | Subtle, from fennel | Minimal |
Think of Chole as the bolder, street food cousin of Chana Masala. Both are fantastic — this recipe sits in the Chana Masala camp: well-spiced, flavorful, and versatile enough to pair with almost anything.
Why You’ll Love This Recipe
- Ready in 40 minutes from start to finish (after soaking)
- Naturally vegan and gluten-free — no dairy, no wheat
- Nutritionally outstanding — chickpeas are among the most protein- and fiber-dense foods available
- The masala paste technique ensures flavors penetrate the chickpeas, not just coat them
- Works with any Indian bread — roti, naan, poori, paratha, bhatura
- Stores and reheats beautifully — often tastes better the next day
Ingredients for Chana Masala (Serves 3–4)
For the Chickpeas
- ¾ cup dried white chickpeas (kabuli chana), soaked overnight
- 1.5 cups water for pressure cooking
- Salt to taste
For the Masala Paste (Sauté and Grind)
- 2 teaspoons oil
- 3 medium tomatoes, roughly chopped
- 1 medium onion, roughly chopped
- 1-inch piece of fresh ginger
- 6 garlic cloves
- 1 teaspoon fennel seeds (saunf)
- ½ teaspoon black peppercorns
For the Curry Base
- 1 small onion, finely chopped
- 1½ teaspoons red chili powder (adjust to taste)
- ¾ teaspoon coriander powder
- 1 teaspoon garam masala powder (or chana masala powder)
- Salt to taste
- 2.5 cups water in total (split across the cooking stages)
- Juice of half a lemon
- Fresh coriander leaves for garnish
For the Tempering
- 1.5 tablespoons oil
- ½-inch piece cinnamon
- 2 cloves
- ½ bay leaf
The Star Ingredient: Why Fennel Seeds Make This Recipe Special
Most Chana Masala recipes stop at the usual suspects — ginger, garlic, onion, tomato. This recipe goes one step further by grinding fennel seeds and black pepper directly into the masala paste.
Fennel seeds bring a faint, natural sweetness and an anise-like warmth that rounds out the sharpness of the tomatoes and the heat of the chili. Black pepper adds a deep, lingering heat that is different from the front-of-mouth burn of red chili — it builds slowly and adds complexity.
Together, these two ingredients are what give this Chana Masala its distinct, restaurant-quality depth. Don’t skip them.
Step-by-Step: How to Make Chana Masala
Step 1 — Soak and Pressure Cook the Chickpeas
The overnight soak is essential. Rinse ¾ cup of dried white chickpeas several times, then cover generously with cold water and soak for at least 8 hours — overnight is ideal. The chickpeas will swell to nearly double their dry size. This is what you want.
After soaking, drain and rinse them again. Transfer to a pressure cooker with 1.5 cups of fresh water. Pressure cook on medium heat for 5 whistles, then allow the pressure to release naturally. The chickpeas should be completely soft — press one between your fingers and it should crush with almost no resistance. Drain but save the cooking water — you’ll use it in the curry.
Instant Pot: Cook on High Pressure for 40–45 minutes with natural pressure release. Stovetop pot: Simmer for 60–90 minutes, keeping water topped up, until completely tender.
Step 2 — Build the Masala Paste
This is the step that separates a flat chickpea curry from an extraordinary one.
Heat 2 teaspoons of oil in a pan over medium heat. Add the roughly chopped onion, tomatoes, ginger, and garlic. Sauté, stirring regularly, until the tomatoes completely break down, the onions turn soft, and the raw smell disappears — about 8–10 minutes. The mixture should look glossy and slightly jammy.
Take the pan off the heat and let the mixture cool to room temperature. Transfer to a blender and add the fennel seeds and black peppercorns. Blend everything together into a completely smooth, fine paste. No water is needed — the tomatoes provide enough moisture.
Set the paste aside. This is the flavor engine of your curry.
Pro tip: For the smoothest possible paste, blend in two stages — first pulse a few times to break everything down, then blend continuously for 60–90 seconds. A grainy paste leads to a grainy gravy.
Step 3 — Build the Curry
In a pressure cooker (you’ll be using it again), heat 1.5 tablespoons of oil over medium heat. Add the tempering ingredients — cinnamon, cloves, and bay leaf. Let them sizzle in the oil for 60 seconds until deeply fragrant. This step blooms the essential oils in the whole spices and infuses the cooking oil itself with their aroma.
Add the finely chopped onion and fry, stirring frequently, until it turns a deep golden brown. This takes 7–9 minutes and requires patience — you need the onions to caramelize properly. Golden-brown fried onions add sweetness and body to the curry that translucent, undercooked onions simply cannot provide.
Now pour in the prepared masala paste and stir it into the golden onions. Cook the paste over medium heat for 5–7 minutes, stirring continuously, until it darkens slightly, thickens, and the oil begins to separate at the edges. This is the crucial oil-separation point — it signals that the raw taste of the tomatoes and spices has fully cooked out.
Step 4 — Add the Spices
Add the red chili powder, coriander powder, and garam masala (or chana masala powder) directly to the cooked paste. Stir immediately and thoroughly. Cook for 1–2 minutes until the spice powders are completely absorbed and you can smell them bloom into the masala. Add salt at this stage.
On chana masala powder vs. garam masala: Chana masala powder (brands like MDH or Everest) has a more complex, slightly sour spice blend specifically designed for chickpea curries. It gives a distinctly restaurant-style flavor. Homemade garam masala produces a cleaner, more customizable result. Both are excellent — choose based on what you have and the flavor profile you prefer.
Step 5 — Combine and Pressure Cook Together
Add the cooked chickpeas to the masala along with the reserved chickpea cooking water — start with about 1 cup. Stir everything together so the masala thoroughly coats every chickpea.
Seal the pressure cooker and cook for 1 whistle on medium heat. This final short pressure cook does something special: it drives the masala flavor deep into the chickpeas rather than letting it sit on the surface. The chickpeas absorb the spices, the gravy gets body from the chickpea starch, and everything comes together into a unified, cohesive curry.
Step 6 — Finish and Adjust
Open the cooker once the pressure releases naturally. Assess the consistency. If the gravy is very thick, add the remaining water (up to 1 cup) and simmer uncovered over low heat for 4–5 minutes until the oil separates again and the curry reaches your preferred consistency.
Taste and adjust salt. Squeeze in the juice of half a lemon — this brightens the entire dish and balances the richness of the spices. Garnish generously with fresh coriander leaves.
Serve hot.
How to Thicken Chana Masala Naturally (Without Cornflour)
Home cooks often wonder how to get that thick, restaurant-style gravy without adding thickeners. Here are four natural methods:
- Mash some chickpeas: Use the back of a spoon to press 8–10 chickpeas against the side of the pot. The starchy mash dissolves into the gravy and thickens it naturally.
- Longer simmering: Simmer uncovered on low heat for an extra 5–10 minutes. The water evaporates and the gravy concentrates.
- Reduce water: Use less water in the final cooking stage and add more only if needed.
- Blend part of the curry: Scoop out ¼ of the chickpeas with some gravy, blend until smooth, and stir back in. This is what many restaurants do.
What to Serve with Chana Masala
The beauty of this curry is its versatility. It works across a wide range of serving occasions:
For breakfast or brunch:
- Crispy poori — the most traditional and indulgent pairing
- Bread slices — quick, easy, and surprisingly good
For lunch or dinner:
- Soft phulka / chapati — the everyday classic
- Butter naan or garlic naan — for a more special meal
- Laccha paratha — adds a flaky, layered texture
- Bhatura — for the full Chole Bhature experience
For a complete meal spread:
- Serve alongside a simple raita, pickled onions, sliced cucumber, and a squeeze of lemon
- Works beautifully as part of a larger thali with dal and rice
Nutritional Benefits of Chana Masala
Chickpeas are nutritional overachievers. Here’s what a serving of Chana Masala delivers:
| Nutrient | Per Serving (approx. 100g) |
|---|---|
| Calories | ~280–320 kcal |
| Protein | 15g |
| Dietary Fiber | 23g |
| Carbohydrates | 45g |
| Fat | 8–10g |
| Iron | 4mg (22% DV) |
| Calcium | 224mg (22% DV) |
| Vitamin C | 47mg (57% DV) |
| Potassium | 756mg (22% DV) |
With 15g of plant protein and an extraordinary 23g of fiber per serving, Chana Masala is one of the most nutritionally complete vegetarian meals you can put on the table. It’s filling, it keeps blood sugar stable, and it provides iron, calcium, and potassium in meaningful amounts.
Expert Tips for the Best Chana Masala
Soak long enough. Eight hours is the minimum; overnight is ideal. Under-soaked chickpeas stay firm at the center no matter how long you cook them.
Cook the masala paste until oil separates — twice. Once after adding the paste to the onions, and again after adding the spices. Both oil-separation moments indicate that the raw flavors have cooked out. Rushing either one makes the curry taste undercooked.
Save the chickpea cooking water. It’s starchy and flavorful. Adding it back into the curry instead of plain water adds body to the gravy that you simply can’t replicate otherwise.
Fennel seeds and pepper go in the paste, not the tempering. Grinding them with the onion-tomato mixture distributes their flavor evenly throughout the gravy. Adding them whole to the tempering gives you unpredictable bursts of flavor instead of consistent depth.
The second pressure cook is a game-changer. That single final whistle — chickpeas in the masala under pressure — is what makes the spices penetrate the chickpeas rather than sitting around them. Don’t skip it.
Lemon juice goes in at the end, not during cooking. Adding it earlier destroys its brightness. Squeeze it on right before serving for maximum impact.
Storage and Make-Ahead Tips
Chana Masala is one of the best make-ahead curries in Indian cooking:
- Refrigerator: Stores well in an airtight container for up to 2 days. The flavors deepen overnight and the next-day version is often better than the freshly made one.
- Reheating: Warm gently on the stovetop over low heat with a splash of water. Stir occasionally to prevent the bottom from catching.
- Freezer: Freezes beautifully for up to 1 month. Thaw overnight in the refrigerator and reheat on the stovetop. Add a little water to loosen the gravy as it will have thickened.
- Meal prep strategy: Make a double or triple batch and freeze in portion-sized containers. On busy nights, you’re 10 minutes away from a full meal — just reheat and make fresh bread.
4 Variations Worth Trying
1. South Indian Style Chana Masala Add a tempering of mustard seeds, curry leaves, and dried red chilies. Use tamarind instead of lemon juice for sourness. Skip fennel and add coconut paste for a completely different, equally delicious character.
2. Instant Pot Chana Masala (No Soak) Rinse dried chickpeas without soaking and cook directly in the Instant Pot on High Pressure for 50 minutes. Add the masala paste and spices, then cook for another 10 minutes. Total time from dry chickpeas to finished curry: about 75 minutes.
3. Restaurant-Style Dark Chole For the deep, almost chocolate-colored gravy you get at premium Punjabi restaurants, add 1 teaspoon of strong black tea water (brew one teabag in ½ cup water) along with the chickpea cooking water. It deepens the color dramatically without affecting flavor.
4. Light and Quick Weeknight Version Use canned chickpeas (2 x 400g cans, drained and rinsed). Skip the soaking and first pressure cook entirely. Make the masala paste, build the curry, add chickpeas, and simmer uncovered for 15 minutes. On the table in under 30 minutes.
Frequently Asked Questions
Q1. Can I make Chana Masala without a pressure cooker?
Absolutely. Soak the chickpeas for at least 8 hours, then simmer in a deep pot with plenty of water for 60–90 minutes until completely tender. For the final cooking stage, add the chickpeas to the masala in the pot, cover, and simmer over low heat for 15–20 minutes instead of pressure cooking. The result is equally delicious, just takes longer.
Q2. Why is my Chana Masala gravy thin and watery?
The most common reasons are adding too much water, not cooking the masala paste long enough, or not simmering uncovered at the end. To fix a thin gravy: simmer uncovered over medium-low heat until it reduces, mash a handful of chickpeas into the gravy, or blend a portion of the curry and stir it back in.
Q3. Can I use canned chickpeas instead of dried?
Yes — two 400-gram cans of chickpeas (drained and rinsed) replace ¾ cup dried. Skip the soaking and first pressure cooking steps entirely. Add the canned chickpeas when the recipe calls for adding cooked chickpeas, skip the second pressure cook, and instead simmer covered for 10–15 minutes. The gravy will be slightly less starchy and rich compared to the dried version, but still very good.
Q4. How do I make Chana Masala less spicy?
Reduce the red chili powder to ½ teaspoon and use Kashmiri red chili powder instead of regular — it gives color without intense heat. Skip the extra green chilies if your recipe includes them, and add a teaspoon of sugar to balance the spice level. A tablespoon of cream or coconut milk stirred in at the end also softens the heat beautifully.
Q5. What is the difference between Chana Masala powder and Garam Masala?
Garam masala is a general warming spice blend — typically cinnamon, cardamom, cloves, black pepper, and cumin. Chana masala powder is a more complex blend specifically developed for chickpea curries, often including dried mango powder (amchur), pomegranate seeds, and other souring agents that give the curry a more tangy, robust flavor. Both work well in this recipe; chana masala powder gives a more distinctly restaurant-style result.
Time to Make This Your Go-To Chickpea Curry
Chana Masala earns its place as a staple for good reason. It’s fast enough for weeknights, impressive enough for guests, nutritious enough to feel good about, and flexible enough to pair with almost any Indian bread or rice. The sauté-and-grind masala paste technique takes an extra 10 minutes but delivers a depth of flavor that shortcuts simply cannot match.
Make it once this week — with poori for a celebratory breakfast, or with roti for a simple, satisfying dinner. Once it’s in your regular rotation, you’ll wonder how you ever made chickpea curry without that fennel-and-pepper masala paste.
Tried this recipe? Leave a comment below and let us know how it turned out! Share your serving ideas, your spice adjustments, or your family’s verdict — we love hearing from you. And if you found this guide helpful, share it with a fellow home cook who needs a great chickpea curry recipe in their life.
Pairs perfectly with: Crispy Poori | Butter Naan | Laccha Paratha | Steamed Basmati Rice | Pickled Onions | Cold Lassi