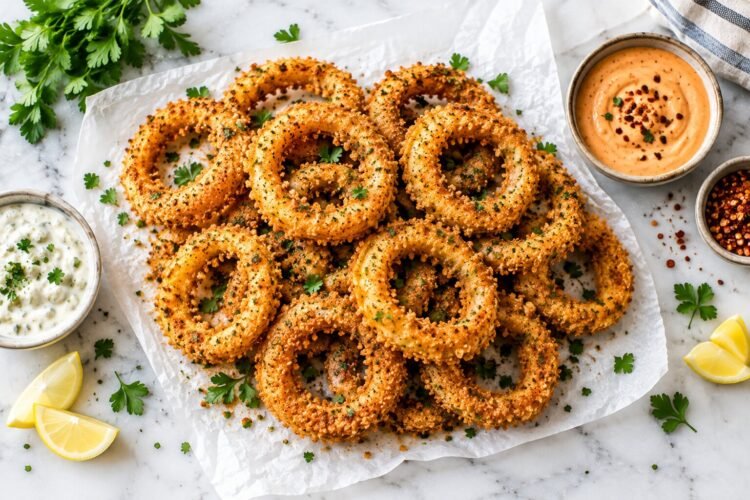
There is a reason onion rings appear on every American diner and burger restaurant menu without exception. When they are made correctly — a sweet, slightly caramelised onion interior enclosed in a shattering, golden-brown crust — they are one of those foods where the experience dramatically exceeds the sum of the parts.
The problem, historically, has been making them at home. Deep frying at home means a pot of oil that needs to be heated, held at temperature, monitored, and then cooled and disposed of. It means a kitchen that smells of frying for hours. It means the cleanup situation that follows any deep-frying session. And despite all that effort, home deep-fried onion rings frequently disappoint — uneven oil temperature producing some rings that are greasy and pale while others are over-browned and crisp.
Air Fryer Onion Rings solve every single one of those problems.
The air fryer’s circulating hot air produces genuinely, impressively crispy panko-crusted rings at 370°F without any oil beyond a drizzle over the coated rings before cooking. The process is a three-step dredge — flour, egg, seasoned panko — that any home cook can execute cleanly and confidently. Total time from cutting board to table: 25 minutes. Total cleanup: a few bowls and the air fryer basket.
One reader who has been making this recipe repeatedly described finding no need to reference the recipe anymore after a few sessions — it becomes that automatic. Another, who is gluten-free and had never eaten an onion ring before trying this recipe with a gluten-free flour substitute, described the result as “heaven.” These are the responses a recipe earns through consistent, genuine quality rather than novelty.
This guide covers every detail — the onion choice, the three-station dredge system explained properly, the temperature and timing, the batch management technique that means everyone eats hot rings, the full variations, and the dipping sauces that elevate the experience.
Why the Air Fryer Makes Better Onion Rings Than a Pan of Oil
This requires some pushback on the instinct that deep-frying is inherently superior to air frying for anything that needs a crust. For most foods, that instinct has some validity. For onion rings specifically, air frying has meaningful advantages.
The Fat Absorption Problem in Deep-Frying
When food is submerged in oil, several things happen simultaneously. The surface moisture of the food evaporates rapidly, creating bubbles. As those bubbles escape, they leave behind a pressure difference that draws oil inward. For a thick batter coating (like classic American onion ring batter), this oil absorption is unavoidable — it is part of the texture.
For a panko breadcrumb coating, which has far more air pockets and surface area, the oil absorption during deep frying can be even more significant — producing rings that are crispy but noticeably oily, with a heavy, slightly greasy aftertaste.
Air-fried panko onion rings absorb almost no oil beyond the light drizzle applied before cooking. The circulating heat crisps the panko through dehydration rather than oil immersion, producing a crunch that is genuinely lighter — crispy without greasy.
The Control Advantage
Deep-frying requires constant attention to oil temperature. Too cold and the rings absorb oil and become soggy; too hot and the coating burns before the onion inside softens. For a home cook without a deep-fry thermometer and experience reading oil temperature by feel, this control is difficult.
The air fryer operates at a fixed, consistent temperature with no management required. Set to 370°F, start the timer, and come back to golden onion rings without any monitoring in between.
The Reader Feedback Tells the Story
Over 60 ratings, the most common language used to describe these onion rings includes “easy,” “crispy,” “non-greasy,” and “delicious.” One reader described them as so reliably good that they have “never bought frozen rings again.” These are not the words people use for a compromise cooking method — they are the words they use when something works.
The Best Onion for Onion Rings
The recipe specifies one large yellow onion — and this choice is specific and worth explaining.
Yellow Onion: The Right Balance
Yellow onions have a natural sulphur compound content and sugar balance that produces the ideal onion ring experience. When raw, they are pungently sharp. When cooked inside their coating at 370°F for 8-11 minutes, those sulphur compounds convert and the natural sugars caramelise slightly — producing an interior that is tender, sweet, and mellowed from the raw sharpness into something that contrasts beautifully with the savoury, seasoned panko exterior.
The yellow onion also has a cell structure robust enough to maintain its shape through the three-dredge process without falling apart — which is critical for coating each ring cleanly.
Other Onion Types: When to Use Them
White onion: Slightly sharper and more pungent than yellow. The rings will have more pronounced onion bite in the finished product. Works well; choose this if you want more aggressive onion flavour.
Sweet onion (Vidalia, Walla Walla): Significantly sweeter and milder than yellow. The finished rings will have a more delicate, almost candy-like interior sweetness. Excellent choice for anyone who finds yellow onion too assertive. The confirmed recipe developer response to the reader question “Can I use other onions?” was a direct yes.
Red onion: Produces a slightly more bitter interior with a distinctive purple hue visible where the onion contacts the coating. Milder raw than yellow but with a more complex, slightly earthier cooked flavour. A perfectly valid choice for visual variety or flavour change.
Sweet potato or zucchini rings: The same three-station dredge in this recipe works beautifully with sweet potato rounds or thick zucchini rings, producing vegetables that have the same crispy panko exterior with a softer, sweeter interior. Not onion rings — but using the same technique.
Ingredients (Serves 4 as a snack or side dish)
The Onion
- 1 large yellow onion — sliced into ½-inch thick rounds, rings separated
The Three-Station Dredge
Station 1 — Flour
- ½ cup all-purpose flour — creates the dry base layer that gives the egg wash something to cling to; without it, the egg slides off the onion’s naturally smooth surface
Station 2 — Egg Wash
- 2 large eggs — beaten until smooth and uniform with no streaks of white
Station 3 — Seasoned Panko
- 1¼ cups panko breadcrumbs — panko’s larger, airier flakes crisp more dramatically than regular fine breadcrumbs
- ½ teaspoon garlic powder — adds savoury, allium depth
- ½ teaspoon onion powder — amplifies the onion character of the rings themselves
- ½ teaspoon sea salt — balances and brightens all other flavours
For Cooking
- Extra-virgin olive oil — drizzled generously over the coated rings before air frying; this is what enables the panko to brown and crisp rather than staying pale
For Serving
- Dipping sauce of choice — see full guide below
Understanding the Three-Station Dredge System
This is the fundamental technique in the recipe, and understanding why each station exists makes the whole process clearer and more reliable.
Why Three Stations?
Each station serves a specific, irreplaceable function in building the coating:
Flour (Station 1): Onion rings have naturally smooth, moist surfaces. Panko placed directly on an onion ring will not adhere — it has nothing to grip. Flour provides that grip: it adheres to the onion’s moisture, creates a slightly rough, dry surface, and gives the egg something to bind to.
Egg (Station 2): Egg acts as the adhesive between the flour-coated onion and the panko coating. Its protein content, when heated, forms bonds with both the flour beneath and the panko above — creating a cohesive, layered coating rather than separate components that fall off the ring.
Seasoned Panko (Station 3): The final coating that determines texture and flavour. Panko’s large, irregular flake size means each piece creates its own tiny pocket of air when it crisps — these air pockets are what produce the shattering crunch that makes great onion rings distinctive. The seasoning at this station ensures flavour through every bite of the coating, not just on the onion itself.
The Coating Rest Technique (Reader-Discovered Improvement)
One reader who makes this recipe frequently shared a technique that genuinely improves coating adhesion: after completing the dredging process, letting the coated rings rest at room temperature for 5-10 minutes before air frying. During this rest, the egg layer begins to partially set and dry slightly against the panko, creating a stronger mechanical bond before heat is applied. The result is a coating that stays on more consistently during cooking and eating.
This technique — resting breaded food before cooking — is the same principle behind letting schnitzel or fried chicken rest after breading. It works.
Step-by-Step: How to Make Air Fryer Onion Rings
Step 1 — Prep the Onion
Peel the onion and slice into ½-inch rounds — use a sharp knife and a cutting board, cutting in even, confident strokes rather than sawing. Consistent ½-inch thickness means all rings cook evenly.
Separate each round into individual rings by pressing the centre layers out from the outer rings. Set aside the very small inner rings — they are too small to coat cleanly and will either be skipped or saved for another use (they are excellent sautéed with garlic for pasta or a topping for burgers).
Step 2 — Set Up the Three Stations
Arrange your three stations in sequence on the counter, with a large clean plate at the end for the coated rings:
Left: A shallow bowl or dish with the ½ cup of flour
Centre: A small bowl with the 2 beaten eggs
Right: A rimmed tray or shallow dish with the panko, garlic powder, onion powder, and sea salt thoroughly mixed
The rimmed tray for the panko is better than a bowl — the lower sides allow more efficient pressing of the rings into the crumbs.
Step 3 — Preheat the Air Fryer
Set the air fryer to 370°F (188°C) and preheat for 4-5 minutes. A genuine preheat ensures the rings enter an already-hot environment and begin crisping immediately — cold-start cooking delays the browning phase and can result in less crispy coating.
Step 4 — Dredge Each Ring
Working one ring at a time through the three stations:
- Dip the ring in flour. Tap firmly against the side of the bowl to shake off excess — too much flour creates a thick, pasty layer that dulls the crunch
- Transfer immediately to the egg. Turn to coat all surfaces. Lift and let excess drip off for 2-3 seconds
- Press into the seasoned panko firmly on both faces and around the outer edge. Use the dry hand from the previous station or a fork to flip and press the other side. The coating should be thorough — no visible bare onion
Place completed rings on the clean plate. After all rings are coated, drizzle with olive oil and toss gently to distribute — every surface should receive some oil.
The one-hand, two-hand method: Designate one hand for wet stations (egg) and one for dry stations (flour and panko). This prevents the common problem of coating your fingers in alternating layers of flour, egg, and panko, which eventually clumps and falls into the bowls.
Step 5 — Air Fry in Batches
Place the oiled, coated rings in the preheated air fryer basket in a single layer with space between each ring. This spacing is non-negotiable — rings touching each other will steam at the contact points rather than crisping. Work in batches of whatever quantity fits your basket size comfortably in a single layer.
Air fry at 370°F for 8-11 minutes until golden brown and crisp. The timing range accounts for differences between air fryer models — check at 8 minutes on your first batch to calibrate for your specific appliance.
Step 6 — The Warm-All-Batches-Together Trick
Once all batches are cooked, pile all the rings together in the basket (no need for single layer now — they are already cooked). Air fry at 370°F for 1-2 minutes. This simultaneously re-heats any rings that have cooled from the first batch, tightens any slightly-soft coating from sitting, and ensures every ring is served hot and crispy at the same time.
Serve immediately from the basket with your chosen dipping sauce.
Gluten-Free Variation
One reader specifically tried this recipe with a gluten-free adaptation and described the results as “fantastic” and “heaven” — and had never eaten an onion ring before due to lifelong gluten avoidance.
For a gluten-free version:
- Replace the all-purpose flour with a 1:1 gluten-free flour blend (Bob’s Red Mill, King Arthur, or any similar blend)
- Replace regular panko with gluten-free panko (available at most major supermarkets)
- Everything else remains identical
The reader used a convection roast setting at 400°F for 11 minutes rather than the 370°F air fryer setting — a good alternative if your air fryer’s minimum temperature is 375°F or if you prefer a slightly more intense heat for gluten-free coatings (which sometimes need marginally more heat to achieve the same crispness as wheat-based coatings).
Dipping Sauces: The Complete Guide
The right sauce elevates onion rings from very good to genuinely memorable. Here are the best options:
Classic American choices:
- Ketchup — the universal default; simple and entirely appropriate
- Mayonnaise — particularly Japanese Kewpie mayo, which has more umami than standard American mayo
- Ranch dressing — the American sports bar pairing; herby, creamy, cooling against the crispy rings
More interesting options:
- Tartar sauce — the recipe’s suggested pairing; the capers and pickles in classic tartar sauce add acidity that contrasts with the sweet onion interior
- Sriracha mayonnaise — 3 tbsp mayo + 1 tbsp sriracha + ½ tsp lemon juice; the mild heat perfectly complements the sweetness of the cooked onion
- Chipotle sauce — mayonnaise base with chipotle in adobo, lime juice, garlic, and smoked paprika; smoky and excellent
- French onion dip — serving a dish that celebrates onion alongside a dip that also celebrates onion is a genuinely good decision
For an elevated presentation:
- Truffle aioli — mayonnaise with a few drops of truffle oil, garlic, and lemon; turns snack rings into something appropriate for a dinner party starter
- Blue cheese dip — particularly good alongside spicier onion rings if you have added cayenne to the panko coating
Spice and Seasoning Variations
The base recipe is clean and crowd-pleasing. These additions change the character completely:
Spicy Onion Rings: Add ¼-½ teaspoon of cayenne pepper to the panko mix. The heat contrast against the sweet onion interior is excellent.
BBQ Style: Add ½ teaspoon of smoked paprika and ¼ teaspoon of brown sugar to the panko mix. Serve with BBQ sauce.
Italian Herb Rings: Replace garlic and onion powder with 1 teaspoon of Italian seasoning blend. Add 2 tablespoons of finely grated parmesan to the panko. Serve with marinara.
Everything Bagel Rings: Replace the garlic and onion powder with 1½ teaspoons of everything bagel seasoning (available at most supermarkets). This variation has a sesame-poppy-garlic-salt character that pairs beautifully with cream cheese dip.
Finer Crumb Version: One reader specifically planned to try a finer breadcrumb on a second session to compare with the standard panko. Using half regular breadcrumbs and half panko produces a denser, less dramatic-looking crust with a more uniform colour — less crunchy but more evenly browned. A valid alternative for those who prefer less visual texture.
Storage and Reheating
The honest assessment: These onion rings are genuinely a serve-immediately food. The panko coating begins softening within 15-20 minutes of cooking as moisture from the cooked onion migrates outward through the crust. Plan to cook and eat in sequence.
Refrigerator storage: Up to 2 days in an airtight container. The rings will be soft — not crispy — after refrigeration.
Reheating: The air fryer is the only method that restores meaningful crispness. Air fry at 375°F for 3-5 minutes. The revived rings will not match freshly made but will be significantly crispier than microwave-reheated.
Do not freeze cooked rings: The texture is damaged irreversibly by freezing — the panko coating and onion interior both change in ways that reheating cannot correct. Cooked onion rings are not a freeze-ahead food.
Nutrition Information (Per Serving — ¼ of Recipe)
| Nutrient | Amount |
|---|---|
| Calories | ~210-240 kcal |
| Carbohydrates | 32-36g |
| Protein | 7-8g |
| Fat | 7-9g |
| Saturated Fat | 1-2g |
| Fiber | 2g |
| Sugar | 3g |
| Sodium | ~380mg |
Compared to restaurant deep-fried onion rings (typically 350-450 calories per comparable serving, with 18-25g fat), this air fryer version represents a calorie reduction of approximately 30-40% and a fat reduction of 60-70%. For a food eaten as an appetiser or side dish alongside heavier mains, this difference is nutritionally meaningful.
Expert Tips for Consistently Perfect Rings
Cut rings at a consistent ½-inch thickness. Thinner rings overcook and become brittle; thicker rings may have a raw-tasting, too-soft interior. A consistent cut means a consistent result.
Shake off excess flour before the egg. A thick layer of flour absorbs the egg and creates a pasty rather than crispy coating. Tap firmly to remove all unattached flour.
Press the panko firmly. The most common cause of coating falling off during air frying is panko that has been tossed over the ring rather than pressed onto it. Firm, two-sided pressing embeds the crumbs into the egg layer.
Drizzle oil over all surfaces. Every part of every ring that receives oil will crisp and brown. Every part that receives no oil will stay pale and dry. Be generous and reach all exposed panko.
Single layer without exception. Rings touching each other steam at the contact point. Even slight crowding reduces crispness across the batch.
Let coated rings rest before cooking. The 5-10 minute rest suggested by an experienced reader genuinely improves coating adhesion. Worth planning for.
Frequently Asked Questions
Q1. Can I use other types of onions for this recipe?
Yes. The recipe developer confirmed that white onions, sweet onions (like Vidalia), and red onions all work in this recipe. Yellow onion is the default because it provides the best balance of flavour intensity and sweetness when cooked. Sweet onions produce a milder, sweeter interior; white onions produce a sharper bite; red onions produce a slightly more complex, earthier flavour with a distinctive purple hue at the onion surface. Any of these is a valid choice depending on your preference.
Q2. Why are my onion rings not crispy?
Three most likely causes. First, the basket was overcrowded — rings touching each other steam rather than crisp; cook in batches with space between each ring. Second, insufficient oil — drizzle generously and ensure every surface of every ring has some oil coverage before air frying. Third, too much flour or egg in the coating, creating a thick, wet layer that the air fryer cannot fully crisp in 8-11 minutes — tap off excess flour firmly before the egg station.
Q3. Can I make onion rings gluten-free with this recipe?
Yes — as confirmed by a reader who did exactly this and described the results as “fantastic.” Substitute a 1:1 gluten-free flour blend for the all-purpose flour and use certified gluten-free panko breadcrumbs. No other changes are needed. One reader used a convection oven setting at 400°F for 11 minutes rather than the standard air fryer setting and found excellent results. The temperature increase compensates for the slightly different browning behaviour of gluten-free coatings.
Q4. What is the best temperature and time to air fry onion rings?
370°F (188°C) for 8-11 minutes is the tested sweet spot for this recipe. Lower temperatures (below 360°F) extend the cooking time and can result in coating that is set but pale rather than golden and visually appealing. Higher temperatures (above 385°F) can brown the panko too quickly before the onion interior has softened properly. Check at 8 minutes on your first batch — if your specific air fryer runs hot, pull at 8; if it runs cool, give the full 11 minutes.
Q5. Can I prepare the onion rings in advance?
You can dredge and coat the rings up to 30 minutes before cooking and let them rest at room temperature (this actually improves coating adhesion, as one experienced reader discovered). Beyond 30 minutes, the coating begins absorbing moisture from the onion and loses some of its crisp potential. Do not refrigerate coated uncooked rings — the condensation from the cold temperature wets the coating significantly. The best approach: dredge, rest briefly at room temperature, air fry, and serve immediately.
The Side Dish That Makes Every Burger Night Better
Onion rings should not be a restaurant-only food. They should not require a pot of frying oil to make at home. And they should not taste like the freezer-section version when you want something genuinely crispy, sweet, and satisfying.
This recipe makes them what they should be: quick, clean, genuinely crispy, and significantly better than most alternatives. The three-station dredge takes 15 minutes. The air fryer does the rest. The result is a food that earns the kind of enthusiastic, specific feedback that recipes only get when they genuinely deliver.
Make them for game day. Make them alongside burgers. Make them as the starter for a casual dinner. Make them with everything bagel seasoning and a cream cheese dip and watch them disappear before anything else on the table.
Try this recipe and share your results in the comments below! Tell us which onion type you used, which dipping sauce you served alongside, and whether you tried the pre-rest technique. We read every comment — and the best technique tips from home cooks always improve the recipe for everyone else.
Pairs perfectly with: Tartar Sauce | Sriracha Mayo | Ranch Dressing | Veggie Burgers | Chicken Breakfast Sandwich | BBQ Jackfruit Wraps
Also explore on KitchenWhisper.in:
- Air Fryer Bombay Potatoes – Crispy Indian Style
- Air Fryer Roasted Green Beans
- Air Fryer Samosa Pinwheels