There is a particular flavour experience that very few sauces in the world deliver — simultaneously citrusy and vinegary, warmly smoky, spiced with a heat that builds slowly rather than hitting all at once, with a depth that makes you go back for one more piece before you have finished the first.
That is peri peri. And once you have tasted it properly — not as a vague memory of a fast-food chain’s version, but as the main event in a recipe that has been designed around it — it becomes one of those flavours you look for ways to incorporate into meals again and again.
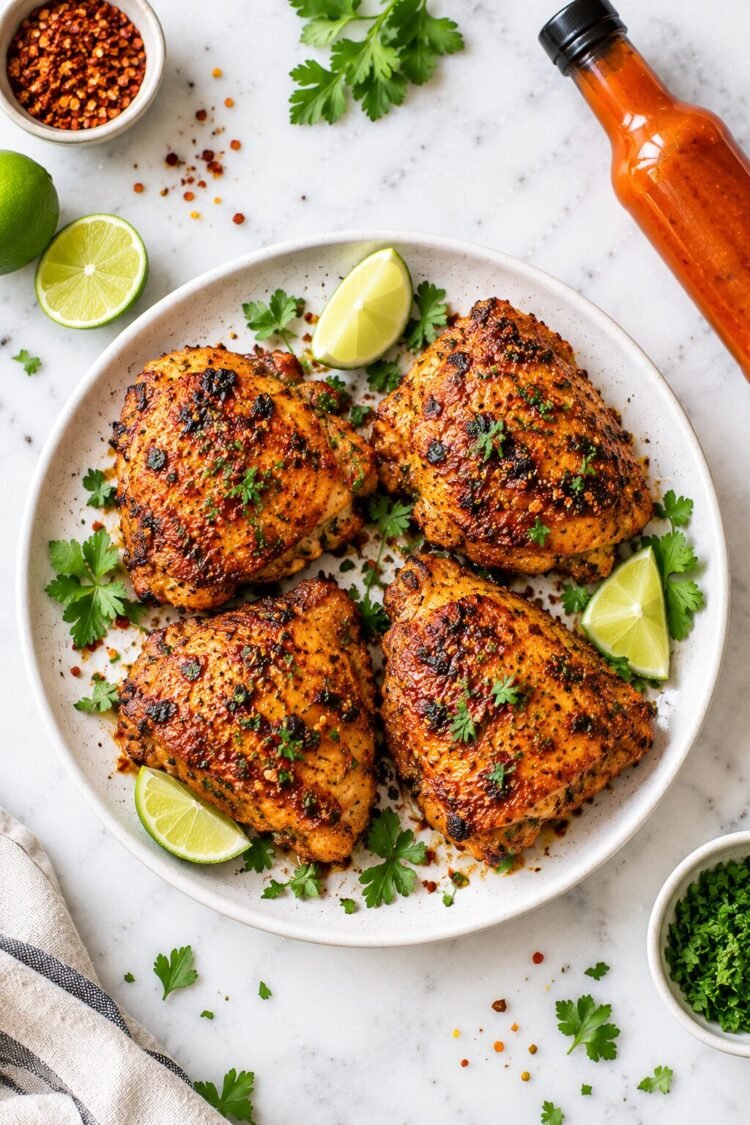
Air Fryer Peri Peri Chicken delivers that experience in 35 minutes with minimal preparation and almost no active cooking effort. Bone-in, skin-on chicken thighs — the cut that stays juicy under any cooking conditions — rubbed with smoked paprika and garlic powder, then coated in peri peri sauce and cooked in the air fryer at 400°F until the skin becomes genuinely crispy and the meat is tender enough to pull away from the bone with the lightest pressure.
The air fryer is why this recipe works as well as it does. The high-speed circulating heat renders the skin fat efficiently, crisping the exterior dramatically more than a conventional oven would at the same temperature and in the same time. And the high heat throughout — rather than a gentler, longer oven roast — produces the charred, slightly caramelised surface notes that peri peri sauce develops when exposed to intense heat.
One reader described it as the best dish their partner had ever made. Another found it so successful with boneless thighs that it became their immediate go-to chicken recipe. The sauce does the heavy lifting. The air fryer does the rest.
What Is Peri Peri Sauce and What Makes It So Special?
If you have not cooked with peri peri sauce before — if you have only experienced it as a vague restaurant memory — it is worth understanding what makes it genuinely unique before talking about the recipe itself.
Origins and Flavour Profile
Peri peri sauce is built around the African Bird’s Eye Chilli (Capsicum frutescens), a small, intensely hot pepper with distinctive fruity notes that most other chillies do not have. The sauce blends these chillies with garlic, vinegar (usually white or red wine vinegar), citrus juice (lemon or lime), herbs (typically oregano, basil, or bay leaf), oil, and salt.
The result is a sauce with four distinct, simultaneous flavour dimensions:
- Heat — from the Bird’s Eye Chilli; builds progressively rather than hitting immediately
- Acidity — from the vinegar and citrus, cutting through the richness of fatty chicken
- Depth — from the garlic, herbs, and any caramelisation of the sauce during cooking
- Sweetness — very subtle, from the peppers themselves and the slight reduction that happens during air frying
This four-dimensional complexity is what makes peri peri so effective as a marinade specifically — each element interacts with the chicken differently, and the cooking process intensifies all of them.
Store-Bought Sauce: What to Buy
The recipe uses store-bought peri peri sauce, which is the practical choice for a weeknight recipe that fits into a 35-minute window. Two brands dominate the market:
Nando’s: The original and most famous. Available in several heat levels — Lemon & Herb (mildest), Medium, Hot, Extra Hot, and the intensely spiced XX Hot. The Medium is the best starting point for most palates; the garlic variety, specifically requested by one reader for this recipe, produced “absolutely delicious” results.
Trader Joe’s (US): A more affordable and widely available alternative that performs very well in cooked applications. If choosing between the two for this recipe specifically, both produce excellent results — Trader Joe’s holds up beautifully to the high air fryer temperature without burning.
Important: The recipe calls for peri peri sauce, not peri peri oil. Peri peri oil (a chilli-infused oil) has a completely different consistency, behaviour, and flavour profile — it will not produce the same coating or result. Look specifically for the sauce.
Choosing your heat level: This recipe as written makes a spicy chicken. Choose the heat level of your sauce based on your household’s preference — lemon and herb for mild, medium for approachable heat, hot or extra hot for those who want serious fire.
Why Chicken Thighs Specifically?
The recipe specifies bone-in, skin-on chicken thighs — and this choice is worth explaining, because it is the combination of cut and cooking format that produces the specific result this recipe delivers.
The Case for Bone-In, Skin-On
The bone: Bone-in chicken thighs cook more evenly than boneless because the bone conducts and radiates heat from the inside out simultaneously with the external heat cooking from the outside in. The meat closest to the bone — which is often the last to cook in boneless pieces — cooks more reliably in bone-in format.
The skin: The fat layer beneath chicken skin renders slowly during the 20-25 minutes at 400°F, basting the meat from above as it liquefies. More importantly for this recipe, the skin becomes the crispiest, most dramatically textured part of the finished dish — the peri peri sauce, applied before cooking, caramelises and slightly chars against the skin during the high-heat phase, creating concentrated flavour pockets that are arguably the best part of eating this chicken.
The thigh vs breast argument: Thigh meat has a significantly higher intramuscular fat content than breast, which means it is far more forgiving of slightly longer cooking times — where a breast becomes dry if cooked 2-3 minutes beyond its ideal internal temperature, a thigh can go 5-10 minutes beyond without meaningful texture degradation. For a recipe cooked at high heat in an air fryer, this margin matters.
For boneless chicken thighs: One reader successfully used boneless thighs with this recipe, describing them as “juicy and so flavorful.” The cooking time reduces slightly — check at 15 minutes total rather than 20-25. Still excellent results.
The Ideal Internal Temperature
The recipe specifies a target of 175-185°F / 79-85°C for chicken thighs — higher than the standard food-safe minimum of 165°F / 74°C.
This higher target is not about food safety — at 165°F, the chicken is already completely safe to eat. It is about texture. Chicken thigh contains more connective tissue (collagen) than breast, and that collagen begins converting to gelatin at temperatures above 165°F. By cooking to 175-185°F, the collagen fully converts, producing chicken that is not just safe but genuinely tender — pulling apart easily with a fork rather than having any of the slightly dense, resistant texture that chicken thighs can have at lower temperatures.
A meat thermometer is the only reliable way to confirm this temperature, and it is strongly recommended here. The air fryer’s intense heat can make the exterior look done well before the bone-adjacent meat has reached its target.
Ingredients (Serves 4)
The Chicken
- 4 bone-in, skin-on chicken thighs — approximately 2 lbs (900g) total; excess hanging skin trimmed for cleaner cooking
The Dry Rub
- ½ teaspoon smoked paprika — not sweet paprika; the smokiness is a specifically chosen complement to peri peri’s citrusy heat
- ½ teaspoon garlic powder — provides even garlic distribution without the burning risk of fresh garlic at 400°F
- ¼ teaspoon salt — seasons the chicken beneath the sauce layer
The Marinade
- ¼ cup (approximately 60ml) peri peri sauce — Nando’s Medium, Nando’s Garlic, or Trader Joe’s; choose your preferred heat level
Step-by-Step: How to Make Air Fryer Peri Peri Chicken
Step 1 — Prep the Chicken
Pat each chicken thigh completely dry with paper towels — both the skin side and the underside. Surface moisture prevents the sauce from adhering properly and interferes with skin crisping. If there is any large, loose flap of excess skin hanging beyond the meat edge, trim it off with kitchen scissors. It will not crisp and can burn during the high-heat cooking.
Step 2 — Apply the Dry Rub
Combine the smoked paprika, garlic powder, and salt in a small bowl. Stir until evenly mixed. Sprinkle the seasoning mixture over all surfaces of the chicken thighs — top, bottom, and sides. Rub it in firmly, ensuring the spice blend reaches into any folds or under the skin edge.
Why dry rub before sauce? The dry rub acts as a flavour layer beneath the sauce, providing warmth and smokiness that complements rather than competes with the peri peri’s citrus-vinegar character. It also creates a slightly drier surface for the sauce to adhere to — the spice rub absorbs any residual surface moisture from the chicken, allowing the sauce coating to sit on the surface rather than sliding off.
Step 3 — Coat with Peri Peri Sauce
Add the ¼ cup of peri peri sauce to the bowl with the seasoned chicken. Using your hands or a brush, coat all surfaces thoroughly — top, bottom, and sides. The sauce should cover every visible surface. Rub the sauce into any grooves or under the skin edge if possible — sauce that contacts the meat directly, rather than just the skin surface, produces more intensely flavoured finished chicken.
Step 4 — Preheat and Marinate Simultaneously
Preheat the air fryer to 400°F (200°C) for 5 minutes. While the air fryer preheats, let the sauced chicken marinate at room temperature for those same 5 minutes. This brief rest allows the sauce to begin penetrating the surface spice layer.
Longer marination (optional but good): If you have more time, the peri peri sauce deepens in flavour with a 30-minute to 4-hour refrigerator marinade. The vinegar and citrus in the sauce gently tenderise the surface proteins during this extended contact time. This is the method to use if you are preparing the recipe for a dinner party where timing and flavour intensity both matter.
Step 5 — First Cook: 10 Minutes Skin-Side Down
Arrange the marinated chicken thighs in the air fryer basket skin-side down — not skin-side up. This is the placement that makes the difference between reasonably good skin and genuinely crispy skin.
Why skin-side down first? Two reasons: the direct contact between the skin and the hot basket surface creates initial searing heat that begins rendering the fat immediately; and the juices from the cooking meat drip away from the skin rather than pooling against it, preventing steaming. The underside, positioned upward, develops colour from the circulating air.
Cook at 400°F for 10 minutes.
Step 6 — Flip and Finish: 10-15 Minutes
Using tongs, carefully flip each chicken thigh so the skin side is now facing up. The skin should look partially cooked with some browning visible.
Continue cooking at 400°F for 10-15 more minutes, until the skin is deeply golden and crispy and a meat thermometer inserted into the thickest part (not touching the bone) reads 175-185°F / 79-85°C.
Total cook time: 20-25 minutes. Check temperature at 20 minutes and continue until the target is reached.
Step 7 — Rest and Serve
Remove the chicken from the air fryer basket and allow to rest on a plate for 3-4 minutes. Resting allows the muscle fibres — contracted under high heat — to relax and reabsorb the juices that have been pushed outward during cooking. Cutting immediately after the air fryer results in noticeably more juice loss.
Serve hot with lime wedges for squeezing — the fresh citrus against the hot, spiced chicken is exceptional — and your choice of sides.
What Makes This Skin Actually Crispy: The Science
The crispy skin is what separates genuinely excellent air fryer chicken from the merely cooked variety — and it is worth understanding why this recipe achieves it consistently.
Chicken skin is approximately 35-40% fat by weight. When that fat is exposed to high heat, it renders — liquefies and flows away from the skin, leaving behind a thin, dehydrated protein network that crisps under continued heat. The air fryer at 400°F renders fat approximately 25-30% faster than a conventional oven at the same temperature because the high-velocity air strips moisture from the surface simultaneously, accelerating dehydration.
The smoked paprika in the dry rub helps the skin colour without burning by providing carotenoid pigments that brown at the Maillard reaction temperature before the proteins themselves over-colour.
Starting skin-side down ensures the maximum fat-rendered surface is exposed to the direct heat of the basket, creating the initial sear that begins the crisping process before the slower final 10-15 minutes of skin-up cooking.
What to Serve With Air Fryer Peri Peri Chicken
The bold, citrusy, spicy character of peri peri chicken calls for accompaniments that either cool the heat or complement its acidity:
Cooling sides:
- Cucumber and yogurt raita — the cooling dairy contrast is excellent
- Simple coleslaw with apple cider vinegar dressing
- Plain steamed rice — absorbs the spiced juices beautifully
Complementary sides (air fryer friendly):
- Air fryer roasted green beans — see Air Fryer Roasted Green Beans on KitchenWhisper.in
- Air fryer roast potatoes with garlic — the starchy richness balances the heat
- Garlic bread or flatbread for mopping up the juices
The peri peri restaurant experience:
- Corn on the cob — grilled or air-fried with a little butter and salt
- Spiced rice with a squeeze of lime
- A simple green salad with lemon vinaigrette
Variations Worth Trying
Variation 1 — Boneless Peri Peri Chicken Thighs
Remove the bones entirely (or buy pre-boned thighs) and use the exact same method. Reduce total cook time to 15-18 minutes at 400°F, checking at 15 minutes. Boneless thighs are significantly easier to eat and still deliver very good results. One reader used boneless Nando’s Garlic sauce thighs and called it “SUPER easy” with a result her partner declared “the best dish I’ve made for him.”
Variation 2 — Extra Crispy Skin (Double Coat Method)
Apply the dry rub and peri peri sauce as directed. Refrigerate uncovered for 1-2 hours. This uncovered refrigerator rest dries the skin surface, which then crisps more dramatically in the air fryer than a freshly sauced piece of chicken. The time investment produces a noticeably crispier skin.
Variation 3 — Lemon & Herb Mild Version
Use Nando’s Lemon & Herb sauce (the mildest version) in place of any hot variety. Add 1 teaspoon of fresh lemon juice and 1 teaspoon of fresh thyme to the sauce before coating. This version is appropriate for households with children or heat-sensitive guests.
Variation 4 — Peri Peri Chicken Drumsticks
Replace thighs with chicken drumsticks. Use the same seasoning and sauce quantities. Cook skin-side down for 8 minutes, flip, cook for a further 8-10 minutes. Drumsticks have less fat than thighs and cook faster — check temperature at 16 minutes.
Variation 5 — Homemade Peri Peri Sauce
Blend 4-6 African Bird’s Eye chillies (or small Thai red chillies) with 3 garlic cloves, 2 tablespoons olive oil, 2 tablespoons red wine vinegar, 1 tablespoon lemon juice, 1 teaspoon smoked paprika, ½ teaspoon dried oregano, and ¼ teaspoon salt. Process until smooth. Use exactly as you would store-bought sauce. The flavour is more complex and customisable — increase lemon for more citrus, add more chillies for more heat.
Nutrition Information (Per Serving — 1 Chicken Thigh)
| Nutrient | Amount |
|---|---|
| Calories | 334 kcal |
| Protein | 24g |
| Fat | 24g |
| Saturated Fat | 6g |
| Carbohydrates | 4g |
| Fiber | 1g |
| Sugar | 2g |
| Cholesterol | 142mg |
| Sodium | 486mg |
| Potassium | 370mg |
| Vitamin C | 3mg |
| Iron | 1mg |
At 334 calories per chicken thigh with 24 grams of protein, this is an excellent high-protein main course for any dietary approach. The 4 grams of carbohydrates make it suitable for low-carb and ketogenic diets — peri peri sauce adds minimal carbohydrate load while dramatically elevating the flavour.
Expert Tips for the Best Result
Use a meat thermometer every time. The target of 175-185°F for chicken thighs is what produces the specific fall-off-the-bone tenderness this recipe is known for. Cooking by colour and time alone will not consistently hit that target.
Skin-side down first. This is not optional — it is the technique that produces genuinely crispy skin rather than pale, slightly flabby skin.
Sauce, not oil. Use peri peri sauce specifically, not peri peri oil. The consistency, water content, and caramelising behaviour of the sauce are what create the characteristic coating on the finished chicken.
Avoid honey or sugar additions. The original source specifically notes that honey, maple syrup, or brown sugar added to the marinade can cause burning in the air fryer during the 20-25 minutes required for bone-in thighs. Skip the sweetener — the peri peri sauce has natural sweetness from the peppers.
Do not overcrowd the basket. Air fryer performance depends entirely on hot air circulating around every piece. Pieces touching each other will steam at the contact points rather than crisping. Leave visible space between each chicken thigh.
Frequently Asked Questions
Q1. Can I use chicken breast instead of chicken thighs?
Bone-in chicken breast can be substituted, but requires adjustment. Chicken breast is significantly leaner than thighs and overcooks faster — the ideal internal temperature for breast is 160-165°F rather than the 175-185°F target for thighs. With bone-in breast, cook at 375°F (slightly lower) for approximately 20-25 minutes, checking at 20 minutes. Boneless skinless breast fillets need only 15-18 minutes. The result will be less juicy than thigh meat and the skin (if present) will be less dramatic — but the flavour from the peri peri sauce will be equally excellent.
Q2. Does the peri peri sauce burn in the air fryer?
The peri peri sauce will caramelise and develop some dark, charred spots on the skin surface during the 20-25 minutes at 400°F — this is intentional and desirable. These slightly charred areas contain the most concentrated, complex flavour of the entire dish. However, genuine burning (black, bitter, acrid) is unlikely with sauce alone. The risk of burning increases if you add extra sugars (honey, maple syrup) — avoid these for bone-in chicken that needs the full 20-25 minutes.
Q3. How long should I marinate peri peri chicken?
The recipe’s minimum marination time is just 5 minutes (the time it takes to preheat the air fryer) — and it produces very good results. For better depth of flavour, 30 minutes is a meaningful improvement. For the best possible flavour intensity, marinate refrigerated for 4-8 hours. The vinegar and citrus in peri peri sauce gently tenderise the chicken surface during longer marination periods. Overnight marination (up to 12 hours) is possible but may slightly over-tenderise the outer layer of the chicken — 4-8 hours is the optimal sweet spot.
Q4. What heat level of peri peri sauce should I use?
Start with Nando’s Medium if you are new to peri peri — it has clear heat that most adult palates can handle without discomfort, while still delivering the full flavour profile. Use Lemon & Herb for a completely mild, family-friendly version. Use Hot or Extra Hot if you want genuine, challenging heat. Nando’s Garlic has been specifically praised in reader comments for this recipe — it adds a rounder, more savoury depth alongside the heat that makes the finished chicken particularly compelling.
Q5. Can I make peri peri chicken without an air fryer?
Yes. Bake in a conventional oven preheated to 425°F (220°C) on a wire rack set inside a baking tray (the rack allows hot air to reach the underside, improving skin crisping). Cook skin-side up for the entire bake time of 35-40 minutes, until the internal temperature reaches 175-185°F. The skin will be less crispy than the air fryer version, but adding a 3-minute blast under the broiler / grill at the end will close most of the gap.
Your New Go-To Chicken Recipe
Peri peri chicken has earned its place as one of the world’s most loved chicken preparations because the sauce genuinely does something no other marinade does — that specific combination of citrus acidity, vinegar sharpness, garlic depth, and progressive chilli heat that makes every bite more interesting than the last.
The air fryer makes it fast, makes the skin genuinely crispy, and makes it a Tuesday dinner rather than a special occasion dish. The recipe is simple enough to become automatic — a seasoning rub, a sauce coat, 20-25 minutes, done.
Try it with Nando’s Garlic next time you want something that earns “the best dish I’ve ever made” from someone at your table.
Made this recipe? Share your results in the comments below! Tell us which sauce brand and heat level you used, what you served alongside, and whether you went boneless or bone-in. And if you have found a peri peri pairing that works particularly well — share it.
Pairs perfectly with: Garlic Bread | Corn on the Cob | Coleslaw | Steamed Rice | Cucumber Raita | Air Fryer Roasted Green Beans
Also explore on KitchenWhisper.in:
- Air Fryer Chicken Tikka – Authentic Indian Recipe
- Air Fryer Chicken Tenders – Crispy in 25 Minutes
- Air Fryer Chicken Tikka Masala
- Air Fryer Roasted Green Beans