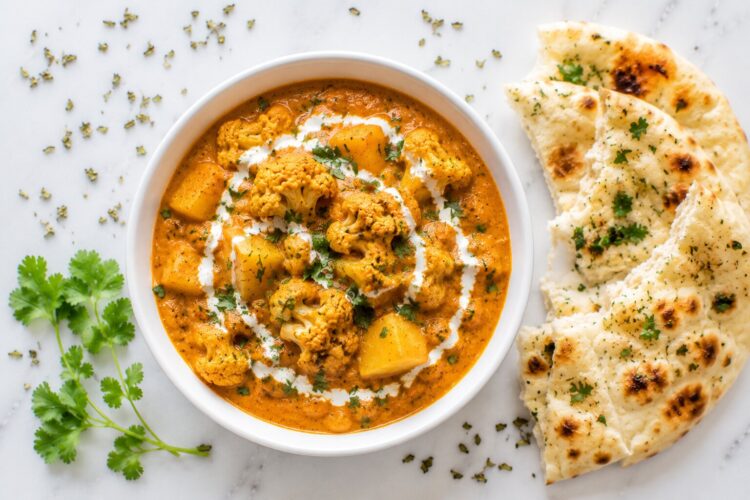
There is something deeply comforting about Aloo Gobi that goes beyond the taste of the dish itself.
It is the smell of it. The way cauliflower absorbs spices as it cooks — that warm, earthy aroma filling the kitchen that signals something homely and satisfying is coming. Aloo Gobi is one of those dishes that has been feeding Indian families across generations, showing up on weekday lunch plates, in school tiffin boxes, on festive thalis, and at restaurant tables with equal ease and equal affection.
Aloo means potato. Gobi means cauliflower. Together they form one of North India’s most beloved vegetarian dishes — humble in its ingredients, endlessly satisfying in the eating.
But here is the thing most people do not know: there are actually two completely different versions of Aloo Gobi, and they taste nothing like each other.
The first is the dry, rustic sookhi Aloo Gobi — made with minimal water, turmeric, cumin, and a handful of spices, cooked until the vegetables are tender and slightly golden. It is the version made in home kitchens across Punjab every single day. Quick, simple, honest.
The second is the restaurant-style version — and that is what this recipe is about. Rich, creamy, and built on a proper makhani-style sauce of onions, ripe tomatoes, cashew paste, whole spices, and butter, it is the kind of Aloo Gobi that makes you go quiet for a moment when you taste it. Deeply flavorful, silky in texture, with the kind of complexity that usually takes years to develop in a kitchen.
This guide gives you both versions — explained, compared, and fully detailed — so you can make whichever version fits your day.
Dry Aloo Gobi vs. Restaurant-Style Aloo Gobi: Which One to Make?
Both versions are authentic. Both are worth making. But they serve different purposes:
| Feature | Dry Aloo Gobi (Sookhi) | Restaurant-Style (Makhani) |
|---|---|---|
| Cooking time | 25-30 minutes | 50-60 minutes |
| Gravy | None — dry stir-fry | Rich, thick makhani sauce |
| Key technique | Dum cooking / sauté | Masala building + simmering |
| Fat used | Oil or ghee | Butter + oil |
| Cashews | Not used | Essential |
| Cream | Not used | Added at finish |
| Best served with | Roti or paratha | Rice, naan, or paratha |
| Occasion | Everyday meals | Special meals, guests |
| Vegan-friendly | Easily | With substitutions |
| Flavor profile | Earthy, spiced, light | Rich, creamy, complex |
Make dry Aloo Gobi when: You want a quick, everyday side dish and have 30 minutes.
Make restaurant-style when: You are cooking for guests, want a complete main course experience, or simply want something exceptional.
The recipe in this guide focuses on the restaurant-style makhani version — the one that justifies the effort with extraordinary results.
Why This Recipe Works: The Makhani Sauce Secret
The defining element of this recipe is the sauce — and it is the same foundational makhani gravy used in Paneer Butter Masala and other restaurant-style North Indian dishes. Understanding what makes it special helps you make it correctly every time.
The sauce is built on three pillars:
1. Properly cooked onion-tomato masala The onions are fried until golden, the ginger-garlic paste is cooked until the raw smell disappears, and the tomatoes are sautéed until they completely break down and become a thick, glossy paste. This takes patience — about 12-15 minutes total — but it is where all the deep flavor lives. Rush this step and the sauce tastes flat and raw.
2. Soaked cashew paste Cashews soaked in hot water and blended to a completely smooth paste are folded into the masala before the vegetables. They thicken the sauce naturally, add a subtle nuttiness, and create that characteristic silky, restaurant-quality texture. This is what separates makhani sauce from a basic tomato gravy.
3. The oil-separation moment The sauce is ready for the next step only when oil or butter visibly separates from the masala and pools at the sides. This separation signals that the tomatoes have fully cooked, the cashew paste has incorporated, and the raw flavors have completely cooked out. Never skip waiting for this moment.
Ingredients (Serves 4)
For the Cashew Paste
- 15 whole cashews
- ½ cup hot water (for soaking)
- 2 tablespoons water (for blending)
Main Ingredients
- 2 tablespoons neutral oil (sunflower or refined coconut)
- 1 tablespoon unsalted butter (or ghee for richer flavour; use oil for vegan)
- ½ cup onion, finely chopped
- 1 to 1¼ teaspoons ginger-garlic paste (or 1 inch fresh ginger + 3-4 garlic cloves, crushed)
- 2 to 2½ cups ripe tomatoes, finely chopped (or blended for a smoother sauce)
- ¼ teaspoon turmeric powder
- ½ teaspoon Kashmiri red chili powder (or sweet paprika for milder version)
- 1 teaspoon coriander powder
- Salt to taste
Whole Spices
- 1-inch cinnamon stick
- 1 bay leaf
- 2-3 green cardamoms, lightly crushed
- 2-3 cloves
- 1 black cardamom
- 1 strand of mace (javitri) — optional but adds beautiful fragrance
Vegetables
- 1 medium cauliflower — about 3 cups of medium florets
- 2 medium potatoes — peeled and cut into 1-inch cubes (about 2 to 2½ cups)
- 1½ to 2 cups water
Finishing Ingredients
- ½ teaspoon kasuri methi (dried fenugreek leaves), crushed
- ¼ to ½ teaspoon garam masala
- 2 tablespoons heavy cream (or light cooking cream; skip for vegan)
- Fresh coriander leaves for garnish
Ingredient Notes and Smart Substitutions
Cauliflower — Choose and Prep Carefully
Select a cauliflower with tight, creamy-white florets and no dark spots or yellowing. Fresh, firm cauliflower cooks evenly and holds its shape in the sauce — old or soft cauliflower breaks down and creates a mushy texture.
Blanching is highly recommended — even if your cauliflower looks clean, tiny insects can hide between the florets. Blanching in salted hot water for 15-20 minutes kills any hidden insects and slightly pre-cooks the florets, reducing final cooking time and ensuring even texture throughout the curry.
Potatoes — Which Variety Works Best
- Waxy potatoes (baby potatoes, red skin) — hold their shape throughout cooking; best for a neater presentation
- All-purpose potatoes (Yukon Gold) — slightly creamy texture once cooked; excellent choice
- Starchy potatoes (Russet) — can become too soft and dissolve into the gravy; use with caution
- Indian desi potatoes — the traditional choice; medium starch content and robust flavour
Cut all potatoes and cauliflower into similar-sized pieces — this is the most important step for even cooking. Mismatched sizes mean some pieces are mushy before others are tender.
Tomatoes — Ripe Matters Enormously
Unripe or pale tomatoes produce a sharp, acidic sauce with no natural sweetness. Use the ripest, reddest tomatoes available. If fresh tomatoes are not at their best, substitute with half a cup of canned passata (no added citric acid) — the flavour will be more consistent.
Cashews — The Texture Secret
Soaking cashews in hot water for 20-30 minutes before blending is not optional. Raw, unsoaked cashews do not blend smoothly and leave a grainy texture in the sauce. Properly soaked cashews blend into a completely smooth paste that integrates into the masala invisibly, leaving only silkiness behind.
Nut-free substitution: Replace cashews with 3 tablespoons of heavy cream added at the finishing stage. The sauce will be less thick and slightly less silky, but still excellent.
Almond paste: Soak 15 blanched almonds in hot water for 2 hours, peel, and blend to a smooth paste. Works well but produces a slightly different flavour profile.
Kasuri Methi — Non-Negotiable Finishing Touch
Kasuri methi (dried fenugreek leaves) is the ingredient that announces to every diner that a dish is restaurant-style North Indian. Its slightly bitter, herbal quality blooms instantly when added to hot gravy and transforms the entire flavor profile. Always crush it between your palms before adding — this activates the essential oils. There is genuinely no adequate substitute.
How to Make Restaurant-Style Aloo Gobi: Step-by-Step
Step 1 — Soak the Cashews
Place the cashews in a small bowl. Pour hot water over them and leave them to soak for 20-30 minutes while you prepare everything else. Once soaked, drain and transfer to a small blender or spice grinder. Add 2 tablespoons of fresh water and blend to a completely smooth, lump-free paste. Set aside.
The paste should look like thick white cream — no visible cashew pieces, no graininess. If your blender is not powerful enough to achieve this, strain through a fine sieve after blending.
Step 2 — Blanch the Cauliflower
Break the cauliflower into medium florets — roughly 1.5-inch pieces. Bring a large pot of water to a rolling boil with a generous pinch of salt. Add the florets, remove from heat, and leave them submerged in the hot water for 15-20 minutes. They should look slightly translucent at the stems after blanching.
Drain, rinse with fresh water, and set aside. The florets are par-cooked and cleaned — they will finish cooking in the sauce.
Step 3 — Build the Whole Spice Base
Heat the butter and oil together in a wide, heavy-bottomed pan or kadai over medium heat. Once the butter melts and the oil shimmers, add all the whole spices: cinnamon, bay leaf, green cardamoms, cloves, black cardamom, and mace strand.
Fry for 60-90 seconds, stirring constantly, until the spices sizzle and release their fragrance into the fat. The kitchen should smell warm and aromatic at this point. Do not let the spices darken to black — they will turn bitter.
Step 4 — Cook the Onions to Golden
Add the finely chopped onions to the spiced fat. Stir to coat evenly. Cook over medium heat, stirring regularly, for 7-9 minutes until the onions turn a proper golden colour — not pale, not brown, but the warm amber of caramelised sugar. This golden stage is important: it adds sweetness and body to the masala that simply translucent onions cannot provide.
Add the ginger-garlic paste and stir continuously for 60-90 seconds until the sharp, raw pungency gives way to a sweeter, cooked aroma. Reduce heat slightly if the paste threatens to stick or burn.
Step 5 — Cook the Tomatoes Down
Add the chopped tomatoes and stir well to combine with the onion mixture. Cook over low-medium heat, stirring every 2 minutes, for 8-10 minutes until the tomatoes completely break down, lose their raw smell, and reduce into a thick, glossy, concentrated paste that is pulling away from the sides of the pan.
Patience here changes everything. Undercooked tomatoes produce a raw, sharp sauce with an unpleasant acidic aftertaste. Properly cooked tomatoes produce a sweet, deep, round sauce. The extra 5 minutes is worth every second.
Step 6 — Add Cashew Paste and Spice Powders
Add the cashew paste, turmeric, Kashmiri red chili powder, and coriander powder to the tomato masala. Stir thoroughly until completely incorporated. The mixture will look rich, thick, and deep orange.
Continue cooking on low-medium heat, stirring constantly, for another 8-10 minutes. This is the critical stage: you are cooking out the raw taste of the cashews and fully integrating them into the masala. The mixture will gradually thicken, deepen in colour, and — most importantly — the oil and butter will begin to separate visibly at the edges of the pan.
When you can clearly see orange-tinged oil pooling at the sides and the masala looks glossy and pulls away cleanly from the pan, the sauce base is ready.
Step 7 — Add Vegetables and Simmer
Add the blanched cauliflower florets and diced potatoes to the masala. Stir gently to coat every piece with the thick sauce. Add salt to taste.
Pour in 1½ to 2 cups of water — start with 1½ cups and add more if needed. Stir, bring to a gentle boil, then reduce heat to low. Cover the pan with a lid, leaving a small gap for steam to escape.
Simmer for 18-22 minutes, checking and stirring every 5-6 minutes. Add a tablespoon or two of water if the gravy looks too thick before the vegetables are done. The cauliflower should be completely tender — a fork should slide through a floret with zero resistance. The potatoes should be cooked through but still holding their shape.
The test: Press a potato cube against the side of the pan — it should mash easily with light pressure. If it resists, cook for 3-5 more minutes.
Step 8 — Finish and Serve
Once the vegetables are perfectly cooked and the gravy has reached a thick, coating consistency, turn the heat to the lowest setting. Add the crushed kasuri methi, garam masala, and heavy cream. Stir gently to combine. Simmer uncovered for just 45-60 seconds — long enough to integrate the finishing ingredients but not long enough to boil the cream.
Remove from heat. The residual heat of the curry will continue blooming the kasuri methi for another minute.
Taste one final time and adjust: more salt if needed, a pinch more garam masala if the spicing needs depth, a squeeze of lemon if the tomatoes were particularly sweet and you want a little brightness.
Garnish generously with fresh coriander leaves before serving.
How to Make Simple Dry Aloo Gobi (Bonus Recipe)
When you want the everyday version — no makhani sauce, no cashews, just honest spiced vegetables — this is the method:
Ingredients (Serves 3-4):
- 2 tablespoons oil or ghee
- 1 teaspoon cumin seeds
- ½ teaspoon ajwain (carom seeds) — optional but highly recommended
- 1-inch piece of ginger, julienned or grated
- 2-3 green chilies, slit
- 1 medium cauliflower, cut into medium florets
- 2 medium potatoes, peeled and cubed
- ½ teaspoon turmeric
- ½ teaspoon red chili powder
- 1 teaspoon coriander powder
- ½ teaspoon amchur (dry mango powder)
- Salt to taste
- Fresh coriander for garnish
Method: Heat oil in a wide pan. Add cumin seeds and ajwain — let them pop for 30 seconds. Add ginger and green chilies, fry briefly. Add potatoes first and cook covered for 5 minutes on medium-low heat. Add cauliflower, all spice powders, and salt. Stir well, cover, and cook on low heat for 15-18 minutes, stirring every 5 minutes, until both vegetables are tender. Add amchur, stir, and cook uncovered for 2 minutes until any remaining moisture evaporates. Garnish and serve.
Total time: 30 minutes. No sauce, no cashews, pure Punjabi everyday cooking.
What to Serve with Aloo Gobi
With the restaurant-style curry version:
- Butter naan or garlic naan — for mopping up every drop of the makhani sauce
- Steamed basmati rice — the light, separate grains contrast beautifully with the thick gravy
- Jeera rice — cumin-scented rice that complements the makhani spices perfectly
- Laccha paratha — flaky, layered; the best choice for a complete restaurant-style experience
- Peshwari naan — the slight sweetness works surprisingly well with this dish
With the dry version:
- Plain roti or phulka — the traditional and ideal pairing
- Dal and rice — makes a complete, balanced everyday meal
- Paratha — with a dollop of white butter and pickle on the side
For a complete vegetarian spread: Add cucumber raita, dal makhani or dal tadka, a simple kachumber salad, and papad alongside the Aloo Gobi. This combination feeds 6-8 people comfortably and covers every flavor and texture you could want at a meal.
Variations and Additions
Aloo Gobi Matar: Add ½ cup of fresh or frozen green peas along with the vegetables in Step 7. They require no extra cooking time and add sweetness and color.
Aloo Gobi with Paneer: Add 100g of cubed paneer in the last 5 minutes of cooking. The paneer absorbs the makhani sauce beautifully and makes the dish more substantial and protein-rich.
Fully Vegan Version: Replace butter with an additional tablespoon of oil or coconut oil. Skip the heavy cream entirely or substitute with 3 tablespoons of coconut cream at the finishing stage. The cashews already provide enough richness that the dish is still deeply satisfying without dairy.
With Added Vegetables: Diced carrots, French beans, sweet corn, and fresh peas all work well added alongside the cauliflower and potatoes. Add harder vegetables (carrots, beans) with the potatoes; add softer ones (corn, peas) in the last 5-7 minutes of simmering.
Spicier Version: Add 1-2 finely chopped green chilies to the onion stage and increase the red chili powder to 1 teaspoon. A pinch of black pepper stirred in at the end adds heat without affecting the sauce color.
Expert Tips for Perfect Results Every Time
Cut vegetables into equal-sized pieces. This is the single most impactful technique for even cooking. Unequal pieces mean some are mushy while others are still firm — the most common Aloo Gobi texture problem.
Wait for oil separation before adding vegetables. This is the moment the sauce transforms from a collection of ingredients into a unified, flavored base. Adding vegetables before oil separates means they cook in a half-finished sauce and absorb raw flavors.
Keep the heat at low-medium throughout. High heat causes the sauce to catch at the bottom, produces bitter, scorched spots, and dries out the vegetables before they are cooked through. Low and slow is the correct approach for makhani-style cooking.
Taste at three stages: After the masala is cooked (adjust spices), after adding salt and water (adjust seasoning), and at the very end (final balance of salt, spice, and cream). Each stage catches different issues.
Reserve some hot water nearby. If the sauce thickens too quickly before the vegetables are cooked, adding cold water can drop the pan temperature and uneven the cooking. Keep a cup of hot water beside the stove and add gradually as needed.
Storage and Reheating
Refrigerator: Store in an airtight container for 1-2 days. The flavors deepen overnight. The sauce may thicken on refrigeration — add 2-3 tablespoons of warm water when reheating.
Reheating: Warm gently on the stovetop over low heat, stirring occasionally. Avoid the microwave if possible — it heats unevenly and can make the cauliflower rubbery.
Freezer: The makhani sauce freezes well (up to 1 month) but the vegetables do not — cauliflower and potatoes turn mushy after freezing and thawing. If you want to batch cook, freeze just the sauce and add freshly cooked vegetables when reheating.
Leftovers tip: Leftover Aloo Gobi masala makes an excellent filling for toasted sandwiches or parathas the next day. The thick sauce clings to the vegetables and reheats perfectly inside bread.
Nutrition Information (Per Serving, Approximate — 1 of 4)
| Nutrient | Amount |
|---|---|
| Calories | ~285 kcal |
| Protein | 7g |
| Carbohydrates | 30g |
| Fat | 16g |
| Fiber | 5g |
| Vitamin C | 85mg (94% DV) |
| Potassium | 780mg (22% DV) |
| Calcium | 65mg |
Cauliflower is exceptionally high in Vitamin C and provides meaningful amounts of Vitamin K, folate, and antioxidants. Potatoes contribute potassium, Vitamin B6, and resistant starch. Together, this is a genuinely nutritious vegetarian main course.
Frequently Asked Questions
Q1. What is the difference between dry Aloo Gobi and Aloo Gobi curry?
Dry Aloo Gobi (sookhi sabzi) is cooked without water in a covered pan — the vegetables steam in their own moisture with oil, cumin, turmeric, and simple spices. It is quick, everyday cooking. Aloo Gobi curry (this recipe) is cooked in a full makhani-style sauce of onions, tomatoes, cashews, butter, and cream. The dry version pairs with roti; the curry version works best with rice or naan. Both are authentic — they are simply different dishes suited to different occasions.
Q2. Why is my Aloo Gobi gravy not creamy enough?
The most likely cause is under-soaked cashews or a blender that was not powerful enough to create a completely smooth paste. Cashews need a full 20-30 minutes of soaking in hot water before blending. After blending, the paste should be silky and lump-free — if it feels grainy, blend for longer or strain through a fine-mesh sieve before adding to the masala. Alternatively, add an extra tablespoon of cream at the finishing stage to boost creaminess.
Q3. Can I make Aloo Gobi in an Instant Pot?
Yes. Use the Sauté function for Steps 3-6 (building the masala). Add vegetables, water, and salt. Set to Manual High Pressure for 3 minutes with a 5-minute natural pressure release, then quick release remaining pressure. The cooking time in the Instant Pot is much shorter — be cautious not to overcook, as pressure cooking can make cauliflower very soft. Reduce water to 1 cup when pressure cooking.
Q4. How do I prevent cauliflower from going mushy in curry?
Three things prevent mushiness: first, choose fresh, firm cauliflower — old or soft heads fall apart in sauce regardless of technique. Second, blanch the florets rather than adding them raw — this partially cooks the outer cells and actually makes them more resilient during simmering. Third, do not overcook — check for doneness at 15 minutes of simmering and remove from heat the moment a fork slides through easily. A minute past this point can take the florets from perfectly tender to mushy.
Q5. Is Aloo Gobi a complete meal on its own?
As a standalone dish, Aloo Gobi makhani is a main course rather than a complete nutritional meal — it is lower in protein than a dal or paneer dish. For a balanced meal, serve alongside a protein source: dal tadka, a bowl of yogurt/raita, a paneer dish, or in a vegetarian thali spread. The combination of potato-cauliflower curry with dal and rice or bread creates a well-rounded nutritional profile.
Two Humble Vegetables. One Extraordinary Dish.
Aloo Gobi reminds us that the best cooking is not about rare or expensive ingredients — it is about understanding what everyday ingredients need in order to become something remarkable. Patient masala building. Proper technique. The right finishing touches.
This restaurant-style version asks a little more of you than the everyday dry version. It asks for soaked cashews, a properly cooked makhani base, and the patience to let the oil separate before you move forward. In return, it gives you a curry that genuinely earns every minute spent on it.
Whether you make the rich restaurant version or the quick dry sookhi sabzi depends on the day and the occasion. But having both methods in your repertoire means you will never be at a loss when cauliflower and potatoes are all you have.
Try this Aloo Gobi recipe and share your results in the comments below! Tell us which version you made, what you served it with, and whether you added paneer or kept it vegan. If you discovered a variation that worked brilliantly, share that too — this recipe has been welcoming home cooks’ creativity for decades.
Pairs perfectly with: Butter Naan | Laccha Paratha | Steamed Basmati Rice | Jeera Rice | Plain Roti | Dal Tadka | Cucumber Raita
Also try: Matar Paneer | Gobi Masala | Aloo Matar | Paneer Butter Masala | Baingan Bharta