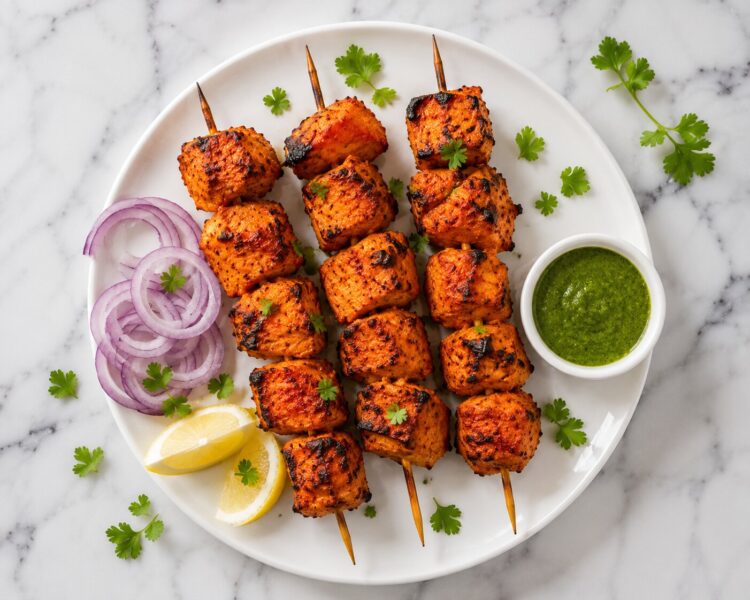
There is a moment at almost every Indian restaurant, right after the appetiser plate arrives, when conversation stops. The chicken tikka hits the table — still sizzling from the tandoor, deep orange-red, spice-charred at the edges, accompanied by that small bowl of mint chutney — and everyone reaches for a skewer before anything else is said.
That specific experience — the smoky heat, the yielding juicy chicken, the bloom of kasuri methi and garam masala in the crust — feels like something that should belong exclusively to restaurant kitchens and their 500°C clay ovens.
It does not. And this recipe proves it.
Air Fryer Chicken Tikka replicates the authentic tandoor experience with remarkable accuracy using an appliance that is already sitting on your kitchen counter. The secret is not in the cooking method alone — it is in a marinade that has been refined over centuries of North Indian cooking to produce exactly the flavour and texture that makes Chicken Tikka one of the most beloved Indian dishes in the world.
This recipe rated 4.95 out of 5 stars by over 100 home cooks does not achieve that rating by accident. It is the result of understanding exactly what makes tikka genuinely great — the yogurt tenderisation, the two-stage spice approach, the chickpea flour trick, the basting during cooking — and translating each element precisely for the air fryer.
This guide gives you everything: the complete authentic recipe, the science behind each marinade ingredient, air fryer settings and timing, three cooking method alternatives, all the variations worth trying, and the answers to every question that comes up when making this dish from scratch.
What Is Chicken Tikka? The Dish and Its History
Tikka is a word with roots in the Punjabi language, derived from the Turkish tikke meaning “piece” or “bit.” Chicken Tikka refers specifically to boneless chicken pieces marinated in a spiced yogurt mixture and cooked at intense heat — traditionally in a tandoor, the cylindrical clay oven that reaches temperatures unachievable in most conventional cooking.
Chicken tikka has origins in Mughal-era North Indian cooking, a culinary tradition that valued rich marination, fragrant spices, and high-heat cooking techniques that char the surface while leaving the interior tender and juicy. Chicken Tikka Masala — the dish created by taking chicken tikka and adding it to a cream-tomato sauce — became so popular in the United Kingdom that it was at one point described as Britain’s most-ordered restaurant dish, which speaks to how effectively the flavour profile travels across cultures.
The key distinction between Chicken Tikka and Tandoori Chicken is boneless versus bone-in. Tikka uses boneless cubes — faster to marinate, faster to cook, easier to eat as an appetiser or in wraps. Tandoori uses bone-in pieces that cook longer and develop slightly different flavour from the bone. Both use the same marinade philosophy.
Why the Air Fryer Works So Well for Tikka
The traditional tandoor operates at 450-500°C — far beyond what any domestic oven or appliance reaches. Yet air-fried chicken tikka consistently produces results that experienced cooks describe as equal to or better than restaurant tikka. Here is why.
The air fryer’s fan circulates intensely hot air (400°F / 200°C) at high velocity around the food from every direction. This does three specific things that matter for tikka:
1. It desiccates the marinade surface rapidly. The fast air movement strips moisture from the outer layer of marinade quickly, causing it to set and begin charring while the interior stays protected by the remaining moisture. This is exactly what happens in a tandoor.
2. It creates Maillard browning on all sides simultaneously. Unlike a pan or grill that browns only one surface at a time, the air fryer’s circulating heat allows the tikka to develop colour on all sides during cooking — producing the characteristic speckled, multi-sided char of restaurant tikka.
3. It concentrates the spice flavours. As moisture leaves the marinade surface during cooking, the spice compounds concentrate at the exterior — creating the intensely aromatic, slightly caramelised spice crust that distinguishes tikka from simply marinated and pan-cooked chicken.
Understanding the Marinade: Why Every Ingredient Is There
This is not a marinade where you can casually substitute or skip components. Each ingredient serves a specific purpose, and understanding them helps you make intelligent adjustments rather than random ones.
Thick Yogurt (3 tablespoons Greek yogurt)
The marinade base. Yogurt’s lactic acid gently denatures the surface proteins of the chicken over the marination period, making the meat noticeably more tender without beginning to break down its structure (the way stronger acids like lemon juice do if used too generously). The fat in yogurt also acts as a flavour carrier, helping the fat-soluble aromatic compounds in the spices penetrate the chicken. Thick yogurt — hung curd or Greek yogurt — is specifically needed because thin, watery yogurt runs off the chicken during cooking rather than forming the adherent coating that creates the tikka crust.
Ginger-Garlic Paste (2 tablespoons)
A fundamental building block of North Indian cooking. Together, ginger and garlic contribute aromatic compounds that are both distinctive in themselves and act as flavour amplifiers for the spices around them. The allicin in garlic and the gingerols in ginger also have mild tenderising and anti-microbial properties. Use freshly made paste for the most vibrant flavour — store-bought works but loses aromatic potency over time.
Kashmiri Red Chili / Paprika (1 teaspoon)
This is the colour ingredient. Kashmiri chili is a mild variety prized for its deep, vivid red-orange colour rather than heat. It is what gives chicken tikka its characteristic restaurant-red appearance. If you substitute with regular red chili powder at the same quantity, the heat level will be dramatically higher. Sweet paprika is an excellent substitute for those who want colour without any additional heat.
Cayenne / Red Chili Powder (1 teaspoon)
This is the heat ingredient — separate from the Kashmiri chili that provides colour. Adjust this up or down based on your heat preference. For children or heat-sensitive guests, reduce or omit entirely; the Kashmiri chili alone will still give excellent colour and flavour.
Garam Masala (1 teaspoon)
A warming spice blend — typically featuring cinnamon, cardamom, cloves, black pepper, and cumin — that provides the aromatic depth characteristic of North Indian meat dishes. If garam masala is unavailable, curry powder is a reasonable substitute though the flavour profile will shift.
Kasuri Methi / Dried Fenugreek (1 teaspoon)
This is the ingredient that announces “restaurant-quality tikka” to anyone who knows North Indian cooking. Kasuri methi has a slightly bitter, herbal quality that, when blended into the hot marinade crust, produces the characteristic aroma of tandoori cooking. Always crush it between your palms before adding to activate the essential oils. It is irreplaceable in flavour terms, though skippable if truly unavailable.
Chickpea Flour / Besan (2 teaspoons)
This is the tikka-specific technique that most home recipes leave out. Besan added to the marinade does two important things: it absorbs excess moisture from the yogurt (preventing the marinade from running off during cooking) and it creates a very thin, delicate coating around each piece of chicken that crisps and chars beautifully under high heat. The besan coating is part of why restaurant tikka has that characteristic slightly firm, spice-charred exterior. Without it, the yogurt simply dries out and peels off rather than forming a coherent crust.
Oil (1 teaspoon in marinade + basting)
Chicken breast is extremely lean — it contains almost no intramuscular fat. This lack of internal fat makes it prone to drying out during the intense heat of air frying. The oil in the marinade provides a small amount of surface fat that helps conduct heat evenly and reduces moisture loss. The basting with butter or oil midway through air frying serves the same purpose — it replenishes the surface moisture and fat that has cooked off during the first half of cooking.
Ingredients for Air Fryer Chicken Tikka (Serves 4)
For the Chicken
- 500g / 1 lb boneless chicken breast (or thighs — see below), cut into 2-inch cubes, uniform in size
For the Marinade
- 3 tablespoons thick Greek yogurt (or hung curd)
- 2 tablespoons fresh ginger-garlic paste (or ¾ tablespoon each minced fresh ginger and garlic)
- 1 teaspoon Kashmiri red chili powder (or sweet paprika — for deep colour with mild heat)
- 1 teaspoon cayenne / red chili powder (reduce or omit for less heat)
- 1 teaspoon ground coriander
- 1 teaspoon garam masala
- 1 tablespoon tandoori chicken masala powder (optional — available at Indian grocery stores; adds significant depth)
- 1 teaspoon coarsely ground black pepper (skip for less spice)
- 1 teaspoon kasuri methi, crushed between palms
- 1 teaspoon lemon juice
- 2 teaspoons chickpea flour (besan)
- 1 teaspoon neutral oil (sunflower, canola, or avocado)
- Salt to taste
For Cooking and Garnish
- Butter or oil — for basting during air frying
- Lemon wedges
- Thinly sliced raw onion (soaked in cold water for 10 minutes to remove sharpness)
- Chaat masala — a pinch sprinkled over the finished tikka before serving
- Fresh mint-coriander chutney — for dipping
Step-by-Step: How to Make Air Fryer Chicken Tikka
Step 1 — Prepare the Chicken
Pat all the chicken pieces completely dry with paper towels. Surface moisture dilutes the marinade and prevents it from adhering properly. Cut into cubes as uniform in size as you can manage — 2-inch cubes work well for air frying at the timing given; smaller pieces cook faster and risk drying out, larger ones need more time.
If using chicken breast, consider this: breast meat produces tikka that is firm and clean-tasting, but it is less forgiving of overcooking. Thighs are juicier, more flavourful, and stay tender even if the cooking runs slightly longer — the fat content of thigh meat provides built-in protection against drying. Many experienced tikka cooks use thighs exclusively for this reason. The recipe works equally well with either; adjust your expectations for timing if switching.
Step 2 — Make and Apply the Marinade
In a large bowl, combine all the marinade ingredients and mix thoroughly into a thick, uniform paste. The consistency should be similar to thick sour cream — pasty enough to coat the chicken pieces without dripping off.
Add the dry-patted chicken cubes and toss to coat every surface completely. Use your hands for this — it is the most effective way to ensure the marinade reaches into every crevice and corner of each piece.
Cover the bowl with cling film or transfer to a zip-lock bag. Refrigerate for a minimum of 2 hours. Four to six hours is better. Overnight is best. The difference in flavour depth between a 2-hour marinade and an 8-hour one is significant and noticeable in the finished tikka — plan ahead when you can.
Important: Take the marinated chicken out of the refrigerator 20-30 minutes before cooking. Cold chicken placed directly in a hot air fryer cooks unevenly — the exterior can char before the interior reaches a safe temperature. Bringing it closer to room temperature first ensures more even cooking throughout.
Step 3 — Skewer the Chicken
Thread the marinated chicken pieces onto skewers, leaving a small gap between each piece — do not pack them tightly together. The gaps allow hot air to circulate fully around every exposed surface, which is critical for even browning.
If using wooden or bamboo skewers, soak them in water for at least 15 minutes before using. Dry wood at high air fryer temperatures can scorch or even ignite. Metal skewers need no preparation but can make the chicken cook slightly faster at the points where metal contacts the air fryer basket.
Skewering is optional — you can air fry the chicken tikka directly in the basket without skewers. The pieces will be harder to turn, but the results are very similar. If going skewer-free, ensure the pieces are spaced apart in the basket rather than touching.
Step 4 — Preheat and Air Fry
Preheat your air fryer to 400°F / 200°C for 5 minutes. A genuine preheat is important here — the basket should be genuinely hot before the chicken goes in, to immediately begin the surface-searing effect.
Lightly brush or spray the air fryer basket with oil to prevent sticking. Place the skewers or loose chicken pieces in the basket. Baste the top surfaces of the chicken pieces with a small amount of butter or oil — this is the first basting.
Air fry at 400°F / 200°C for 6-8 minutes. Then open the basket, turn the skewers (or turn individual pieces), and baste again with butter or oil on the now-exposed surfaces.
Continue air frying for another 6-8 minutes, until the tikka is deeply coloured with visible char spots, the edges look slightly caramelised, and the chicken is cooked through to an internal temperature of 165°F / 74°C.
Total time: 12-16 minutes, depending on your specific air fryer model and the size of your chicken cubes.
The most important warning: Do not overcook. Chicken breast especially will become stringy, dry, and chewy if cooked beyond the point of safety. Check the internal temperature with an instant-read thermometer. The moment it reads 165°F, it is done — pull it immediately regardless of what the timer says.
Step 5 — Rest, Garnish, and Serve
Allow the tikka to rest for 3-4 minutes after cooking. Resting allows the internal juices to redistribute — a piece of chicken cut immediately after cooking loses significantly more moisture than one that has rested briefly.
Arrange on a serving plate with onion rings, lemon wedges, and a generous sprinkle of chaat masala. The chaat masala at the end is not decoration — it adds the tangy, slightly sour quality that bridges the richness of the tikka with the fresh accompaniments. Serve hot with mint-coriander chutney alongside.
Alternative Cooking Methods
Conventional Oven
Preheat your oven to 460°F / 240°C for a full 10 minutes — the oven must be genuinely, completely preheated. Line a baking tray with aluminium foil (for easy cleanup) and place a wire rack on top. Arrange the skewered tikka on the rack — the rack elevates the chicken so heat reaches the underside as well.
Bake for 25-30 minutes, turning once halfway through and basting with butter or oil at the turn. For the last 3-4 minutes, switch to the broiler setting and watch carefully — the broiler creates the char and colour that distinguishes tikka from simply baked chicken.
Outdoor Grill or Barbecue
Chicken tikka cooked over charcoal is the closest home approximation of tandoor flavour — the smoke from the coals infuses the marinade with a depth that no indoor method fully replicates. Cook over medium-high direct heat for approximately 15-20 minutes, turning every 4-5 minutes and basting with butter at each turn.
Stovetop Cast-Iron Skillet
Heat a cast-iron skillet or grill pan to high heat. Brush the surface with a thin layer of oil. Cook the tikka pieces (without skewers) for approximately 4-5 minutes per side on high heat, pressing gently with a spatula for better surface contact. Cover with a lid between turns to trap heat and cook the interior through. This method produces good colour and char but less of the all-around crisping that the air fryer achieves.
Serving Ideas Beyond the Classic Plate
Chicken tikka’s versatility extends far beyond the restaurant platter presentation:
Chicken Tikka Wrap: Slice the cooked tikka pieces into strips. Spread a flatbread or large chapati with mint yogurt sauce. Layer with sliced raw onion, shredded lettuce, julienned cucumber, and the tikka strips. Fold and serve. One reviewer specifically created this wrap combination — adding sriracha to the yogurt, frying leftover marinade with onions and peppers as a filling — and called the result “a next-level kebab.”
Tikka Rice Bowl: Serve over plain steamed basmati rice with a side of cucumber raita. The tikka juices and chaat masala season the rice as they mingle.
Chicken Tikka Pizza: Use as a topping on naan bread spread with tomato sauce and mozzarella — a popular fusion option that makes an excellent party appetiser.
Tikka Salad: Slice cooled tikka over a mixed salad of cucumber, tomato, red onion, and romaine. Use the mint chutney thinned with lemon juice as the dressing.
Chicken Tikka Masala: The obvious next step — cook a quick tomato-cream gravy and add the tikka pieces to it. You already have the most difficult component ready.
Expert Tips for the Best Results
Marinate for as long as your schedule allows. Two hours is the minimum. Eight hours is noticeably better. The spices penetrate deeper, the yogurt tenderises more thoroughly, and the kasuri methi has more time to bloom its volatile aromatics into the chicken.
The besan (chickpea flour) is not optional. It is the ingredient responsible for the coherent, charring outer crust. Without it, the yogurt marinade simply dries to a thin film rather than forming the characteristic tikka crust.
Baste at the turn. Do not baste at the start of cooking — the oil will simply drip away before it can do anything useful. Baste when you flip the tikka halfway through, so the fat goes onto surfaces that are going straight back into high heat and will crisp into the chicken immediately.
Do not crowd the basket. Overcrowding traps steam and prevents the all-around air circulation that creates the char. Better to cook in two batches than to sacrifice the texture of the entire portion.
Leftover marinade is gold. Do not discard it. Toss capsicum (bell pepper) squares and onion quarters in the leftover marinade and air fry them at the same temperature for 8-10 minutes. The spiced vegetables make extraordinary accompaniments.
Nutritional Profile (Per Serving — Approximately 4 Tikka Pieces)
| Nutrient | Amount |
|---|---|
| Calories | 181 kcal |
| Protein | 26g |
| Carbohydrates | 5g |
| Fat | 5g |
| Saturated Fat | 1g |
| Cholesterol | 74mg |
| Sodium | 145mg |
| Fiber | 2g |
| Vitamin A | 1226 IU |
| Vitamin C | 10mg |
| Iron | 2mg |
At 181 calories and 26 grams of protein per serving, Air Fryer Chicken Tikka is an exceptional high-protein, low-fat appetiser or main course — particularly notable given how richly flavoured it tastes at that calorie count. The air fryer method’s minimal oil use is entirely responsible for this lean profile; the same marinade cooked with regular basting in a traditional tandoor can run 50-80 calories per serving higher.
Variations and Substitutions
Chicken thighs instead of breast: Juicier, more flavourful, more forgiving of slightly longer cooking times. Ideal for beginners or anyone who has previously ended up with dry tikka. Adjust the cooking time upward by 3-4 minutes for bone-in thighs.
Paneer tikka (vegetarian): Use the exact same marinade with firm paneer cubes. Reduce the cooking time to 8-10 minutes total — paneer needs less heat than chicken. This is equally authentic and equally delicious.
Tofu tikka (vegan): Extra-firm tofu, pressed dry, marinated the same way. Replace the yogurt with thick coconut yogurt. Reduce cooking time slightly. The texture is different but the spice flavour is identical.
Dairy-free version: Replace the Greek yogurt with unsweetened coconut yogurt or soy yogurt at the same quantity. The marinade adheres slightly differently but still produces excellent results.
Mild family version: Skip the cayenne entirely. Keep the Kashmiri chili for colour. Add extra coriander powder and a pinch of cardamom for warmth without heat. This version is genuinely suitable for children who enjoy mild Indian flavours.
Extra smoky version (Dhungar method): After air frying, place the cooked tikka in a heatproof bowl. Set a small piece of burning charcoal in a small foil cup in the centre. Drop 3-4 drops of ghee on the coal, cover immediately, and let the smoke infuse for 90 seconds. This produces an extraordinary depth of tandoor smokiness that no appliance can replicate in any other way.
Frequently Asked Questions
Q1. How long do you air fry chicken tikka and at what temperature?
Air fry chicken tikka at 400°F / 200°C for a total of 12-16 minutes, turning and basting with butter or oil halfway through (at the 6-8 minute mark). Exact timing depends on your specific air fryer model and the size of your chicken cubes. Always confirm doneness with an instant-read thermometer — the chicken should reach 165°F / 74°C at its thickest point. Cooking time increases by 3-5 minutes for bone-in thighs.
Q2. Can I make chicken tikka without marinating overnight?
Yes, though the depth of flavour is noticeably better with longer marination. The minimum practical marination time is 2 hours — enough for the spices to penetrate the surface and the yogurt to begin tenderising the chicken. Four to six hours produces significantly better results, and overnight marination consistently produces the most flavourful, tender tikka. If pressed for time, even 30-60 minutes of marination is better than none — the marinade still adheres and provides surface flavour.
Q3. Why is my chicken tikka dry in the air fryer?
Dry tikka is almost always caused by overcooking and by skipping the basting step. Chicken breast has very little internal fat and dries out quickly beyond its safe internal temperature of 165°F. Pull it the moment the thermometer reads 165°F, regardless of colour. Basting with butter or oil when you flip the tikka halfway through cooking replenishes the surface moisture and fat that has cooked off during the first half. Using chicken thighs instead of breast provides significantly more protection against drying.
Q4. What is kasuri methi and can I skip it?
Kasuri methi is dried fenugreek leaves — available at any Indian grocery store and increasingly at mainstream supermarkets in their international food sections. It has a distinctive, slightly bitter herbal quality that is deeply associated with restaurant-style North Indian cooking. It is skippable if unavailable — the tikka will still be very good — but the flavour it contributes is genuinely unique and irreplaceable. If you cook Indian food regularly, buying a small bag is worthwhile; it stores well for months and improves dozens of dishes.
Q5. Can I use store-bought tandoori masala instead of individual spices?
Yes, completely. If the full spice list feels daunting, replace the coriander powder, garam masala, and tandoori chicken masala with 2-3 tablespoons of a good store-bought tandoori marinade powder. Keep the Kashmiri chili (for colour), the kasuri methi (for flavour), and the besan (for the crust). The result will be slightly less customised but still excellent and authentic-tasting.
Make It Tonight
Chicken Tikka is one of those dishes where the technique genuinely matters as much as the ingredients. The overnight marinade, the besan trick, the mid-cook basting, the brief rest before serving — none of these steps is complicated, but each one contributes something specific that the finished dish would be noticeably poorer without.
Get all of them right, and you will produce something that earns a 4.95-star rating from everyone at your table — something that makes people stop talking for a moment, reach for the chutney, and immediately ask when you are making it again.
Try this recipe and share your results below! Tell us whether you used breast or thigh, how long you marinated, and which serving style worked best for your household. And if you tried the dhungar smoky finish, we absolutely want to know how it turned out.
Pairs perfectly with: Mint-Coriander Chutney | Onion Rings | Lemon Wedges | Chaat Masala | Basmati Rice | Butter Naan
Also try: Air Fryer Tandoori Chicken | Air Fryer Paneer Tikka | Chicken Tikka Masala | Air Fryer Tandoori Shrimp