If you have ever sat at a North Indian restaurant — whether it is a bustling dhaba on a Punjab highway or an air-conditioned biryani house in Delhi — you have almost certainly had a small steel bowl of Boondi Raita placed beside your main course without even asking for it.
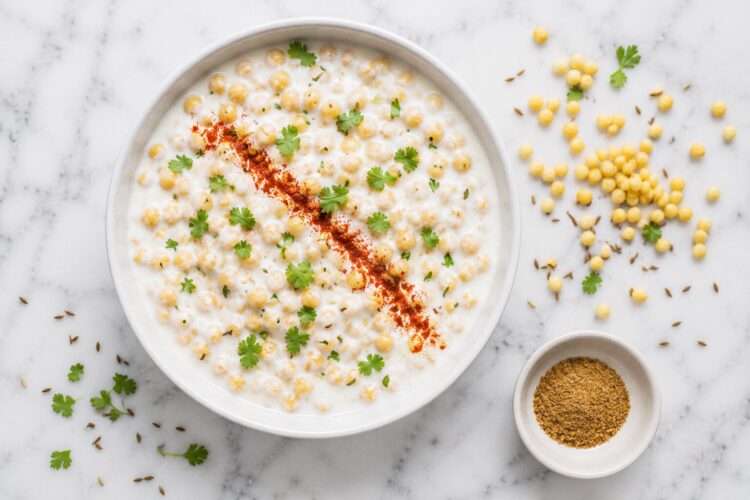
There it sits, cool and white with specks of red chili and green coriander on top, and those little golden boondi pearls peeking through the yogurt. You scoop a spoonful alongside your plate of spiced rice or stuffed paratha and something clicks — the heat settles, the richness lifts, and the whole meal makes sense.
That is what a good Boondi Raita does. It does not demand attention. It simply makes everything better.
Boondi Ka Raita is one of the most widely loved raita varieties in Indian cooking — popular enough that it appears on nearly every North Indian restaurant menu from the most humble dhaba to the most polished fine-dining thali. And yet it is also one of the quickest, easiest things you can make at home. No cooking. No special equipment. Under 10 minutes from start to finish.
This guide gives you the complete restaurant-style version — with the double-garnish technique, the crispy-and-soft boondi method, and the precise spice balance that separates an extraordinary bowl of Boondi Raita from an ordinary one.
What Is Boondi Raita? (The Name Tells the Story)
The word boondi derives from boond — the Hindi word for water droplets. And boondi are exactly that: tiny, round, spherical fried balls made from chickpea flour (besan) batter, so small they look like golden beads or miniature water droplets frozen mid-fall.
They are made by pressing chickpea flour batter through a perforated ladle held over hot oil — the batter falls in drops and puffs into perfectly round spheres almost instantaneously. These fried spheres are light, hollow, crunchy, and slightly savory. They absorb liquid readily — which is precisely what makes them perfect in raita.
Raita is the broad category of yogurt-based accompaniments that form an essential part of North Indian cuisine — cooling, tangy, mildly spiced, and specifically designed to counterbalance the heat and richness of the dishes they accompany.
Boondi Raita combines both: the creamy, spiced yogurt base of a classic raita with the unique texture of boondi — crunchy when first added, gradually softening as they absorb the yogurt. The result is a raita with textural interest and substance that plain yogurt alone cannot provide.
Why This Recipe Is Restaurant-Style — And What That Actually Means
Restaurant Boondi Raita is different from a basic home version in four specific ways:
1. The yogurt is whisked completely smooth. Restaurants never serve lumpy raita. The yogurt is beaten with a whisk until it looks silky and pourable — this makes the raita look more refined and ensures the spices distribute evenly.
2. The spice layering is precise. Restaurant versions use roasted cumin powder, chaat masala, red chili powder, black salt (kala namak), and regular salt together. The combination produces a flavour depth that single-spice versions cannot achieve. Each spice plays a specific role.
3. Soft boondi inside, crunchy boondi on top. The best restaurant-style presentation uses soaked, softened boondi folded into the raita — and then a small handful of unsoaked, still-crunchy boondi scattered on top just before serving. This gives you two textures in one bowl: creamy and soft inside, with a satisfying crunch on top.
4. The garnish is intentional. A sprinkle of red chili powder in a thin line across the surface, a scatter of fresh coriander, and those crispy boondi on top — this is the restaurant presentation that makes the bowl visually striking before a single spoon is dipped in.
Ingredients for Boondi Raita (Serves 4)
Main Ingredients
Plain Yogurt / Dahi (1 cup / 250g, chilled) This is the foundation. Use full-fat, fresh yogurt for the richest, creamiest result. The yogurt should not be sour — fresh dahi with a mild, clean tang is what you want. If the yogurt is already sour, add ¼ teaspoon of sugar to balance it. For a thicker, restaurant-style consistency, use hung curd or thick Greek yogurt.
Chilled Milk or Water (½ cup) Restaurants thin their raita to a pourable, medium consistency — not as thick as dip, not as thin as lassi. Cold milk gives a slightly richer result; cold water keeps it lighter. Both are correct.
Plain Salted Boondi (½ cup) The hero ingredient. Use plain salted boondi — also called sada boondi or namkeen boondi — for the most balanced, versatile raita. Avoid masala boondi (heavily spiced) for this recipe, as their strong flavoring can overwhelm the carefully balanced spice mix in the yogurt.
Where to find boondi: Available at every Indian grocery store, most general stores in India, and online. Common brands include Haldiram’s, Bikaji, and Aashirvaad. Always check the best-before date — old boondi that has been stored too long can have a slightly off smell from the oil going rancid. Smell before using.
Roasted Cumin Powder / Bhuna Jeera (½ teaspoon) This is the aromatic backbone of Boondi Raita. Raw cumin powder is good; freshly roasted cumin powder is exceptional. The roasting process drives off moisture and develops dozens of new aroma compounds — a smokier, nuttier, more complex character than raw cumin.
To make roasted cumin powder: Dry roast 2 tablespoons of whole cumin seeds in a small pan over medium-low heat, stirring constantly, for 3-4 minutes until darkened and fragrant. Cool completely, then grind to a fine powder. Store in a small airtight jar — it keeps well for 2-3 months and improves dozens of Indian dishes.
Chaat Masala (¼ to ½ teaspoon) The ingredient that makes Boondi Raita taste specifically like a restaurant raita. Chaat masala is a complex spice blend containing dried mango powder (amchur), black salt, cumin, coriander, and various other spices — producing a simultaneously tangy, savory, slightly spicy, and deeply aromatic flavour that no single spice replicates. Start with ¼ teaspoon and increase to taste.
Red Chili Powder (¼ teaspoon) Adds color and a gentle warmth. Use Kashmiri red chili powder for vivid color with minimal heat, or regular red chili powder for more heat with less visual impact. Adjust to your preference.
Black Salt / Kala Namak (¼ teaspoon) Black salt’s distinctive sulfurous, savory quality is characteristic of North Indian raitas and chaat dishes. It adds a depth that regular salt alone cannot provide. If unavailable, substitute with regular salt — but the raita will taste noticeably different from the restaurant version.
Salt to taste Use in addition to the black salt — the combination of both provides the right savory balance.
For Garnish
- 1-2 tablespoons fresh coriander leaves, finely chopped
- A small pinch of red chili powder (for the surface dusting)
- 2-3 tablespoons unsoaked, crispy boondi (reserved from the ½ cup)
- Optional: 1 tablespoon fresh mint leaves, torn
- Optional: A pinch of chaat masala dusted on the surface
How to Make Restaurant-Style Boondi Raita: Step-by-Step
Step 1 — Soak the Boondi (5-7 Minutes Passive)
Measure out ½ cup of plain salted boondi. Reserve 2-3 tablespoons separately in a small bowl — these stay unsoaked and are used for the crunchy garnish.
Place the remaining boondi in a small bowl. Pour warm (not hot — approximately 50°C/120°F) water over them until they are just submerged. Cover and set aside for 5-7 minutes.
Why warm water, not hot? Hot water (above 70°C) can make the boondi dissolve rather than just soften, turning them mushy and losing their shape. Warm water is sufficient to soften them — they will absorb the liquid and turn from crunchy and hollow to soft and yielding.
After soaking, drain through a fine strainer. Hold the boondi in your palm and press very gently — squeeze out excess water without crushing them. You want them soft and moist, not waterlogged. Set aside.
For a crispier texture throughout: Skip the soaking entirely. Add dry boondi directly to the raita just before serving. They will stay crunchy for about 15-20 minutes before gradually softening as they absorb the yogurt. This is the version to use if you are serving immediately.
Step 2 — Whisk the Yogurt
Pour the chilled dahi into a mixing bowl. Using a fork or a small whisk, beat the yogurt vigorously for 30-45 seconds until it is completely smooth, lump-free, and slightly airy. You should see no clumps or solid pieces of yogurt remaining.
This whisking step transforms the texture from thick and dense to smooth and silky — the foundation of a properly made raita. Restaurant raita is never lumpy; the smoothness is the first signal of quality.
Step 3 — Add Milk and Spices
Pour the cold milk into the whisked yogurt, stirring as you add it, until the raita reaches a medium consistency — pourable but not thin, coating the back of a spoon lightly.
Add the roasted cumin powder, chaat masala, red chili powder, black salt, and regular salt. Stir everything together until the spices are completely and evenly distributed through the yogurt. Taste carefully at this stage — the spice balance should feel slightly over-seasoned, as it will mellow once the boondi are added.
Tasting at this stage is essential. The boondi are already salty, and as they soak into the yogurt, they will release a little of their salt. Season the yogurt base slightly lighter than your final target, accounting for the salt the boondi will contribute.
Step 4 — Fold In the Boondi
Add the soaked, drained boondi to the spiced yogurt. Fold gently with a spoon — stir slowly so the boondi are evenly distributed without being crushed. They should remain whole and visible throughout the raita rather than being mashed.
Cover the bowl and refrigerate for 10-15 minutes before serving. This short resting time allows two things to happen: the boondi absorb some yogurt and become creamier and more integrated, and the spices bloom and meld into the dairy for a more rounded, unified flavor.
Step 5 — Garnish and Serve (The Restaurant Technique)
Transfer the chilled raita to a serving bowl. Smooth the surface with the back of a spoon.
Now the garnish — the detail that elevates home cooking to restaurant presentation:
- Scatter the reserved unsoaked crispy boondi across the surface — they add immediate visual texture
- Dust a thin line or scattered pinch of red chili powder across the white surface — the contrast is striking
- Scatter the finely chopped fresh coriander (and mint, if using)
- Optional: a tiny pinch of chaat masala dusted over the top
Serve immediately while the garnish boondi are still crunchy, or refrigerate for up to 2 hours with the garnish applied just before serving.
Soft Boondi vs Crispy Boondi: What Works When
This is one of the most discussed aspects of Boondi Raita and the answer depends entirely on personal preference and serving context:
| Preference | Method | When to Use |
|---|---|---|
| Fully soft boondi | Soak in warm water 7-10 min | Best for make-ahead raita, serving with biryani, meals where the soft texture is preferred |
| Semi-soft boondi | Soak for 3-4 min only | Most restaurant-style presentations; slight yield with some bite remaining |
| Fully crunchy boondi | No soaking — add just before serving | Best for immediate serving; distinct texture contrast; popular at weddings and large gatherings |
| Mixed (soft inside + crunchy on top) | Soak main portion; reserve some dry | The classic restaurant presentation; gives both textures in every serving |
5 Variations of Boondi Raita Worth Making
1. Sweet Boondi Raita (Meetha Raita)
Add 1 tablespoon of sugar to the spiced yogurt base. The sweetness creates a beautiful contrast with the savory spices and is a traditional variation served in Rajasthani meals and some North Indian festive thalis. Skip the chili powder if making a fully sweet version.
2. Masala Boondi Raita (Extra Spiced)
Add ¼ teaspoon of garam masala and ½ teaspoon of finely chopped green chili to the basic recipe. The additional spicing produces a bolder, more assertive raita that stands up well alongside very rich, heavy dishes like Dum Biryani or Dal Makhani.
3. Boondi Pomegranate Raita
Fold in 3 tablespoons of fresh pomegranate arils along with the boondi. The pomegranate seeds add bursts of sweet-tart juice and beautiful jewel-like color — an elegant festive variation that works particularly well for party presentations.
4. Boondi Mint Raita (Pudina Boondi Raita)
Replace the coriander garnish entirely with fresh mint leaves — both as a finely chopped addition to the yogurt and as a whole-leaf garnish. The mint creates a more intensely cooling, refreshing character that pairs particularly well with spicy dishes.
5. Tadka Boondi Raita (Tempered Version)
Heat 1 teaspoon of oil in a small pan. Add ¼ teaspoon of mustard seeds and let them pop. Add 1 dried red chili and 6-8 curry leaves — fry for 10 seconds. Pour this hot tadka over the assembled raita just before serving. The mustard-curry leaf tempering adds a South Indian influence and a gorgeous aroma.
What to Serve Boondi Raita With
The versatility of Boondi Raita makes it one of the most useful accompaniments in Indian cooking:
With Rice Dishes:
- Biryani — the single most popular pairing; the cool, spiced yogurt with soft boondi is the ideal contrast to the aromatic, spiced rice
- Vegetable Pulao or Matar Pulao — lighter rice dishes where the raita provides the main flavour interest alongside the rice
- Jeera Rice + Dal — even simple everyday combinations feel complete with this raita
With Flatbreads:
- Aloo Paratha — the classic dhaba combination; stuffed paratha with boondi raita is one of North India’s most beloved breakfast and lunch pairings
- Laccha Paratha — the flaky texture pairs particularly well with the soft-crunchy boondi
- Roti or Phulka — everyday meals feel more complete
With Snacks and Starters:
- Samosa and kachori — the raita functions as a cooling dipping sauce
- Papdi — drizzle boondi raita over papdi for an instant, elegant chaat-style snack
- Tikki and pakoras — the cool yogurt cools the fried snacks perfectly
At Celebrations:
- A large bowl of Boondi Raita is essential at North Indian wedding lunches and banquets, where it accompanies the full thali
- It serves well for parties because it can be made ahead and holds its texture and flavour for several hours in the refrigerator
Health and Nutritional Benefits
Boondi Raita is genuinely nutritious despite being a side dish rather than a main course:
Yogurt (the dominant ingredient):
- Rich in calcium — one serving provides approximately 160mg, about 16% of the daily requirement
- Contains live probiotic cultures that support gut health and immunity
- Provides complete protein with all essential amino acids
- The cooling dairy fat helps neutralize the heat of capsaicin in spicy dishes — the same biochemical reason raita works so effectively with spicy Indian food
Roasted Cumin:
- Contains thymol and other compounds that stimulate digestive enzyme production, reducing post-meal bloating and gas
- A primary reason cumin is a fixture in Indian raita recipes — it aids digestion of the accompanying meal
Black Salt (Kala Namak):
- Contains trace minerals including sulfur compounds
- Used in Ayurvedic medicine to support bile production and liver function
- Lends a distinctive umami depth without excess sodium compared to regular salt
Boondi (in moderation):
- Made from chickpea flour (besan), which is a good source of plant protein and fiber
- The deep-frying adds fat, so boondi should be used in modest quantities — ½ cup for 4 servings is a balanced amount
Per serving, Boondi Raita at approximately 85 kcal is one of the lowest-calorie Indian accompaniments available — making it an excellent choice for calorie-conscious diners who still want flavourful, satisfying food.
Expert Tips for Perfect Boondi Raita Every Time
Taste the boondi before using. Commercial boondi has a shelf life, and the oil used in frying can go rancid over time — producing an unpleasant smell that will ruin the raita. Fresh boondi should smell neutral and slightly savory. If it smells off, do not use it.
Never use hot water for soaking. Boiling or very hot water turns the boondi to mush. Warm water — comfortably warm, not steaming — is the correct temperature. The soaking time of 5-7 minutes produces the ideal semi-soft texture.
Season lighter than you think is needed. The boondi already contain salt, and they will release that salt into the yogurt as they sit. Over-salted raita is one of the most common problems — always undersalt the yogurt and adjust after combining.
Add boondi garnish at the last minute. If you are transporting or preparing ahead, keep the unsoaked garnish boondi in a separate small bag and scatter them on the surface just before serving. This preserves the visual contrast and the textural crunch of the garnish.
The chilling step is not optional. Even 15-20 minutes of refrigeration after assembling noticeably improves the flavour — the spices bloom further into the cold yogurt, the boondi soften slightly more, and the whole bowl becomes more cohesive and unified.
Rescue an over-spiced raita by adding a few tablespoons of plain whisked yogurt and a teaspoon of milk — this dilutes the spice level without changing the consistency dramatically.
Storage and Make-Ahead Guide
Refrigerator: Boondi Raita stores well in an airtight container for up to 1 day. As it sits, the boondi absorb more yogurt and soften further — the next-day version has fully soft, creamy boondi throughout rather than the semi-soft texture of freshly made raita. Many people prefer this fully-integrated texture.
Keep the garnish separate. If making ahead for a party or meal, assemble the raita (without garnish) and refrigerate. Apply the crispy boondi, chili, and coriander garnish just before serving.
Freezing: Do not freeze Boondi Raita. Yogurt separates and turns grainy on thawing, and the boondi texture becomes unpleasant. Make it fresh or at most a day ahead.
Consistency adjustment when serving from refrigerator: The raita thickens noticeably overnight. Stir in 1-2 tablespoons of cold milk or water before serving to restore the original pourable consistency.
Boondi Raita vs Other Popular Raitas
| Raita | Key Ingredient | Texture | Flavour | Best Paired With |
|---|---|---|---|---|
| Boondi Raita | Fried gram flour balls | Creamy + textured | Savory, spiced, slightly tangy | Biryani, paratha, pulao |
| Cucumber Raita | Grated kheera | Light, watery | Fresh, cooling, minimal spice | Any spiced curry, light meals |
| Onion Tomato Raita | Raw onion + tomato | Chunky | Tangy, sharp | Dal, sabzi, everyday meals |
| Palak Raita | Blanched spinach | Smooth-chunky | Earthy, herbal | Roti, paratha, light dinners |
| Fruit Raita | Seasonal mixed fruit | Creamy-chunky | Sweet-tangy | Biryani, festive thalis |
Boondi Raita sits at the intersection of the most textural and most restaurant-associated raita varieties — which is why it appears on so many professional menus and why it makes such an impression when well-made at home.
Frequently Asked Questions
Q1. Can I make Boondi at home instead of using store-bought?
Yes, and homemade boondi is significantly fresher and more flavorful than commercial versions. Make a smooth, medium-thin batter with besan (chickpea flour), salt, and water. Hold a perforated ladle (or jhara) over hot oil and pour the batter through the holes — tiny drops fall into the oil and puff into spheres within 30-45 seconds. Drain and cool before using. However, for a quick 10-minute raita, store-bought boondi is completely practical and works excellently.
Q2. What is the difference between plain boondi and masala boondi for raita?
Plain boondi (also called salted or sada boondi) are made with just chickpea flour, salt, and oil — a neutral savory flavor that works as a blank canvas for the spiced yogurt. Masala boondi contains additional spices like chili, coriander, and chaat masala built in — they have a stronger, more assertive flavor of their own. For raita, plain boondi is recommended because it allows you to control the spice balance precisely. Masala boondi can overwhelm the subtle spicing of the yogurt.
Q3. How long can I keep Boondi Raita in the refrigerator?
Boondi Raita keeps well in an airtight container for up to 1 day in the refrigerator. After that, the yogurt may develop excess sourness and the boondi will become very soft and slightly gummy. For the best texture, consume within 24 hours of making. If you want to extend the life of the raita without the boondi going too soft, make the spiced yogurt base ahead and add the boondi only 30-60 minutes before serving.
Q4. My boondi raita is too sour. How do I fix it?
Sourness usually comes from yogurt that was already tangy, or from the raita sitting too long. To fix: add ¼ teaspoon of sugar and stir — sugar is the most effective and fastest way to balance excess sourness in raita without changing the texture. Alternatively, stir in a few tablespoons of fresh, un-soured yogurt to dilute the tang. A pinch of chaat masala can also redirect the palate from sourness toward complexity.
Q5. Is Boondi Raita gluten-free?
Boondi is made from chickpea flour (besan), which is naturally gluten-free. However, some commercial boondi brands process their products on equipment shared with wheat flour, creating cross-contamination risk. If strict gluten avoidance is required, check the packaging for a certified gluten-free label or choose a brand that specifically indicates gluten-free manufacturing. The yogurt, spices, and other ingredients in this raita are naturally gluten-free. Always check the specific asafoetida (hing) brand used — some contain wheat flour as a carrier.
The Little Bowl That Completes Every Meal
Boondi Raita is proof that the most impactful things in Indian cooking are often the quietest. It does not announce itself. It does not demand attention. It simply sits beside the biryani or paratha and does its work — cooling, balancing, adding texture, completing the meal in a way that nothing else quite manages.
Make it once properly — with roasted cumin powder, the double-boondi garnish technique, and the careful spice balance — and you will understand exactly why this bowl appears on nearly every North Indian restaurant table without being ordered.
Try this Boondi Raita recipe and share your results in the comments below! Tell us which version you made — soft boondi or crunchy, sweet or spiced — and what you served it with. And if the restaurant-style garnish technique made a difference, we want to hear that too.
Pairs perfectly with: Chicken Biryani | Vegetable Biryani | Aloo Paratha | Dal Makhani | Matar Pulao | Chole Bhature | Any spiced North Indian curry