Walk into any South Indian restaurant — from a humble Udupi tiffin centre in Bengaluru to an upscale South Indian dining room in Delhi or Mumbai — and there is one dish whose arrival at the table turns every head in the room.
The masala dosa.
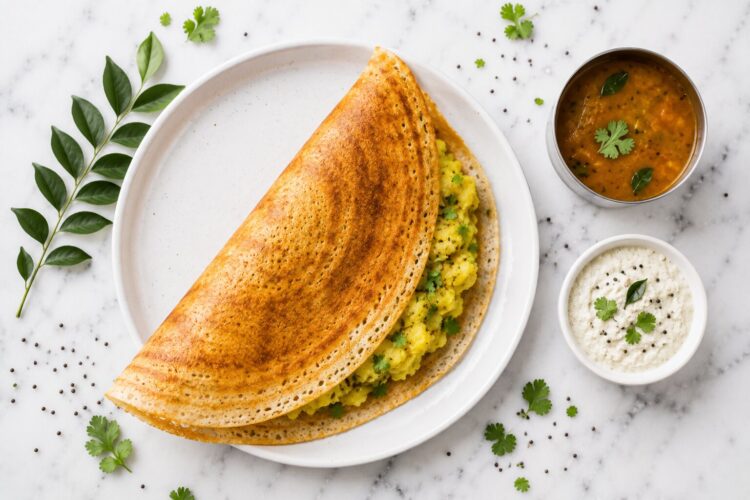
It arrives on a large plate, golden and impossibly crisp, curled or folded around a fragrant potato filling that has been tempered with mustard seeds and curry leaves. The surface catches the light. There is the sound of it when you break through the first time — that clean, satisfying crackle. Alongside it: a small bowl of fresh white coconut chutney and a steel cup of sambar still steaming from the kitchen.
This is one of India’s most beloved breakfasts. Not just in the South — masala dosa is now eaten enthusiastically everywhere from Chandigarh to Kolkata, from London to New Jersey. And once you understand what makes a great masala dosa — the fermentation science, the batter ratios, the cast-iron technique — you can make one at home that genuinely rivals the restaurant version.
This guide gives you everything: the complete batter recipe with all the professional tips, the step-by-step potato masala, the Mysore masala dosa variation with its red chutney, expert troubleshooting for every common dosa problem, and a complete answer to every question first-time dosa makers ask.
What Is Masala Dosa? The Story Behind India’s Favourite Crepe
Dosa is a thin, fermented crepe made from a batter of ground rice and lentils. It is one of the oldest recorded foods in South Indian cuisine — references to a rice-and-lentil pancake appear in Tamil literature dating back over a thousand years.
Masala dosa specifically refers to the version filled with aloo masala — a spiced, tempered potato curry. Food historians trace its popularisation to the Tuluva Mangalorean cuisine of coastal Karnataka, from where Udupi restaurants spread it across India and eventually the world. The iconic MTR restaurant chain in Bengaluru and the network of Udupi restaurants that appeared in Mumbai in the 1960s-70s are largely credited with bringing masala dosa to national prominence.
Today it is arguably South India’s most recognised culinary export — and for good reason. The combination of a fermented, slightly sour crepe with a sweet-spiced potato filling, cool coconut chutney, and earthy sambar creates a breakfast experience that is simultaneously complex and deeply satisfying.
Masala Dosa vs Mysore Masala Dosa: What’s the Difference?
This is a question that confuses many home cooks and diners. Both use the same crispy dosa crepe and the same potato filling — but there is one significant distinction:
| Feature | Regular Masala Dosa | Mysore Masala Dosa |
|---|---|---|
| Origin | Udupi / coastal Karnataka | Mysore, Karnataka |
| Inner surface | Plain (no chutney spread) | Smeared with red garlic-chili chutney |
| Filling | Aloo masala (mild) | Aloo masala + red chutney = spicier |
| Butter | Optional | Typically more generous |
| Flavor profile | Mild, slightly sour, aromatic | Spicier, more intense, richer |
| Heat level | Mild | Medium to hot |
The Mysore version adds a vibrant red chutney — made from garlic, dried red chilies, and sometimes coconut — spread on the inside surface of the dosa before the potato filling goes in. This small addition transforms the flavor profile entirely: it adds heat, depth, and a garlicky sharpness that makes every bite more complex.
Both versions are included in this guide.
Understanding Dosa Batter: The Science of Fermentation
The single most important thing to understand about masala dosa is that the batter is the foundation of everything. A properly fermented batter will produce golden, crisp, aromatic dosas every time. A poorly fermented batter will produce pale, chewy, flat crepes regardless of how skilled you are at the tawa.
Why Fermentation Transforms the Batter
Fermentation is a biological process in which naturally occurring microorganisms — primarily Leuconostoc mesenteroides and Lactobacillus bacteria present on the rice and lentils — consume the sugars in the batter and produce carbon dioxide gas and lactic acid as byproducts.
This process does four critical things:
1. Creates the characteristic sour taste — the lactic acid produced during fermentation is responsible for the slightly sour, complex flavor of dosa batter. This sourness is not a defect; it is essential to what makes dosa distinctive.
2. Makes the crepe crisp — the carbon dioxide bubbles distributed throughout the batter create tiny air pockets that, when they hit the hot tawa, expand rapidly and produce the thin, porous, crisp structure of a good dosa.
3. Improves nutrition — fermentation partially breaks down the phytic acid in rice and lentils, making the minerals and nutrients significantly more bioavailable than in unfermented form. Fermented dosa batter is measurably more nutritious than the same ingredients cooked without fermentation.
4. Develops aroma — the esters and other organic compounds produced during fermentation contribute to the characteristic toasty, complex aroma of dosa cooking on a hot iron surface.
Ingredients for Restaurant-Style Masala Dosa (Serves 6–8)
For the Dosa Batter
- 1½ cups raw rice (sona masuri or any short-to-medium grain raw rice)
- ½ cup idli rice (optional but adds the sticky quality that helps dosas brown evenly)
- ½ cup urad dal (split black gram, hulled)
- 3 tablespoons chana dal (split Bengal gram — adds texture and golden colour)
- ½ teaspoon methi seeds (fenugreek seeds — adds aroma and helps fermentation)
- 3 tablespoons poha (flattened rice — soaked 30 minutes before blending; adds lightness and helps crisp texture)
- Salt to taste
- Water — for soaking and blending
Pro tip: Some restaurants add a small amount of rice flour or fine semolina (chiroti rava) to the finished batter for extra crispness. If you want to replicate this: stir 2 tablespoons of rice flour into the batter after fermentation is complete, before making dosas.
For the Aloo Masala (Potato Filling)
- 3 medium potatoes (about 400g), boiled or pressure-cooked until fully tender
- 1 medium onion, thinly sliced
- 1-inch piece ginger, finely grated
- 2-3 green chilies, slit or finely chopped
- 8-10 curry leaves
- 1 teaspoon mustard seeds
- ½ teaspoon cumin seeds
- 1 teaspoon chana dal (soaked in hot water for 30 minutes, then drained)
- 1 teaspoon urad dal (soaked with the chana dal)
- ¼ teaspoon turmeric powder
- 1 pinch asafoetida (hing)
- 1 tablespoon oil (any neutral oil)
- Salt to taste
- 2 tablespoons fresh coriander leaves, chopped
For the Mysore Red Chutney (for Mysore Masala Dosa)
- 4-6 dried red chilies (Byadagi variety for milder heat and deep colour, or Guntur for more heat)
- 6-8 garlic cloves
- 2 tablespoons desiccated coconut (or fresh coconut)
- 1 teaspoon roasted chana dal (dalia)
- ½ teaspoon tamarind paste
- Salt to taste
- Water — as needed to blend to a smooth, spreadable paste
For Making Dosas
- Oil, ghee, or butter — for cooking
- Half an onion — for seasoning the cast-iron tawa between dosas
How to Make Masala Dosa: Complete Step-by-Step
Stage 1 — Soak (4-5 Hours)
Dal mixture: In one bowl, combine the urad dal, chana dal, and methi seeds. Rinse thoroughly 2-3 times. Cover with plenty of cold water and soak for 4-5 hours. In a separate small bowl, rinse and soak the poha for 30 minutes before blending.
Rice mixture: In a second bowl, combine the raw rice and idli rice (if using). Rinse thoroughly. Cover with cold water and soak for 4-5 hours.
Why soak separately? The dal and rice have different textures and require different blending times for optimal results. The dal needs to be blended to a very smooth, frothy consistency — any coarse methi seed particles will taste bitter. The rice is blended to a slightly coarser texture. Blending separately gives you full control over each.
Stage 2 — Blend the Batter
Blend the dal: Drain the soaked dal. Add to a wet grinder or high-powered blender with the soaked and drained poha. Add approximately 1 to 1¼ cups of cold water gradually while blending. Blend for 8-10 minutes (in a wet grinder) or 5-6 minutes (in a powerful blender) until the dal batter is completely smooth, light, and frothy. It should look almost like a mousse — pale, airy, and very finely ground with no visible grain. Transfer to a large bowl.
Blend the rice: Drain the soaked rice. Add to the same blender with approximately ½ to ¾ cup of cold water. Blend to a slightly coarse consistency — finer than fine semolina but not as smooth as the dal. This coarser grind gives dosas their characteristic texture and helps them become crisp. Transfer to the bowl with the dal batter.
Combine and salt: Mix the dal batter and rice batter together thoroughly. Add salt to taste and mix again. The combined batter should be thick but pourable — when you lift a ladle and let it fall, it should flow steadily off the spoon.
Consistency check: The batter should coat the back of a spoon lightly. If it is too thick, add a small amount of water. Too thin and the dosas will not have enough substance to become crisp.
Stage 3 — Fermentation (8-16 Hours)
Cover the batter bowl loosely with a lid or kitchen towel — it needs some air circulation, not a tight seal. Keep it in a warm, undisturbed place to ferment.
Fermentation time by temperature:
- Hot climate (30-35°C): 6-8 hours, typically overnight
- Moderate temperature (24-28°C): 10-12 hours
- Cold climate (below 20°C): 12-16+ hours; use a warm oven (preheat at 50°C/120°F for 10 minutes, then turn off and leave batter inside with the light on)
- Instant Pot: Use the Yogurt setting for 8-10 hours with an external lid (not the IP sealing lid)
How to test fermentation: Drop half a teaspoon of batter into a bowl of water. If it floats, fermentation is complete. If it sinks, it needs more time. Properly fermented batter will have risen noticeably in volume (nearly doubled), have visible bubbles on the surface, and smell pleasantly sour and slightly tangy — not acidic or alcoholic.
Important: Do not over-ferment. Overly fermented batter becomes too sour, too thin, and produces dosas that spread unevenly and lack the characteristic crisp texture. Check from 6 hours in a hot climate.
Stage 4 — Make the Aloo Masala
Heat 1 tablespoon of oil in a wide pan over medium heat. Add mustard seeds and cumin seeds. When the mustard seeds pop (about 30-40 seconds), add the soaked chana dal and urad dal. Stir constantly until they turn golden — about 60 seconds.
Add asafoetida, grated ginger, curry leaves, and slit green chilies in quick succession. Stir for 30 seconds until fragrant.
Add the sliced onions and cook, stirring regularly, for 6-7 minutes until they become fully translucent and begin to just catch colour at the edges.
Add turmeric and salt. Stir to combine. Now crumble the cooked potatoes directly into the pan — use your hands to break them into roughly textured pieces rather than smooth mash. You want some texture remaining, not a smooth puree.
Add 2 tablespoons of the water used to boil the potatoes (or plain water). Stir gently for 2 minutes, letting the potato absorb the spiced oil and onion mixture. The masala should look cohesive and golden-tinted from the turmeric. Add fresh coriander and stir through. Set aside and keep warm.
Stage 5 — Prepare the Mysore Red Chutney (Optional)
Soak the dried red chilies in hot water for 15 minutes to soften. Drain. Combine in a blender with the garlic cloves, desiccated coconut, roasted chana dal, tamarind paste, and a pinch of salt. Add 2-3 tablespoons of water and blend to a smooth, thick, spreadable paste. It should be intensely flavoured — this is spread thinly, not generously. Set aside.
Stage 6 — Cook the Masala Dosa
Prepare your batter: After fermentation, the batter should be checked for consistency. Fermentation may have thinned it slightly. If needed, gently stir without deflating the batter too much. The consistency for pouring should be like thick cream — thinner than pancake batter, thicker than crepe batter.
Season the tawa: Heat your cast-iron tawa or heavy non-stick dosa pan over medium-high heat for 3-4 full minutes. For a cast-iron pan: pour a few drops of oil and rub vigorously with a cut onion. The onion seasons the surface, removes any residue, and prevents sticking. This step is not optional for cast iron.
The heat test: Sprinkle a few drops of water on the pan surface. If they evaporate immediately with a sharp sizzle, the tawa is hot enough. If they sit and steam slowly, wait another minute.
Pouring and spreading: Reduce heat slightly to medium. Take a full ladle of batter (approximately ¼ to ⅓ cup) and pour it into the centre of the pan. Immediately begin spreading it in a circular, outward motion — moving from the centre to the edges in concentric circles. Work confidently and quickly — the batter begins setting immediately on the hot surface. Aim for a thin, even layer approximately 8-9 inches in diameter.
The single most common mistake: Pouring the batter and then waiting. You have approximately 3-4 seconds from when the batter hits the hot pan before it sets enough that spreading becomes difficult. Practice the motion before your first dosa — pour, then immediately and confidently spread outward.
Drizzle ¼ to ½ teaspoon of oil or ghee around the edges of the dosa. This edge oil is what creates the golden, crisp rim characteristic of restaurant dosas.
Cooking: Cook on medium to medium-high heat for 1-2 minutes until the surface looks dry and opaque (no more wet, shiny batter visible), and the edges begin to lift and turn golden. The underside should be deep golden to light brown.
For Mysore Masala Dosa: Before adding the potato filling, spread ½-1 teaspoon of the red chutney across the surface of the dosa while it is still on the tawa. The heat of the dosa briefly cooks the chutney and melds it with the surface.
Adding the filling: Place 2-3 tablespoons of the aloo masala on one half of the dosa. Either fold the other half over the filling, or roll the entire dosa into a cylinder. Both are authentic presentations.
For extra crispness: After folding, increase heat to medium-high for 30-45 seconds to char the exterior slightly. This final high-heat moment creates the deeply golden, slightly blistered exterior associated with the best restaurant dosas.
Remove with a spatula and serve immediately.
Between dosas: Cast-iron pans benefit from being re-seasoned between each dosa with the onion-oil method. For non-stick pans, simply wipe the surface with a damp cloth to cool it slightly and remove any residue before pouring the next dosa.
The Cast-Iron Advantage: Why Pan Choice Transforms Your Dosa
Most professional advice focuses on the batter — but the cooking surface is equally critical. Here is why:
| Pan Type | Heat Retention | Colour | Crispness | Suitable For |
|---|---|---|---|---|
| Cast-iron tawa | Excellent | Deep golden brown | Maximum | Best overall — reproduces restaurant quality |
| Heavy-bottom non-stick | Good | Light to medium golden | Good | Everyday cooking, beginner-friendly |
| Regular non-stick | Poor | Pale, uneven | Minimal | Produces flat, pale dosas |
| Steel/stainless | Variable | Uneven | Can stick | Difficult to use without experience |
Restaurant dosas are so consistently golden because the cast-iron griddles in professional kitchens are on continuous heat for 6-8 hours before service even begins — they hold heat with extraordinary evenness and produce that signature deep colour and aroma. Replicating this at home requires heating your cast-iron pan for a full 4-5 minutes before your first dosa and not letting it cool between batches.
What to Serve with Masala Dosa
A complete masala dosa meal requires three accompaniments:
1. Coconut Chutney — the classic, essential pairing. Fresh grated coconut blended with green chili, ginger, and tempered with mustard seeds and curry leaves. The cool creaminess balances the crisp, hot dosa perfectly.
2. Sambar — the South Indian lentil and vegetable stew. Its sour, tamarind-flavored broth is the ideal dunking vehicle for torn pieces of crispy dosa. Tiffin sambar (slightly thinner and more soupy than meal sambar) is the traditional restaurant accompaniment.
3. Tomato Chutney — an optional but popular third accompaniment in South Indian restaurants. Tangy, spiced, and slightly sweet — provides a contrast to the coconut chutney.
Expert Tips and Troubleshooting
The Most Common Masala Dosa Problems — Solved
Problem: Dosa sticks to the pan Causes: Pan not hot enough, pan not properly seasoned, or batter spread too thickly. Solutions: Heat cast-iron pan longer before starting. Season with onion between each dosa. Pour batter onto a hotter surface. Ensure batter is not too thick.
Problem: Dosa tears when spreading Causes: Batter too thick, under-fermented batter, or pan too hot. Solutions: Thin batter slightly with water. Check fermentation (batter should float test). Reduce heat slightly before pouring.
Problem: Dosa pale and soft instead of golden and crisp Causes: Pan not hot enough, too little oil at edges, batter spread too thickly. Solutions: Use a heavy-bottomed pan or cast iron. Ensure pan is genuinely hot before pouring. Add slightly more oil at edges. Spread batter thinner.
Problem: Dosa too sour Causes: Over-fermented batter. Solutions: Reduce fermentation time next batch. For already over-fermented batter: add 1 tablespoon of rice flour to neutralize sourness slightly. Or blend in a small piece of fresh coconut to the batter.
Problem: Dosa batter not fermenting Causes: Cold temperature, expired/chlorinated water, no active microorganisms on ingredients. Solutions: Move batter to a warmer location. Use filtered or boiled-and-cooled water (chlorine inhibits fermentation). Add 1 tablespoon of yogurt as a fermentation starter.
Key Expert Tips
Soak and blend dal and rice separately. This gives you control over each component’s texture and ensures the methi seeds are ground completely smooth in the dal.
Use cold water when blending. Cold water prevents the heat generated by blending from killing the microorganisms needed for fermentation.
The water-to-batter ratio is critical at pouring time. Fermentation changes the batter consistency. Always stir and check before making dosas — the batter should flow like thick cream. If it has become too thick overnight, add water teaspoon by teaspoon until correct.
Never deflate the fermented batter. When stirring the fermented batter, be gentle. Those carbon dioxide bubbles are what make your dosas crisp. Aggressive mixing collapses them.
Use the right burner. The largest burner on your stove is the right burner for dosa making. The heat needs to distribute evenly across the entire base of the pan, especially for the edges to cook properly.
Dosa Batter Storage and Make-Ahead Tips
Refrigerating batter: Once properly fermented, the batter can be refrigerated in a covered container for up to 4-5 days. The cold slows fermentation dramatically. Take the batter out 30 minutes before use to bring it to room temperature for best spreading.
Freezing batter: Not recommended — freezing damages the microorganism colonies in the batter and affects fermentation quality if you want to re-ferment. The batter can still be used post-thaw but will produce slightly less crisp dosas.
Over-fermented batter: If the batter has fermented past its peak and tastes too sour, use it to make thick, spongy uthappam (a savory dosa pancake with toppings pressed in) rather than thin crispy dosas. The sourness suits uthappam’s thicker, more bread-like texture.
Nutrition at a Glance
| Nutrient | Per Masala Dosa (1 with filling) | Benefit |
|---|---|---|
| Calories | ~220-250 kcal | Moderate, filling meal |
| Protein | 7g | From dal in batter + dal in masala |
| Carbohydrates | 38g | Complex carbs from fermented rice and lentils |
| Fiber | 4g | Supports digestion |
| Fat | 7g | Primarily from cooking oil/ghee |
| Iron | 2.5mg | From dal and rice combination |
| B Vitamins | Significant | Enhanced by fermentation process |
Masala dosa is a genuinely balanced meal. The fermentation increases nutrient bioavailability significantly, the combination of rice and lentils creates a complete protein profile, and the potato filling provides potassium and Vitamin B6. The sambar accompaniment adds more lentil protein and vegetable micronutrients.
Frequently Asked Questions
Q1. How long should I ferment the dosa batter?
Fermentation time depends entirely on temperature. In a warm Indian climate (28-35°C), 6-8 hours is typically sufficient — overnight is the standard approach. In cooler climates, 12-16 hours is more realistic. The batter is ready when it has nearly doubled in volume, has bubbles visible on the surface, smells pleasantly sour, and passes the float test (a teaspoon dropped in water floats rather than sinks). Never time fermentation by the clock alone — use the visual and sensory indicators.
Q2. Can I make masala dosa without fermenting the batter?
You can make a quick version using instant dosa batter (available at Indian grocery stores) or by using a batter of rice flour, urad dal flour, and yogurt that requires no fermentation. These quick versions produce edible dosas but lack the complex sour flavour, the characteristic crisp porous texture, and the improved nutritional profile that fermentation creates. For occasional dosa making, instant batters are a practical shortcut. For regular making, learning the fermentation process is worth the investment.
Q3. Why are my masala dosas not crispy?
Lack of crispness is almost always caused by one of four things: pan not hot enough when pouring; batter spread too thickly; not enough oil at the edges; or batter that is under-fermented (not enough carbon dioxide bubbles to create the porous structure). The single most effective fix: preheat your pan for 3-4 full minutes before the first dosa, spread the batter as thin as you possibly can while maintaining coverage, and add a proper drizzle of oil around the edges. Use cast iron for significantly better results than any non-stick pan.
Q4. What is the difference between masala dosa and plain dosa?
Plain dosa uses the same fermented batter cooked into the same crisp crepe — but it has no filling. It is typically served rolled (without folding) alongside coconut chutney and sambar. Masala dosa adds the spiced potato filling inside and is usually folded or rolled around the filling. Masala dosa is considered a more complete, satisfying meal because the filling adds protein, fiber, and complex flavour. Both use the same batter; the distinction is entirely in the filling.
Q5. Can I store leftover masala dosa?
Cooked dosas do not store well — they lose their crispness within minutes and become chewy as they cool. This is why dosas are always served immediately from the tawa. The batter, however, stores excellently in the refrigerator for 4-5 days. The potato masala stores in the refrigerator for up to 2 days. The practical approach is to ferment a full batch of batter and make dosas fresh in small batches whenever needed, reheating only the potato filling if making ahead.
Make the Dosa Your Kitchen Is Famous For
Masala dosa asks more of you than most breakfast recipes. The soaking, the careful fermentation, the hot tawa technique — none of it is difficult, but all of it requires understanding rather than just following instructions mechanically.
Once you grasp the fermentation test, nail the batter consistency, and learn the confident spreading motion, everything else falls into place. And then you will have something genuinely worth making — the crispy, golden, aromatic crepe that has been feeding South India for centuries and is now beloved everywhere in the world.
Try this recipe and share your results in the comments below! Tell us how long your batter fermented, whether you made the Mysore version with red chutney, and what the reaction was at your table. First-time masala dosa successes deserve to be celebrated.
Serve with: Coconut Chutney | Tiffin Sambar | Tomato Chutney | Filter Coffee
Also explore: Plain Dosa | Pesarattu (Moong Dal Dosa) | Uttapam | Rava Dosa | Set Dosa