Some dishes take hours of preparation, slow simmering, and a pantry full of specialty ingredients. Paneer Khurchan is not one of them — and that’s exactly what makes it special.
This North Indian gem comes together in about 30 minutes on a single pan, using ingredients you almost certainly already have at home. Paneer strips, sliced onions, tomatoes, bell pepper, a handful of spices — that’s the entire cast. Yet the result is smoky, bold, and satisfying in a way that puts it firmly in the category of dishes you’ll return to again and again.
It’s the kind of recipe that works on a Tuesday night when you want something real without the effort, and equally impressive enough to serve when guests drop by unannounced. Once you understand the technique, you’ll find yourself making it almost instinctively.
This guide covers everything: what Paneer Khurchan actually is, why the cooking method matters so much, the full step-by-step recipe, expert tips, variations, and answers to the questions home cooks ask most often.
What Is Paneer Khurchan? (The Name Explains Everything)
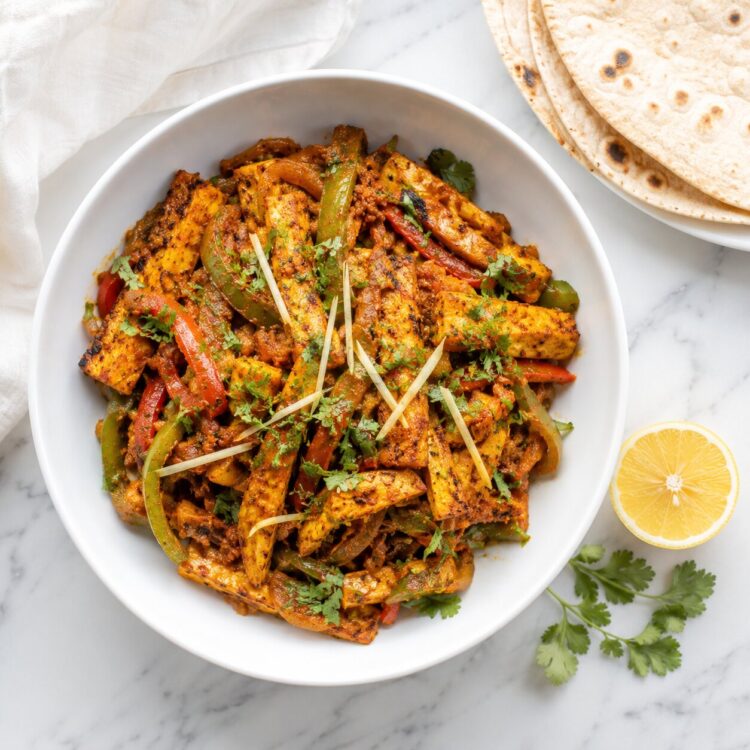
The word khurchan comes from the Hindi verb khurachna, which means “to scrape.” And scraping is exactly what defines this dish. Unlike paneer curries where the cottage cheese is gently folded into a sauce, Paneer Khurchan involves pressing strips of paneer directly against a hot iron tawa (griddle) and then scraping them off — along with the caramelized onion and tomato bits that cling to the surface.
This technique does two important things. First, it gives the paneer a slightly golden, lightly charred edge that you simply cannot achieve in a non-stick pan or a curry pot. Second, the scraping action breaks the paneer strips slightly and mingles them intimately with the vegetable masala, creating a cohesive, semi-dry dish where every bite has both paneer and the bold, spiced base together.
The result is something between a dry sabzi and a sauced curry — intensely flavored, slightly rustic, and deeply satisfying.
Where Does Paneer Khurchan Come From?
Paneer Khurchan is a Punjabi dish, rooted in the dhaba culture of North India. Dhabas — the informal roadside eateries that line highways across Punjab, Haryana, and Delhi — are where this kind of tawa cooking really shines. The flat iron griddle, the high heat, the scraping and tossing — it’s theatrical, fast, and produces food with a distinct character that slow-cooking can’t replicate.
You’ll find Paneer Khurchan on menus at mid-range North Indian restaurants and upscale dhabas, often listed alongside Kadai Paneer and Tawa Paneer. It’s less widely known than those two, which means making it at home gives you a genuine edge — it’s the kind of dish that surprises people pleasantly.
Paneer Khurchan vs. Other Paneer Dishes: How Does It Compare?
| Feature | Paneer Khurchan | Kadai Paneer | Paneer Jalfrezi |
|---|---|---|---|
| Cooking method | Tawa (griddle), scraping | Kadai (wok), simmering | Wok, stir-fry |
| Texture | Semi-dry, slightly charred | Medium gravy | Semi-dry, crunchy veggies |
| Prep time | 30 minutes | 40–45 minutes | 35 minutes |
| Key technique | Scraping on hot tawa | Simmering in kadai masala | High-heat stir-frying |
| Flavor profile | Smoky, tangy, mild-spiced | Bold, spiced, aromatic | Tangy, vibrant, pepper-forward |
| Skill level | Beginner-friendly | Intermediate | Beginner-friendly |
Paneer Khurchan stands out for its speed and the smoky tawa flavor — qualities that make it unique even within the crowded world of North Indian paneer recipes.
Ingredients for Paneer Khurchan (Serves 3)
Main Ingredients
- 250 grams paneer (fresh homemade or good-quality store-bought), cut into batons or strips about 1.5 to 2 inches long
- 2 medium onions (about 90–100 grams), thinly sliced
- 1 large tomato (about 150 grams), chopped
- 1 large green capsicum / bell pepper (about 100 grams), cut into small cubes — red or yellow capsicum work too
- 1-inch piece of fresh ginger, cut into julienne (thin matchsticks)
- 1–2 green chilies, slit lengthwise
Spices
- ¼ teaspoon turmeric powder
- ¼ to ½ teaspoon red chili powder (adjust to taste)
- ½ teaspoon coriander powder
- ½ teaspoon cumin powder
- ¼ teaspoon garam masala powder
- 1 generous pinch of asafoetida (hing)
- Salt to taste
Finishing Touches
- ½ teaspoon kasuri methi (dried fenugreek leaves), crushed between your palms
- 1 tablespoon low-fat cream (optional but recommended)
- 2 tablespoons fresh coriander leaves, chopped
- 1.5 to 2 tablespoons neutral oil (or ghee for a richer version)
- Lime juice to drizzle at serving
What You Cannot Skip: The Right Pan
This is critical — do not use a non-stick pan for Paneer Khurchan. The entire character of the dish depends on the paneer and vegetable bits getting a little stuck to the surface and then being scraped off. Non-stick prevents this from happening.
Use one of the following:
- A thick-bottomed iron tawa (the traditional and best choice)
- A cast-iron skillet — works beautifully
- A thick-bottomed steel or aluminium kadai
The pan must be heavy enough to retain heat evenly. A thin pan will cause the paneer to burn on the outside before the masala cooks through.
How to Make Paneer Khurchan: Step-by-Step
Step 1 — Prep Everything Before You Start
Paneer Khurchan moves fast once it’s on the heat, so have every ingredient ready before you turn the stove on.
Slice the paneer into batons or strips about 1.5 to 2 inches long and about ½ inch wide. Think of thick French fry shapes — you want pieces with enough surface area to get golden on the tawa, but substantial enough to stay intact during the scraping.
Slice the onions thin so they cook quickly. Chop the tomato into small pieces so it breaks down fast. Cut the capsicum into small cubes. Julienne the ginger and slit the green chilies. Set everything in separate bowls. Mix all the spice powders together in a small dish so you can add them in one go.
Paneer tip: If using store-bought refrigerated paneer, soak the strips in warm salted water for 15–20 minutes before cooking. This softens them and reduces the risk of the paneer turning rubbery in the pan.
Step 2 — Sauté the Onions
Heat 1.5 to 2 tablespoons of oil in your iron tawa or cast-iron skillet over medium-low heat. Once the oil shimmers, add the sliced onions and spread them out evenly.
Cook, stirring frequently, until the onions turn fully translucent and begin to soften — about 4–5 minutes. You’re not caramelizing them; you just want the raw harshness to cook out. Keep the heat at medium-low so they soften without browning.
Step 3 — Add Capsicum and Tomatoes
Add the capsicum cubes and chopped tomatoes to the pan. Stir everything together and cook over low heat for 7–8 minutes, stirring regularly.
The goal here is for the tomatoes to break down and release their moisture, which will cook into the onions and capsicum. The capsicum should be just cooked — still with a slight bite, not mushy. If the pan looks dry, add a tablespoon of water and scrape any bits off the bottom.
By the end of this step, the mixture should look like a chunky, glossy masala paste rather than separate vegetables.
Step 4 — Add the Spices
Add all the ground spices at once — turmeric, red chili powder, coriander powder, cumin powder, garam masala, and asafoetida. Add salt to taste.
Stir immediately and thoroughly so the spices coat all the vegetables evenly. Cook for 1–2 minutes until the spices are absorbed and fragrant. You should notice the raw smell of the spices disappearing as they bloom into the masala.
Now add the slit green chilies and ginger julienne. Stir and mix well. Reserve a few ginger strips for garnish at the end.
Step 5 — Add the Paneer and Scrape
Add the paneer batons to the pan and stir gently to coat them in the masala. Now increase the heat to high.
Here’s where the dish comes alive. Using a flat spatula, arrange the paneer strips in a single layer so each one is directly touching the surface of the tawa. Let them cook undisturbed for about 60 seconds. You’ll hear the sizzle intensify and see the edges of the paneer starting to color slightly.
Now scrape firmly. Slide the spatula under the paneer and flip them, scraping up all the bits of onion, tomato, and spice that have stuck to the surface. These scraped, slightly caramelized bits are the heart of the dish — don’t leave any behind.
Flip each paneer strip to cook the other side for another 30–60 seconds. Scrape again.
The whole high-heat phase should take 2–3 minutes maximum. Do not overcook. Paneer left on high heat too long turns from soft and tender to rubbery and dense — and there’s no coming back from that. Move quickly, scrape confidently, and turn off the heat while the paneer still looks moist.
Step 6 — Finish and Serve
Take the pan off the heat. Immediately add the cream (if using) and crushed kasuri methi. Stir gently to combine. The cream adds a subtle richness that rounds out the tangy tomato and spice, while the kasuri methi brings a characteristic herbal bitterness that is deeply North Indian.
Add the chopped coriander leaves and stir through. Garnish with the reserved ginger julienne.
Drizzle fresh lime or lemon juice over the top right before serving. This final acidic hit is not optional — it brightens every flavor in the dish and ties the whole thing together.
Serve immediately while hot.
What to Eat with Paneer Khurchan
The semi-dry texture of Paneer Khurchan makes it ideal for scooping with bread rather than eating with rice. Best pairings:
- Butter Naan — the classic and most indulgent choice
- Garlic Naan — adds another aromatic layer
- Tandoori Roti — lighter, works beautifully
- Laccha Paratha — flaky, layered, a great textural contrast
- Plain Phulka / Chapati — the everyday choice; keeps it lighter
- Rumali Roti — the thin, handkerchief-like bread of dhaba culture; excellent here
If you want to serve it as part of a larger spread, Paneer Khurchan works as a side dish alongside a dal, raita, and plain jeera rice. As bread slices with a smear of butter, it also makes a surprisingly good open-faced snack.
Expert Tips for Perfect Paneer Khurchan Every Time
Use fresh paneer whenever possible. Homemade paneer stays softer and absorbs flavors more readily. If using store-bought, the warm water soak is your insurance policy against rubbery texture.
Iron tawa = non-negotiable. The scraping technique only works on a surface that allows things to stick slightly. A cast-iron skillet is a perfect substitute if you don’t have a traditional iron tawa.
Speed matters during the high-heat phase. Once you raise the flame and add the paneer, the clock is ticking. Have your spatula ready, stay focused, and don’t step away.
Kasuri methi makes the dish. This ingredient shows up in a lot of North Indian recipes as an afterthought, but in Paneer Khurchan it genuinely transforms the flavor. Don’t skip it. Always crush it between your palms before adding — this releases the essential oils.
Control spice level easily. The base recipe is mildly spiced. For more heat, double the red chili powder and add an extra green chili. For a richer version, swap oil for ghee or add a tablespoon of butter at the finishing stage.
Make it vegan: Replace paneer with firm, well-pressed tofu. Skip the cream or use a tablespoon of coconut cream. The texture will be slightly different but the flavor profile holds up well.
Nutrition Information (Per Serving, Approximate)
| Nutrient | Amount |
|---|---|
| Calories | ~290 kcal |
| Protein | 14g |
| Carbohydrates | 10g |
| Fat | 22g |
| Calcium | 380mg |
| Fiber | 2.5g |
Paneer is one of the richest vegetarian sources of calcium and protein available in Indian cooking. Combined with capsicum (high in Vitamin C) and tomatoes (rich in lycopene), Paneer Khurchan is genuinely nutritious despite how indulgent it tastes.
Storage and Reheating
Paneer Khurchan is at its absolute best eaten fresh off the tawa, hot and just made. Here’s the reality of leftovers:
- Refrigerator: Store in an airtight container for up to 1 day.
- Reheating: Warm in a pan over low heat with a splash of water. Avoid the microwave — it makes paneer rubbery.
- After reheating: The paneer won’t be quite as tender as when freshly made, but the flavors actually deepen overnight and the dish is still very enjoyable.
- Do not freeze: Paneer changes texture irreversibly after freezing and thawing.
Best strategy: Make the masala base (onion-tomato-capsicum-spices) ahead of time and refrigerate. Add fresh paneer and do the final tawa scraping just before serving. This approach gives you maximum freshness with minimal last-minute effort.
5 Quick Variations to Try
Once you’re comfortable with the base recipe, these variations are easy to explore:
- Paneer Khurchan with Mixed Peppers — Use red, yellow, and green bell peppers together for a vibrant, colorful version with slightly sweeter flavor.
- Spicy Dhaba Style — Double the garam masala, add 1 teaspoon of chole masala powder, and finish with a drizzle of chili oil.
- Butter & Cream Version — Replace oil with butter, add 2 tablespoons of cream at the end. Richer and more restaurant-adjacent.
- Mushroom Khurchan — Substitute half the paneer with thickly sliced button mushrooms. They benefit from the same scraping technique.
- Smoky Version — After cooking, place a small piece of burning charcoal in a foil cup in the pan, drizzle a drop of ghee on the coal, and cover for 2 minutes to infuse a smoky tandoor-like flavor.
FAQs About Paneer Khurchan
Q1. Can I make Paneer Khurchan without a tawa?
Yes, though the result will differ slightly. A thick-bottomed cast-iron skillet or even a heavy steel kadai can work. The key is using a pan that holds heat well and is not non-stick. Avoid thin-bottomed pans — they heat unevenly and the paneer will burn before the masala cooks through.
Q2. Why did my paneer turn rubbery?
Two likely reasons: either the paneer was cooked on high heat for too long, or it was refrigerated paneer that wasn’t soaked in warm water before cooking. The high-heat scraping phase should take no more than 2–3 minutes total. Move quickly and pull the pan off heat while the paneer still looks moist and soft.
Q3. Can I use store-bought paneer for this recipe?
Absolutely. Soak the paneer batons in warm, lightly salted water for 15–20 minutes before adding them to the pan. This rehydrates the paneer and keeps it tender during the high-heat cooking phase. Drain and pat dry before use.
Q4. Is Paneer Khurchan the same as Tawa Paneer?
They’re similar in technique but different in outcome. Tawa Paneer typically involves marinating and grilling paneer cubes on a tawa in a saucier masala. Paneer Khurchan is drier, uses paneer strips rather than cubes, and centers on the scraping action. Khurchan has a more rustic, tumbled texture while Tawa Paneer tends to be more neatly plated.
Q5. Can I make this dish without cream?
Definitely. The cream is listed as optional in this recipe and many home cooks skip it entirely. The dish is still full-flavored and satisfying without it. If you want the richness without dairy cream, a teaspoon of cashew paste stirred in at the end achieves a similar effect.
Ready to Scrape Your Way to Dinner?
Paneer Khurchan earns its place in the weeknight rotation for good reason. It’s fast, it uses everyday ingredients, it’s forgiving for beginners, and it produces something that genuinely tastes like it came from a real Punjabi dhaba. The scraping technique is oddly satisfying once you get into it — there’s something deeply pleasing about pulling all those spiced, caramelized bits off a hot iron surface.
Make it once this week. Serve it hot with a stack of fresh rotis or butter naan, a squeeze of lime, and some sliced raw onions on the side. We’re willing to bet it goes into your regular rotation before the month is out.
Tried this Paneer Khurchan recipe? Drop your experience in the comments below! Tell us your variation, your heat level, or how you served it — we read every single one. And if it was a hit, share it with someone who needs a great 30-minute dinner idea.
Pairs perfectly with: Butter Naan | Laccha Paratha | Tadka Dal | Cucumber Raita | Fresh Lime Wedges