There are dishes you make on autopilot — and then there’s Chicken Biryani. This is the one you slow down for. The one where you marinate overnight, fry onions to a perfect amber, bloom saffron in warm milk, and layer everything with deliberate care before sealing the pot and letting the steam do the rest.
It’s a dish with presence. When you lift the lid after the final 20-minute dum, the aromas that rise from the pot — saffron, cardamom, ghee, caramelized onion, marinated chicken — are genuinely one of the most satisfying moments in home cooking.
Yes, this recipe takes close to three hours from start to finish, and the marination adds even more time if you plan ahead. But here’s the thing: it’s not difficult. It’s patient. Each step is straightforward, and the payoff is a biryani that rivals anything you’d get at a specialist restaurant — layers of juicy chicken, fragrant rice tinted gold with saffron, crispy sweet onions, and toasted almonds on top.
This guide walks you through everything: what the dum method is and why it matters, the full ingredient list, a detailed step-by-step process, and every expert insight you need for perfect results the very first time.
What Is Chicken Biryani? A Quick History
Biryani is one of the most celebrated rice dishes in the world, with roots tracing back to Persia and Central Asia. The word itself likely derives from the Persian word beriyan, meaning “fried before cooking.” When it arrived in the Indian subcontinent, the dish evolved into dozens of distinct regional styles — Hyderabadi, Lucknowi, Kolkata, Sindhi, Malabar, and more — each with its own spice profile, technique, and character.
This recipe follows the Hyderabadi tradition, which is the most widely recognized style internationally. It uses the dum method (detailed below), marinated raw chicken that cooks with the rice, and a bold, aromatic spice blend in the marinade that forms the flavor foundation of the entire dish.
What Is the Dum Method and Why Does It Matter?
Dum (sometimes written dam) comes from the Persian word for “breath.” The technique involves sealing a pot tightly — traditionally with dough around the lid, though a heavy lid and low heat achieves the same result at home — so that the ingredients cook entirely in their own steam and absorbed aromas.
Here’s what dum actually does:
- The spiced chicken at the bottom heats up and releases its marinade juices as steam
- That steam rises through the partially cooked rice, finishing the cooking and carrying the chicken’s flavors with it
- The saffron milk and ghee drizzled over the rice melt downward, adding richness
- Nothing escapes — every molecule of aroma stays in the pot
The result is rice that doesn’t just sit next to flavorful chicken but is infused with it. Every grain carries the essence of the marinade, the herbs, and the saffron. That’s why biryani cooked with the dum method tastes so fundamentally different from a simple chicken pilaf or a mixed rice dish.
Hyderabadi vs. Other Biryani Styles: A Quick Comparison
| Style | Chicken Method | Key Flavors | Distinguishing Feature |
|---|---|---|---|
| Hyderabadi (this recipe) | Raw chicken cooked with rice (dum) | Saffron, fried onions, ghee, yogurt | Richest flavor, most aromatic |
| Lucknowi (Awadhi) | Chicken par-cooked separately | Subtle, delicate spicing | Softer, gentler flavor profile |
| Kolkata | Light marinade, boiled egg added | Potatoes, kewra water | Slightly sweeter, Bengali influence |
| Sindhi | Tomato-heavy gravy base | Bold, tangy | Wetter, saucier texture |
| Malabar (Kerala) | Short-grain rice, coconut | Fennel, star anise | Coastal, aromatic, unique texture |
This recipe produces the bold, deeply aromatic Hyderabadi-style biryani that most people picture when they hear the word “biryani.” It’s the gold standard for a reason.
Why Chicken Thighs Are Non-Negotiable (And What Happens If You Use Breast)
Nearly every experienced biryani cook — home or professional — insists on chicken thighs. Here’s the science behind that preference:
Chicken thighs:
- Have a higher fat content (about 10–15g per 100g) that keeps them moist during the 20-minute dum cooking
- Can withstand direct contact with the hot base of the pan without drying out
- Develop a very slight, desirable crispness on the side that touches the pot bottom
- Absorb the marinade more readily due to the looser muscle fiber structure
- Stay juicy even if the cooking runs a few minutes longer than planned
Chicken breast in biryani:
- Has almost no fat and dries out rapidly under direct heat
- Becomes rubbery and tough during 20 minutes of steam cooking
- Loses much of its texture in the marinade acids if left overnight
Use boneless, skinless chicken thigh fillets for the best result. If you prefer bone-in thighs (they add more flavor to the steam), simply add 5 extra minutes to the dum cooking time.
Full Ingredients List (Serves 6)
Chicken and Marinade
- 575g (1¼ lbs) boneless skinless chicken thigh fillets, halved
- 180ml (¾ cup) full-fat natural yogurt
- 2 tablespoons neutral oil (avocado or sunflower)
- 4 garlic cloves, minced
- 1 tablespoon fresh ginger, minced
- 2 tablespoons tomato paste (purée)
- ¼ teaspoon asafoetida / hing (optional but recommended — see note below)
- ½ teaspoon turmeric powder
- 2 teaspoons garam masala
- ½ teaspoon ground fenugreek
- 2 teaspoons ground coriander
- 1 teaspoon cumin
- ¼ teaspoon ground cinnamon
- 3 cardamom pods, lightly crushed
- 2 teaspoons mild chili powder (increase for more heat)
- 2 mild green chilies, roughly chopped
- 1¼ teaspoons salt
- 1 tablespoon fresh lemon juice
Par-Boiled Basmati Rice
- 1.5 liters (6¼ cups) water
- 2 teaspoons salt
- 5 cloves
- 1 teaspoon cumin seeds
- 3 bay leaves
- 2 cardamom pods
- 450g (2¼ cups) aged white basmati rice
Crispy Fried Onions
- 4 tablespoons neutral oil
- 2 medium onions, peeled and thinly sliced
Assembly & Finishing
- 3 tablespoons water
- 3 tablespoons fresh coriander (cilantro), chopped
- 1 tablespoon fresh mint leaves, chopped
- 1 teaspoon saffron threads
- 3 tablespoons whole milk, warm
- 3 tablespoons ghee, melted (or unsalted butter)
- 2 tablespoons toasted flaked almonds
To Serve
- Natural plain yogurt
- Extra fresh coriander
Key Ingredient Notes Before You Start
Asafoetida (Hing) — Worth Seeking Out
Asafoetida is a resinous spice with a pungent raw smell that transforms into a deep, savory, onion-garlic flavor when cooked. It’s used in very small quantities (just ¼ teaspoon here) but adds a background depth that is hard to replicate. Look for it in Indian grocery stores or online. It’s optional in this recipe — the spice blend is already generous — but if you cook Indian food regularly, a jar will last you a long time and improve many dishes.
Saffron — Don’t Skip It
Saffron is the defining visual and aromatic element of biryani. Those golden threads steeped in warm milk create the signature golden streaks in the rice and a subtle floral fragrance that no other spice can replicate. A little goes a long way — 1 teaspoon is enough for the full recipe. Steep it in warm (not boiling) milk for at least 2 minutes before using.
Ghee vs. Butter
Ghee is clarified butter with the milk solids removed, giving it a higher smoke point and a rich, nutty flavor that is more intense than regular butter. It’s the traditional choice for biryani and worth using if you can find it. Unsalted butter is a workable substitute — just be aware it has a slightly different flavor and lower smoke point.
Aged Basmati Rice
Older basmati rice (typically labeled “aged” on the package) has lower moisture content and produces longer, more separate grains after cooking. This is the rice to seek out for biryani. Fresh basmati works but may produce slightly stickier results.
Step-by-Step: How to Make Chicken Biryani
Step 1 — Marinate the Chicken (2 Hours to Overnight)
Combine the chicken thigh pieces with every marinade ingredient in a large bowl — yogurt, oil, garlic, ginger, tomato paste, asafoetida, all the spices, green chilies, salt, and lemon juice. Mix thoroughly until every piece of chicken is completely coated.
Cover with plastic wrap and refrigerate for a minimum of 2 hours. Overnight is significantly better. The yogurt tenderizes the meat while the spices penetrate deep into the chicken, and that depth of flavor is what separates a truly memorable biryani from an ordinary one.
Planning tip: Start the marinade the evening before you plan to serve the biryani. The 2-hour minimum becomes 8–10 hours with zero additional effort, and the flavor difference is substantial.
Step 2 — Par-Boil the Rice
This is one of the most important steps in the entire recipe and the one most home cooks get wrong. The rice must be par-cooked — about 70% done — before it goes into the pot. It finishes cooking during the dum.
Bring 1.5 liters of water to a rolling boil with the salt, cloves, cumin seeds, bay leaves, and cardamom pods. Add the basmati rice, stir once, and return to a boil. Simmer uncovered for exactly 5 minutes from the moment it returns to a boil.
Drain immediately through a fine-mesh sieve. The rice should look slightly translucent at the center of each grain — cooked on the outside but not through. This is exactly what you want.
Why salt the rice water heavily? Much of the salt drains away with the water. The remainder seasons the grains evenly and actually mellows further during the dum cooking, distributing throughout the entire dish. Under-salted rice water produces flat, tasteless biryani.
Step 3 — Fry the Onions
This step requires patience. Rush it and you’ll have either underdone pale onions or bitter burned ones. Neither adds what the recipe needs.
Heat 4 tablespoons of oil in your large cast-iron pot or heavy Dutch oven over medium heat. Add the thinly sliced onions in as even a layer as possible and cook, stirring regularly, for 10–15 minutes until they are a deep, rich amber brown — not pale gold, not black, but the color of dark caramel.
These onions serve two purposes: they add a sweet, slightly bitter contrast to the rich spiced chicken, and they provide a beautiful textural element on top of the finished dish.
Scoop the onions out with a slotted spoon and set aside in a bowl. Leave the flavored oil in the pot.
Onion tip: Slice them uniformly thin — about 3–4mm — so they cook evenly. Thick pieces in the same pan as thin ones mean some burn before others color.
Step 4 — Lightly Seal the Chicken
Remove the marinated chicken from the refrigerator. Add it directly to the pot with the onion-flavored oil still in it. Pour in 3 tablespoons of water and stir to combine.
Cook over medium heat for just 2–3 minutes, stirring a couple of times. You’re not fully cooking the chicken here — you’re just lightly sealing the outside and heating the marinade so it begins to bubble and become a sauce rather than a coating. The chicken will finish cooking during the dum.
Spread the chicken into an even layer across the bottom of the pot.
Step 5 — Layer the Biryani
This is the most visually satisfying part of the process, and the order matters.
Layer by layer:
- Fresh herbs: Scatter the chopped coriander and mint leaves evenly over the chicken. They’ll perfume the steam from below.
- Par-cooked rice: Spoon the drained rice on top and gently spread it into a level layer. Don’t press it down.
- Saffron milk: Stir the saffron strands into the warm milk and let it sit for 2 minutes until the milk turns a vivid orange-gold. Drizzle this unevenly over the rice — you want patches of golden color, not uniform coverage, which is what creates the beautiful two-toned finish.
- Melted ghee: Drizzle the melted ghee over the surface of the rice. It will seep down during cooking and add richness to every layer.
- Crispy onions: Scatter the fried onions across the top.
- Toasted almonds: Add the flaked almonds last.
Step 6 — The Dum Cook
Place the lid on the pot but leave a tiny gap — just a centimeter. Set the heat to medium and watch for steam.
The moment you see a steady stream of steam rising from the gap, close the lid fully, reduce the heat to the lowest possible setting, and cook for exactly 20 minutes. Do not lift the lid. Do not stir. The enclosed steam is doing critical work and interrupting it disrupts the entire process.
After 20 minutes, turn off the heat completely and allow the pot to rest undisturbed for 10 more minutes. This resting period allows the steam to distribute evenly and the rice to finish absorbing the liquid below.
Step 7 — Reveal and Serve
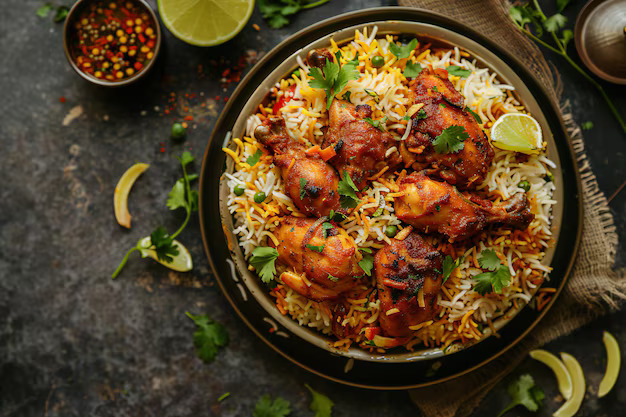
When you lift the lid, the visual is its own reward: golden saffron-streaked rice, caramelized onions, toasted almonds, with wisps of fragrant steam rising from beneath.
When you scoop to serve, always reach down to the bottom of the pot so every plate gets all the layers — spiced chicken, herb layer, fragrant rice, golden top. The chicken pieces touching the base of the pot will have developed a very slight crispness on one side, which adds a wonderful textural contrast.
Top each serving with fresh coriander and a generous spoonful of cold natural yogurt.
Expert Tips for Perfect Biryani Every Time
Marinate as long as possible. Two hours is the floor. Eight to twelve hours is where the real flavor lives. The yogurt tenderizes the chicken while the spices penetrate from the surface inward — and that penetration takes time.
Use a heavy, tight-lidded pot. A cast-iron Dutch oven or heavy-bottomed pot is ideal because it retains heat evenly and creates a near-seal even without dough. Thin-bottomed pots create hot spots and can burn the chicken at the base before the top layers cook through.
5 minutes of par-boiling is exactly right. Under-cooked rice won’t finish during the dum. Over-cooked rice will turn mushy. Five minutes from when the rice water returns to a boil — no more, no less.
Watch the steam, not the clock. The instruction to seal the lid “when you see steam” is critical. If you close the lid before steam is present, the moisture hasn’t started circulating and the dum won’t work properly.
Don’t crowd the onions. Frying too many onions at once causes them to steam rather than caramelize. Use a wide pan, add them in a single layer, and be patient. If you have a small pan, fry them in two batches.
Rest the biryani before serving. The 10-minute rest after turning off the heat isn’t optional — it’s where the final moisture balancing happens. Opening the pot early releases the steam that the top layers of rice still need.
What to Serve with Chicken Biryani
Biryani is a complete meal on its own, but these accompaniments elevate it beautifully:
- Plain natural yogurt — the essential cool, creamy counterpoint to the spiced rice
- Cucumber raita — yogurt with grated cucumber, cumin, and mint; cooling and refreshing
- Garlic naan or chapati — for scooping up the spiced chicken and marinade juices
- Tomato and onion salad — raw, sharp, acidic; cuts through the richness perfectly
- Sweet mango chutney — a small spoonful adds a fruity sweetness that complements the spice
- Pickled red onions — quick to make and a great textural contrast
Avoid serving biryani alongside heavily sauced curries — it’s rich and complex enough to be the star of the plate.
Storage and Reheating
Refrigerator: Store cooled biryani in an airtight container for up to 3 days. The flavors actually deepen overnight, and day-two biryani is arguably better than freshly made.
Reheating: The best method is stovetop — add the biryani to a pot with 2–3 tablespoons of water, cover tightly, and warm over low heat for 8–10 minutes. This revives the steam and keeps the rice from drying out. Microwave reheating works but produces drier results; add a splash of water and cover before microwaving.
Freezer: Biryani freezes well for up to 1 month. Portion into individual servings before freezing. Thaw overnight in the refrigerator and reheat on the stovetop as above.
Meal prep: The marinade can be made up to 24 hours in advance. The fried onions can be made 2–3 days ahead and stored in an airtight container at room temperature.
Nutrition Information (Per Serving, Approximate — 1 of 6)
| Nutrient | Amount |
|---|---|
| Calories | ~520 kcal |
| Protein | 32g |
| Carbohydrates | 58g |
| Fat | 16g |
| Saturated Fat | 5g |
| Fiber | 2g |
| Iron | 3mg (17% DV) |
| Calcium | 120mg |
Chicken thighs provide excellent protein alongside meaningful iron. Basmati rice has a lower glycemic index than most other white rice varieties, making this a more blood-sugar-friendly option than it might appear.
4 Variations Worth Exploring
1. Vegetable Biryani (Veg Dum Biryani) Replace the chicken with a mixture of vegetables — cauliflower, potatoes, carrots, green beans, and peas work beautifully. Par-cook the harder vegetables separately before layering. Reduce the marinade yogurt to 100ml and add a tablespoon of extra oil.
2. Mutton/Lamb Biryani Use bone-in mutton or lamb shoulder pieces. Extend the marination to a minimum of 4 hours (overnight strongly recommended). Pressure cook the meat for 3–4 whistles before layering to ensure it’s tender enough to finish during the dum. Increase total dum cooking time to 25–30 minutes.
3. Egg Biryani A simpler, faster weeknight version. Hard boil 6 eggs, peel, and shallow-fry in oil until golden. Use in place of chicken. The marinade becomes a sauce — cook it down with tomatoes into a thick masala before adding the par-fried eggs and layering.
4. Lighter Weeknight Version Skip the marinade time by using a store-bought biryani paste (Patak’s or similar) mixed with yogurt. The flavor is simpler but the technique and result are still significantly better than any takeaway option. Total time drops to under an hour.
Frequently Asked Questions
Q1. Can I make chicken biryani without a cast-iron pot?
Yes, though the result may vary slightly. A heavy-bottomed stainless steel pot or a non-stick Dutch oven both work. The key requirement is a pot that retains heat evenly and has a close-fitting lid. Avoid thin-bottomed pots — they create hot spots that burn the chicken base before the top layers cook through.
Q2. My rice always comes out either undercooked or mushy in biryani. What am I doing wrong?
The two most common mistakes are par-boiling the rice too long (more than 5 minutes) or not using aged basmati rice. Regular basmati or long-grain rice has more moisture and cooks faster. Use the best quality aged basmati you can find, rinse it thoroughly before cooking, and stick strictly to 5 minutes of par-boiling. Also make sure you’re using the dum at genuinely low heat — too high and the bottom burns before the top cooks.
Q3. Can I skip the marination and cook the chicken directly?
Technically yes, but the flavor difference is significant enough to make it worth planning ahead. Even a 2-hour marinade transforms the chicken from ordinary to exceptional. If you’re pressed for time, the minimum is 30 minutes at room temperature — though the result won’t have the same depth of flavor as an overnight marinade.
Q4. Is chicken biryani spicy?
Using the spice quantities in this recipe with mild chili powder, the finished dish is flavorful but only mildly spicy — more warming than hot. For a spicier biryani, increase the chili powder to 1 tablespoon or use medium/hot chili powder instead of mild, and add an extra green chili to the marinade. For a very mild version suitable for children, reduce the chili powder to 1 teaspoon.
Q5. What is the difference between biryani and pulao (pilaf)?
Both are layered rice dishes with aromatics, but they differ in technique and depth. Pulao is typically a one-pot dish where everything cooks together from the start — simpler, faster, and more homogeneous in flavor. Biryani uses the dum method with separately prepared components layered together, producing a more complex, multi-dimensional result where different layers have distinct flavors and textures. Biryani generally takes longer but is significantly more flavorful.
Your Biryani Is Worth the Effort
Here’s the honest reality of this recipe: it asks more of you than a weeknight curry. The overnight marinade, the careful par-boiling, the patient frying of onions, the precise dum timing — none of it is complicated, but all of it requires intention.
And that intention is exactly what you taste in every bite.
When you scoop through the golden saffron-kissed rice to find the juicy, deeply spiced chicken beneath, when you catch the crunch of caramelized onion and the nuttiness of toasted almond — you understand why biryani has been a celebration dish for centuries. It’s not just a meal. It’s a demonstration of care.
Make it for a special weekend. Make it for guests who will remember it. Make it for yourself on a day that deserves something extraordinary.
Tried this chicken biryani recipe? Leave your review in the comments and tell us how it went! Share what variation you tried, how long you marinated, or what you served it with. And if it earned second helpings at your table — which it almost certainly will — tag us and show us the pot.
Pairs perfectly with: Cucumber Raita | Garlic Naan | Tomato & Onion Salad | Mango Chutney | Cold Natural Yogurt