Picture the moment you carry this to the table. A fully frosted, beautifully layered ice cream cake — whipped cream swirled across the top, a shower of colorful sprinkles catching the light — and someone asks, “Where did you order that from?”
You didn’t order it. You made it. And the look on everyone’s faces when you tell them that is half the joy.
Homemade ice cream cake sounds like a project, but here’s the truth: there is zero baking involved, the ingredient list is short, and the actual hands-on time is only about two hours — spread across a day as you build the layers. The rest is just freezer time doing its thing while you get on with your life.
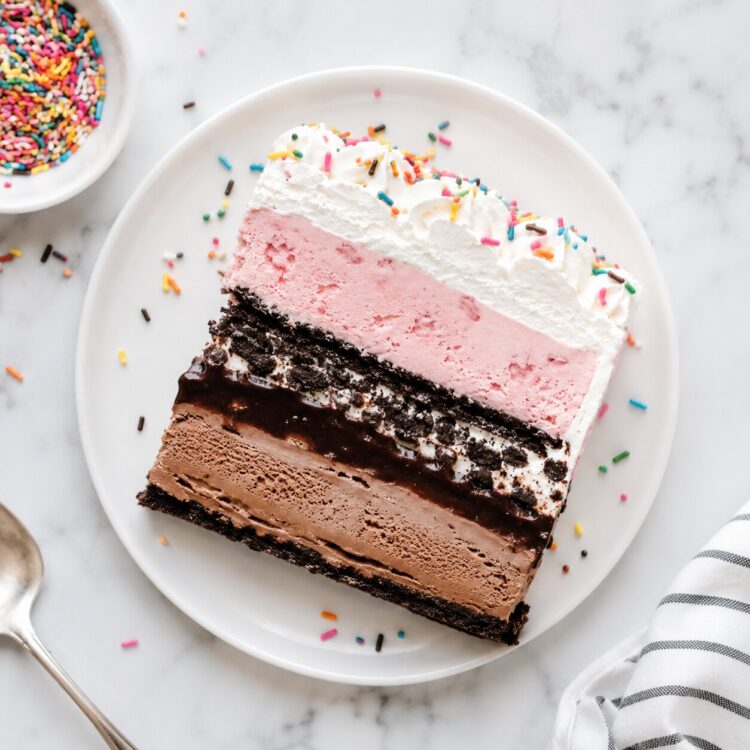
This recipe delivers five distinct, glorious layers: two flavors of ice cream, a ribbon of rich hot fudge, a crunchy Oreo-butter middle, and a cloud of vanilla whipped cream on top. It’s inspired by the iconic Dairy Queen ice cream cake that’s been the centerpiece of birthday parties for decades — except when you make it at home, you control every flavor, every layer, and every detail.
Let’s build something worth celebrating.
Why Make Your Own Ice Cream Cake Instead of Buying One?
Store-bought ice cream cakes are convenient, no question. But here’s what you gain when you make one from scratch:
- Full flavor control — pick any two ice cream flavors you love, not whatever the shop happens to carry
- Better ingredients — homemade hot fudge and fresh whipped cream are dramatically better than their packaged equivalents
- Cost savings — a premium store-bought ice cream cake runs $30–$60; this homemade version costs roughly $15–$20 depending on your ice cream choices
- Customization — change the cookies, add a cake layer, adjust the sweetness, match the flavors to the occasion
- The story — there is something genuinely special about telling your guests you made it yourself
The reaction is always worth it. Every single time.
The 5 Layers: What Makes This Cake Work
Understanding the structure before you start makes the assembly feel effortless. Here’s what you’re building, from bottom to top:
Layer 1 — First Ice Cream
The foundation. Choose your favorite flavor — chocolate is a classic bottom layer because it’s dense and holds its shape well. Use 1.5 quarts (a standard large carton).
Layer 2 — Hot Fudge
A half-cup of hot fudge sauce spread over the first frozen ice cream layer. Homemade hot fudge takes only 5 minutes on the stovetop and the difference in flavor versus store-bought is significant. The fudge adds richness and acts as a flavor bridge between the two ice cream layers.
Layer 3 — Crushed Oreo & Butter Crunch
Ten Oreos, pulsed into coarse crumbs and mixed with two tablespoons of melted butter. This is the textural heart of the cake — the crunchy contrast that makes every bite interesting. The butter is not optional: it binds the crumbs into a cohesive layer and helps the two ice cream sections adhere to each other. Without it, the layers separate. (Testing this the hard way — watching the top layer slide off the cake — teaches you to never skip the butter again.)
Layer 4 — Second Hot Fudge + Second Ice Cream
Another half-cup of hot fudge goes on top of the Oreo layer, followed by your second ice cream flavor. Strawberry paired with chocolate is a beloved combination, but more on flavor ideas below.
Layer 5 — Homemade Whipped Cream
The frosting. Two cups of cold heavy cream whipped with powdered sugar and vanilla until it holds stiff peaks. It covers the top and sides of the frozen cake and can be piped into decorative borders if you want a more finished look. Add sprinkles and you’re done.
Best Ice Cream Flavor Combinations to Try
The beauty of this recipe is that every batch can be different. Here are combinations that work exceptionally well:
Classic & Crowd-Pleasing:
- Chocolate + Strawberry (the original crowd-pleaser)
- Chocolate + Vanilla Bean
- Cookies & Cream + Chocolate Fudge Brownie
Bold & Adventurous:
- Chocolate + Mint Chip (fantastic with the Oreo layer)
- Coffee + Cookies & Cream
- Salted Caramel + Chocolate
Nut Butter Lovers:
- Chocolate + Peanut Butter
- Vanilla + Cookie Butter (Biscoff)
Fruity & Fresh:
- Strawberry + Vanilla
- Mango Sorbet + Coconut (dairy-free friendly)
- Raspberry + Lemon Sorbet
Kid Birthday Favorites:
- Cotton Candy + Vanilla
- Birthday Cake Flavor + Strawberry
- Chocolate Chip Cookie Dough + Vanilla
Pro tip: Choose one bolder, more intensely flavored ice cream (chocolate, coffee, mint) and one lighter or creamier one (strawberry, vanilla, birthday cake). This contrast keeps the cake from being one-dimensional.
Equipment You Need Before You Start
Getting the tools together before you begin saves a lot of scrambling mid-assembly.
Essential:
- 9×3-inch or 10×3-inch springform pan (the deeper, the better — at least 3 inches high)
- Plastic wrap — two overlapping sheets to fully line the pan
- Food processor or blender (for the Oreos)
- Electric hand mixer or stand mixer (for the whipped cream)
- Large spoon or offset spatula (for spreading ice cream)
- Sharp knife for slicing
Helpful but Optional:
- Piping bag and star tip (Wilton 1M is ideal) for decorative whipped cream borders
- Frozen cake stand or cutting board (critical — explained below)
No springform pan? No problem. Use a 9×13-inch baking pan lined with plastic wrap for a sheet-style ice cream cake, or halve the recipe and use an 8×8-inch square pan. Both work beautifully — just make sure plastic wrap lines the entire pan so you can lift the cake out cleanly.
Ingredients List (Serves 10–12)
For the Cake
- 1.5 quarts (about 1.4 liters) chocolate ice cream — or your preferred bottom-layer flavor
- 1.5 quarts (about 1.4 liters) strawberry ice cream — or your preferred top-layer flavor
- 10 Oreo cookies (about 110g), including the cream filling
- 2 tablespoons (28g) unsalted butter, melted
- 1 cup (227g) hot fudge sauce — homemade or high-quality store-bought, divided in half
For the Whipped Cream Frosting
- 2 cups (480ml) heavy whipping cream, very cold
- ⅓ cup (40g) powdered (confectioners’) sugar
- 1½ teaspoons pure vanilla extract
Optional Garnishes
- Sprinkles (any color or style)
- Crushed Oreos or cookie crumbs
- Chocolate shavings or mini chocolate chips
- Fresh strawberries or fruit
Step-by-Step: How to Make Homemade Ice Cream Cake
Step 1 — Prep the Pan and the Oreo Layer
Line your springform pan with plastic wrap. Use two overlapping sheets and press them into the corners, leaving a generous overhang over the sides. This overhang is your handle when you lift the finished cake out.
Pulse the 10 Oreos (cream filling and all) in a food processor until you have coarse crumbs — some larger chunks are welcome, they add texture. Transfer to a bowl, pour in the melted butter, and mix until every crumb is coated. Set aside.
Leaving larger Oreo chunks is intentional. The crunch you get from imperfect, rough crumbs is better than uniform, fine powder.
Step 2 — First Ice Cream Layer
Remove your bottom-layer ice cream from the freezer and let it sit on the counter for exactly 10 minutes. You want it soft enough to spread easily, but not melting — there is a narrow window and it passes fast.
Working quickly, scoop the softened ice cream into the prepared pan. Use the back of a large spoon or a lightly dampened offset spatula to spread it into a level, even layer. It won’t be perfect, and that’s fine.
Cover loosely and freeze for 30 minutes.
Step 3 — Hot Fudge + Oreo Layer
If making homemade hot fudge, prepare it during the 30-minute freeze so it has time to cool slightly. You want it warm enough to be spreadable, but not so hot that it melts the ice cream on contact. If using store-bought, warm it gently in the microwave in 15-second increments.
Pour and spread half the hot fudge (½ cup) evenly over the frozen first ice cream layer. Work quickly and don’t press too hard. Then scatter the buttered Oreo crumbs across the fudge layer and press them down very gently.
Freeze for another 30 minutes.
Step 4 — Second Ice Cream Layer
About 20 minutes into that second freeze, pull your top-layer ice cream out to soften for 10 minutes.
Drizzle the remaining ½ cup of hot fudge over the Oreo layer. Then scoop and spread the second ice cream flavor on top in an even layer, working as quickly as you can.
Cover tightly with plastic wrap or foil. Freeze for a minimum of 12 hours. Overnight is ideal. The cake can stay in the freezer for up to 48 hours before the next step.
The 12-hour freeze is not optional. This is what transforms layers of soft ice cream and crumbs into a firm, sliceable cake. Rushing it means a collapsed, melty mess at the table.
Step 5 — Freeze Your Serving Surface
This step is easy to forget and important not to. At least 30 minutes before you plan to frost and serve the cake, put your cake stand, serving plate, or cutting board in the freezer.
The bottom layer of ice cream will begin melting the instant it touches a room-temperature surface, making the whipped cream frosting nearly impossible to apply neatly.
A frozen surface buys you the 10–15 minutes you need to frost the cake properly.
Step 6 — Make the Whipped Cream
Combine the cold heavy cream, powdered sugar, and vanilla in a chilled bowl. Beat with an electric mixer on medium-high speed until stiff peaks form — about 3–4 minutes. The cream should hold its shape when you lift the beaters.
Use it immediately or refrigerate covered for up to 24 hours.
Step 7 — Frost and Finish
Remove the cake from the freezer. Unclip and remove the springform pan’s rim. Lift the cake using the plastic wrap overhangs and carefully peel the plastic away from the sides and bottom.
Place the cake on your frozen serving surface. Immediately begin spreading the whipped cream across the top and down the sides using an offset spatula. Work efficiently — you have roughly 8–10 minutes before the cake starts softening.
Pipe a decorative border around the top edge if desired (a star tip creates a beautiful ruffled effect). Scatter sprinkles, add garnishes, and either serve immediately or return to the freezer for up to 1 hour before serving.
Step 8 — Slice and Serve
For clean, restaurant-quality slices: run a sharp chef’s knife under hot water, wipe dry, and make your cut. Repeat the hot-water rinse before every single slice. This prevents the knife from dragging and tearing through the frozen layers.
The cake slices beautifully when it’s properly frozen — you’ll see all five layers in clean, defined cross-section, which is its own kind of satisfaction.
Expert Tips for Ice Cream Cake Success
Work in a cold kitchen if possible. If it’s a warm day, crank the AC or run the kitchen fan. Ice cream is unforgiving — even a few degrees of extra warmth will cost you time.
Read the entire recipe before you start. There are multiple freezing intervals. Knowing the rhythm before you begin means you won’t be caught off-guard by a 30-minute wait when the ice cream is already softening on the counter.
Don’t skip the melted butter in the Oreo layer. This single detail is what keeps the two ice cream sections bonded. Skipping it causes the layers to separate cleanly — which means your “top layer” slides off the moment you remove the pan ring.
Use whole-fat heavy cream for the frosting. Light whipping cream (30–35% fat) can work in a pinch, but full-fat heavy cream (36%+ fat) whips more stably and holds its shape longer on the frozen cake surface.
Freeze the knife between slices. If you’re cutting multiple servings at once, keep a bowl of hot water nearby for quick dips between cuts. A cold knife drags; a warm knife glides.
Make it up to 48 hours ahead. The assembled, undecorated cake keeps beautifully in the freezer for two days. Add the whipped cream frosting on the day you plan to serve it.
Fun Variations Worth Trying
Add a Cake Layer at the Bottom
Replace the bottom ice cream layer with a baked 9-inch round cake — chocolate, vanilla, or funfetti. Freeze the cake for 1 hour after cooling, then build the hot fudge, Oreo, and ice cream layers on top. The result is more substantial and has a genuinely impressive cross-section.
Change the Cookie Layer
Oreos are the default, but the crunch layer is endlessly customizable:
- Nutter Butters — pairs magically with peanut butter or chocolate ice cream
- Biscoff cookies — warm, spiced, extraordinary with caramel or vanilla ice cream
- Graham crackers — lighter, works beautifully with strawberry or lemon flavors
- Nilla Wafers — mild and sweet, great with fruit-flavored ice creams
- Crushed brownies — for a more indulgent, fudgy layer (chill them first so they don’t melt the ice cream)
Make It Dairy-Free
Use your favorite dairy-free ice cream brands and coconut whipped cream in place of the standard whipped cream topping. The structure and technique are identical.
Mini Individual Ice Cream Cakes
Line a muffin tin with plastic wrap and build the layers in miniature. Each cup makes one personal-sized ice cream cake — great for parties where you want individual servings without slicing.
Storage Guide
- Unfrosted cake (through Step 4): Up to 48 hours in the freezer, tightly covered
- Frosted cake: Best served within 1 hour of frosting; can sit in the freezer up to 1 additional hour without significant quality loss
- Leftover slices: Cover the cut surfaces with plastic wrap and store in the freezer. Best consumed within 1 week
- Making whipped cream ahead: Refrigerate covered for up to 24 hours before using as frosting
Important: After 48 hours, the cake becomes extremely hard to cut through without letting it soften slightly at room temperature first (about 5 minutes). Plan accordingly if making very far in advance.
Nutrition Information (Per Slice, Approximate — 1 of 12 Servings)
| Nutrient | Amount |
|---|---|
| Calories | ~380–420 kcal |
| Total Fat | 22g |
| Saturated Fat | 13g |
| Carbohydrates | 44g |
| Sugar | 34g |
| Protein | 5g |
| Calcium | 130mg |
Values vary significantly based on ice cream brand, flavor, and portion size.
Frequently Asked Questions
Q1. How far in advance can I make an ice cream cake?
You can assemble and freeze the full cake (through the second ice cream layer) up to 48 hours before serving. Add the whipped cream frosting on the day of your event, ideally within 1–2 hours of serving. The frosting holds up well in the freezer, but the cake becomes very hard to cut through if frozen beyond 48 hours without a brief thaw.
Q2. Why is my ice cream cake melting so fast when I try to frost it?
Two likely reasons: your serving surface was at room temperature (it must be pre-frozen for at least 30 minutes), or you let the cake sit on the counter too long before frosting. Always work quickly, have your whipped cream ready before you remove the cake from the freezer, and return the cake to the freezer immediately if you need a break mid-frosting.
Q3. Can I use store-bought whipped topping (like Cool Whip) instead of making whipped cream?
Technically yes, and it’s a popular shortcut. Store-bought whipped topping is already stabilized, which means it holds its shape longer at room temperature. However, freshly whipped heavy cream has a significantly better flavor and texture. If you’re making the cake the night before and want lower-maintenance frosting, Cool Whip is a practical substitute.
Q4. What if I don’t have a food processor for the Oreos?
Put the Oreos in a zip-top bag, seal it, and crush them with a rolling pin. You’ll get a mix of fine crumbs and larger chunks, which is actually ideal for this recipe. The key is having some textural variation in the crumb layer rather than uniform powder.
Q5. Can I make an ice cream cake without hot fudge?
Yes. Caramel sauce is a wonderful alternative and pairs especially well with vanilla or salted caramel ice cream. You could also use peanut butter sauce, raspberry jam (warm it to spreadable consistency), or even a layer of Nutella. The goal is a thin, sticky, flavorful layer between the Oreo crumbs and the ice cream — whatever sauce achieves that will work.
Go Make Something Worth Celebrating
Here’s the honest truth: once you’ve made a homemade ice cream cake, you’ll never quite feel the same about the store-bought version. Not because it’s wrong — store-bought has its place — but because there is a real and specific joy in putting something this beautiful and this delicious on a table and knowing you built every single layer of it yourself.
The five-layer structure is foolproof. The flavor combinations are endless. And the technique, once you’ve done it once, becomes second nature.
Birthdays, summer cookouts, graduation parties, holidays, or simply a Saturday that deserves something special — this ice cream cake is always the right answer.
Try this recipe and share your flavor combination in the comments below! We’d love to know what you chose — and if you found a pairing so good it deserves to be on this list, tell us that too. Happy freezing!
Perfect for: Birthday parties | Summer BBQs | Holiday celebrations | Weekend treats | Kids’ parties
Also Try – Pineapple Upside Down Cake Recipe – Classic, Moist & Caramelized Delight